
I Tried 7 Ways of Making Glazed Carrots and the Winner Will Change How You Cook Carrots Forever
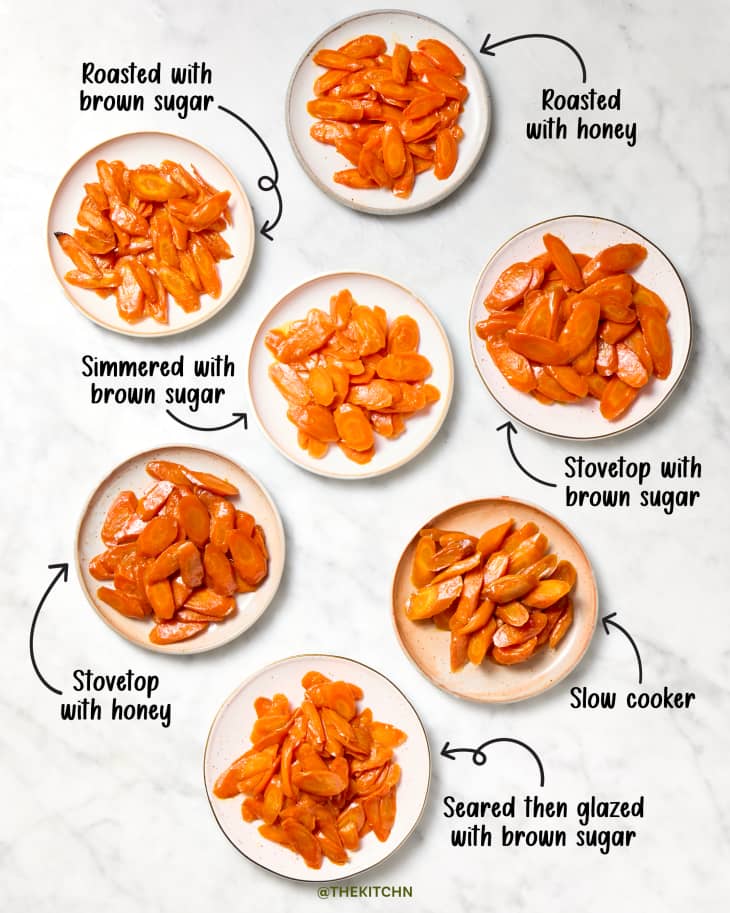
- How I Found the Best Way to Make Glazed Carrots
- Glazed Carrot Method: Roasted with Brown Sugar and Butter
- Glazed Carrot Method: Simmered and Then Sautéed with Butter and Brown Sugar
- Glazed Carrot Method: Sautéed, Simmered, Then Glazed with Brown Sugar and Butter
- Glazed Carrot Method: Stovetop with Honey
- Glazed Carrot Method: Roasted with Honey
Carrots are affordable, delicious, and versatile. You can pickle them, grill them, air fry them, or even make a bacon substitute with them. The options are endless, and we haven’t even mentioned carrot cake! But there is something about a perfect, simple glazed carrot that hits the spot every time. Carrots have a natural sweetness that pairs beautifully with a sweet butter coating, and the combination is always a crowd-pleaser.
It’s a little surprising, considering how pantry-friendly and straight-forward glazed carrots are, that there are so many different recipes and methods. Don’t you just simmer carrots with some liquid, sweet stuff, and a knob of butter? We think that makes a pretty amazing glazed carrot, but is there a better way? We researched and gathered seven popular glazed carrot recipes with distinct cooking methods to find the best way to make glazed carrots.
So, What Is the Best Way to Make Glazed Carrots?
The best way to make glazed carrots is also very easy. Simmer carrots with water, butter, and brown sugar then turn up the heat to thicken the glaze.
How I Found the Best Way to Make Glazed Carrots
- The carrots: While you can never ensure every carrot will be the same (I mean, it’s a vegetable that grows in the dirt), I did my best to eliminate differences by purchasing bags of carrots from the same brand at the same supermarket. I bought full-sized carrots (no baby carrots here) and looked for bags where the carrots were intact, somewhat similarly sized, and a bright orange color. I avoided any bags with carrots covered in a dry white film. These carrots are still safe to eat, but it is a sign that they have started to dry out and might take longer to cook or have tough cores. I used 1 pound of carrots per method and peeled and sliced on the bias into about 1/2-inch-thick pieces.
- The glaze ingredients: To keep the different methods comparable, I eliminated any extra herbs or spices and only seasoned them with salt and pepper. I bought nationally available brands of unsalted butter, extra-virgin olive oil, pure maple syrup, clover honey from a squeezy bear, and light brown sugar.
- The testing: I made the seven batches over two days and photographed each for future reference. I tasted the carrots fresh, hot, and saucy, sampling several from each method to check for how evenly the carrots cooked, from the thinner ends to the thicker parts by the stem. I also judged the overall flavor, as every carrot has its own combination of earthy and sweet flavor notes.
- Ratings: I rated the carrots on a scale of 1 out of 10, with 10 representing a perfectly cooked and gorgeously glazed carrot that was well-coated but not drowning in a pool of sauce. I considered whether the steps in the method were helpful and necessary and how they impacted the final result.
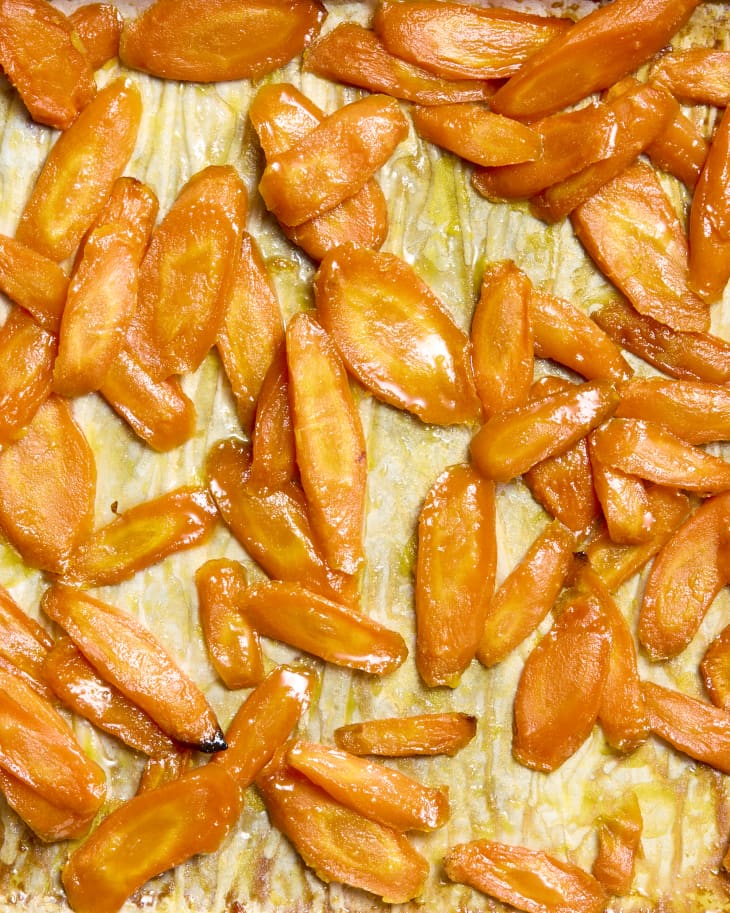
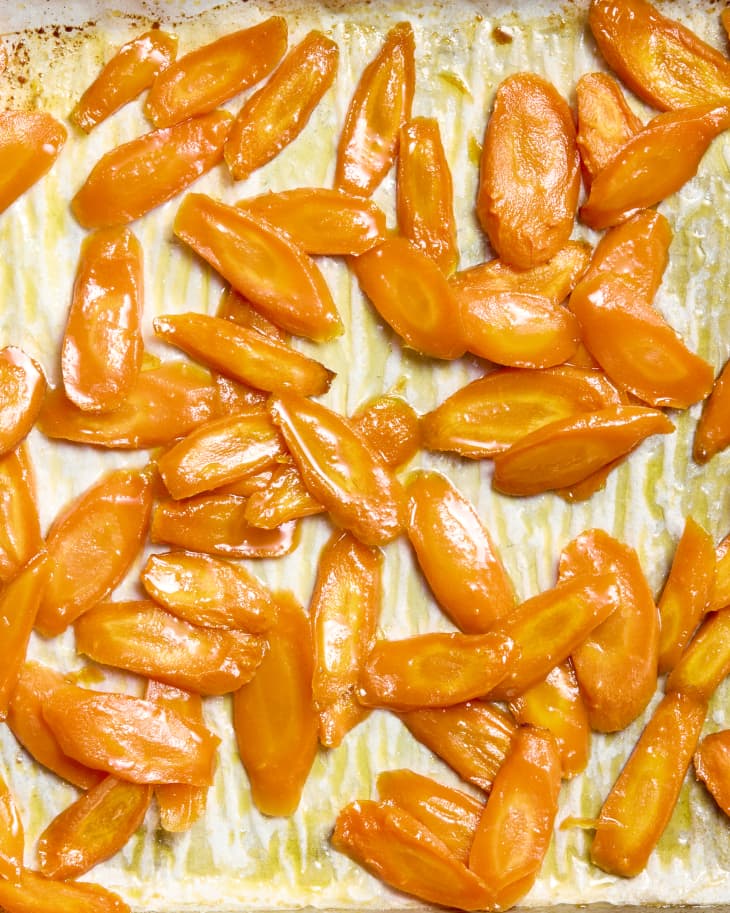
Glazed Carrot Method: Roasted with Brown Sugar and Butter
- Rating: 3/10
About this method: This method is very straightforward and appealing in theory. You toss the carrots with melted butter, olive oil, brown sugar, salt, and pepper on a baking sheet. Then, you roast at 425°F until tender and glazed, about 25 minutes, tossing after the first 15 minutes, until the carrots are tender, browned in spots, and glazed well with some extra left on the baking sheet.
Results: Unfortunately, the idea behind this method and the reality were far apart. Before making it to the 15-minute mark during roasting, I started to smell acrid caramelizing sugar, and sure enough, a peek into the oven revealed that the brown sugar was starting to burn. It was mostly in the corners of the baking sheet where it collected after melting, so I did my best to toss the carrots and redistribute any remaining sugar without scraping up the burned bits. I returned the carrots to the oven to continue roasting because they were not tender yet, but I could only keep them for 5 more minutes due to the continued burning of the sugar and lack of any other moisture or glaze on the tray.
Luckily, the carrots didn’t taste burnt and were cooked enough to eat, although not as tender as I would have liked. Some of the edges on the carrot slices had a candy-like caramelization that was tasty, but overall they were a little dry and plain and left my baking sheet a crusty mess. Roasted carrots? Yes. Glazed carrots? No.

Glazed Carrot Method: Simmered and Then Sautéed with Butter and Brown Sugar
- Rating: 6/10
About this method: This two-step method starts by bringing carrots and water to a simmer. The carrots are not fully covered, so it’s like a cross between steaming and boiling. After simmering until tender, any excess water is drained, and then butter, brown sugar, and salt are added, and everything is cooked together for a few more minutes until the carrots are well coated.
Results: Ideally, cooking the carrots before adding the glaze ingredients offers more control over both aspects of the recipe, but it also opens the window for error. In this method, because the carrots were only partially submerged in water during the first step, they cooked a little unevenly and yielded the Goldilocks of carrots: too firm, too soft, and just right. There was a generous amount of glaze, so the carrots felt more heavily sauced than necessary but still tasty. These carrots were fine but mostly tasted like plain carrots with a slick of sauce on the outside. The inconsistent cooking of the carrots and weak flavor prevented this method from ranking higher.
Glazed Carrot Method: Sautéed, Simmered, Then Glazed with Brown Sugar and Butter
- Rating: 7/10
About this method: This method has three main cooking steps. First, you brown the carrots in some oil over medium-high heat. Then, carefully pour in enough water so it is an inch deep and bring to a boil. Simmer, covered, until tender. After draining the excess water, add butter until melted. Finally, brown sugar and maple syrup go in with salt and pepper, and everything is cooked together for a few minutes until the glaze thickens. The reasoning for the various steps is that the initial sauté will add a depth of flavor and bring out the natural sweetness of the carrot, the boil will cook them, and the final simmer will bond the cooked carrots and the thickening butter-sugar-maple glaze.
Results: In theory, this seems like more work than necessary, so I was curious if the taste warranted the steps. The sauté does lightly caramelize the carrots (while also making a lot of smoke), but most of that browning comes off while simmering, turning the water a murky brown. It also dulled the bright orange of the carrots, which detracts from the elegance of the glaze. The glaze itself was moderate and coated the carrots well. Overall, these were “fine.” The flavor was tasty but not exceptional, the visual was a little dull, and the extra steps were not necessary after all. The moderate ranking reflects this middle-of-the-road result.
Glazed Carrot Method: Stovetop with Honey
- Rating: 7/10
About this method: This is a super-easy method, achievable for home cooks at any skill level. To make honey-glazed carrots on the stovetop, boil sliced carrots in a saucepan until just tender and then drain well and set aside. Add butter, honey, and salt to the same pot and bring to a simmer. Simmer the glaze briefly and then toss with the drained carrots to combine.
Results: I really wanted these carrots to be a standout. They had a pretty sheen from the butter-honey mixture and were ready quickly. But the carrots fell a bit short when tasting. The glaze does not simmer long or cook with the carrots. There was an abundance of honey butter in the bottom of the bowl and very little on the carrots. The carrots were a little plain on their own but tasty with a generous dunk in the sauce. However, a glazed carrot shouldn’t need dunking. Still, it wasn’t a total loss. The carrots were nicely cooked and had a pretty, bright color. They just weren’t really glazed carrots.
Glazed Carrot Method: Roasted with Honey
- Rating: 8/10
About this method: The second roasting method in this skills showdown holds off on adding the sweet element until close to the end of the roasting time. First, toss the carrots with olive oil, salt, and pepper, spread on a parchment-lined baking sheet, and roast at 425°F until tender. Then, drizzle with honey and roast a few minutes longer. Finally, remove them from the oven, add diced butter, and toss to melt into a glaze. This is the only method where the butter is not cooked with the sugar or honey.
Results: After roasting, the carrots were lightly browned in spots but not charred, and it was easy to toss with the honey. The honey only roasts for about five minutes, but it was enough time for it to start bubbling on the tray and thickening. Luckily, the honey was fragrant and toasty, and there were no signs of burning. Stirring in the cold butter produced a creamy, tasty sauce in a good amount to the ratio of carrots. The carrots looked shiny and pretty, and the overall taste was good. The only thing that kept this method from ranking higher is a bit of a nitpick, but the butter didn’t feel fully emulsified with the honey in flavor or texture. The butter slipped a little off the honeyed carrots, leaving a slightly heavy butter taste on the tongue and coating on your lips.
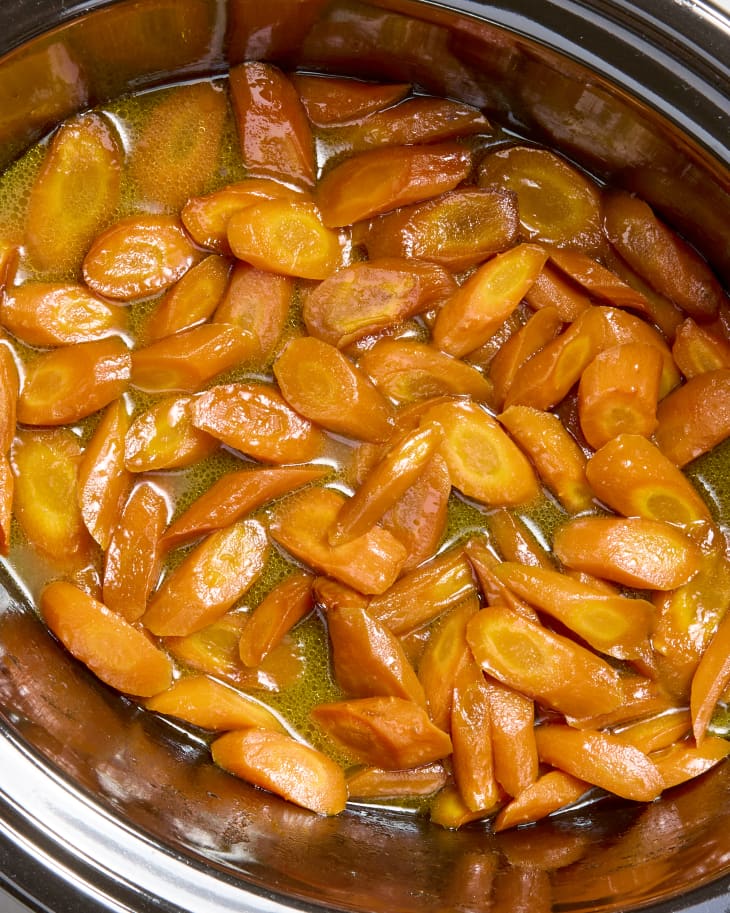
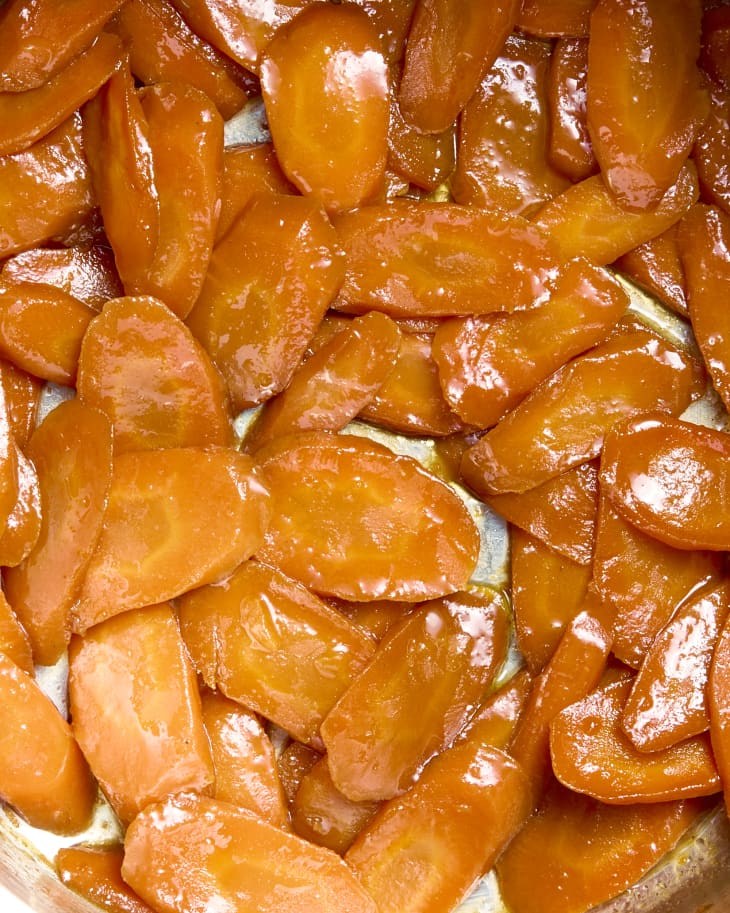
Glazed Carrot Method: Slow Cooker
- Rating: 9/10
About this method: This is the easiest method of the ones tested but also the one that took the longest, although it’s all hands-off time. Simply toss the sliced carrots with melted butter, brown sugar, salt, and pepper in the bowl of a slow cooker, cover, and cook on High for 3 hours. There is an option at the end to cook uncovered a little longer to thicken the glaze, which I found an essential and easy step to include.
Results: I fully admit I had concerns. Three hours seemed like an awfully long time to cook a sliced carrot. And because slow cookers don’t allow for evaporation, wouldn’t the glaze become a thin, watery soup? I surrendered to the process and let them cook, although I did break a slow cooker rule and uncover the pot to check the carrots after two hours to ensure they were not total mush. They were fine, firm still, so on they slowly cooked.
After three hours, the carrots were tender but not overcooked, which was a pleasant surprise! The glaze was a little liquidy, so I followed the final optional step and let them cook with the lid off, stirring once or twice until the glaze thickened. These are some wonderful carrots. Each slice was well-coated, and there was some extra sauce to spoon over top, but it wasn’t too much. Because everything was cooked together from the start, the butter and sugar permeated the carrots. They were deeply flavored with a great balance of sweet and buttery. Although the slow cooker gets very high marks for overall ease and delicious flavor, it couldn’t take the top spot because, without the optional last step, it wouldn’t have been as successful.
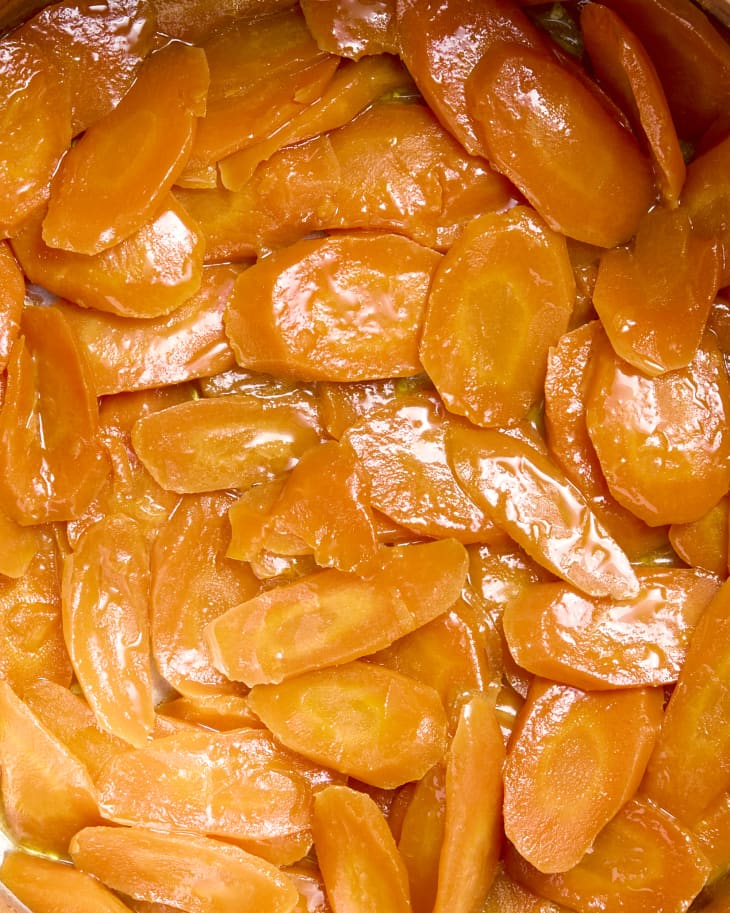
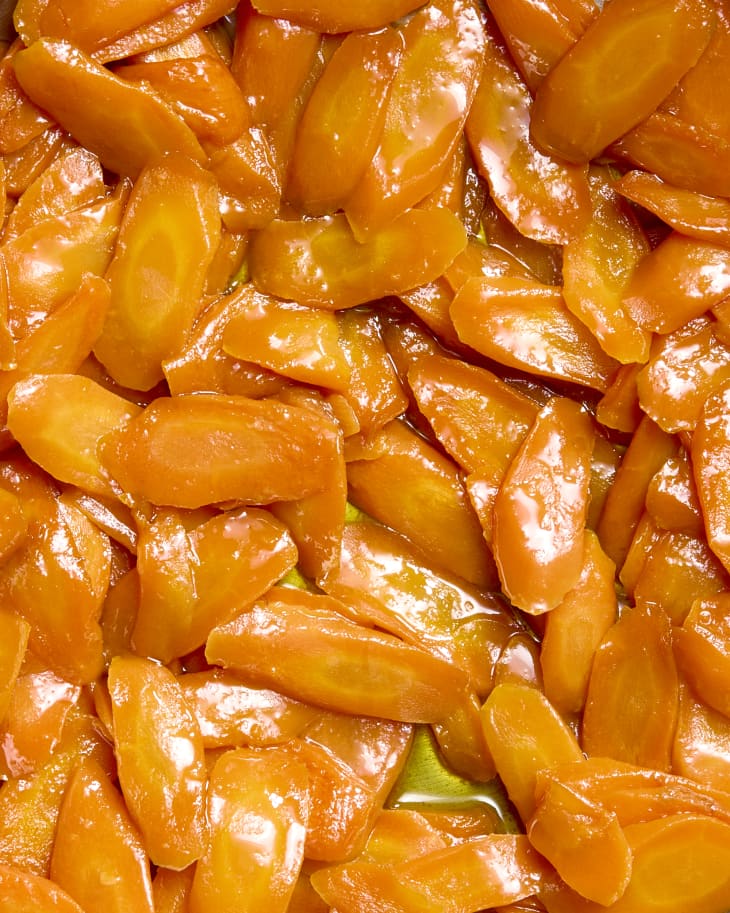
Glazed Carrot Method: Cooked All Together with Brown Sugar and Butter
- Rating: 10/10
About this method: For this method, everything (sliced carrots, butter, brown sugar, and water) goes into a skillet from the start, and the only thing adjusted during cooking is the heat under the pan. After the liquid comes to a boil, cover the skillet and simmer over low heat until the carrots soften but are not cooked. Then, increase the heat and continue to cook, covered, until the carrots are fully tender and the glaze has thickened, stirring occasionally. The success hinges on whether the carrots and the glaze will be ready at the same time.
Results: I loved the simplicity of this method. I wasn’t sure if the stars would align to have the carrots and sauce at their ideal points at the same time, but it worked out beautifully. The carrots were absolutely delicious. These do not taste like carrots with some stuff stuck to their exteriors. They were infused with sweet, buttery goodness through and through. Most of the glaze was lacquered on the slices, but there was a little extra for drizzling over. Beautiful, delicious, and easy, this method grabs the top spot.
Overall Key Takeaways
- When it comes to making glazed carrots, the choice of honey or brown sugar is not as important as the overall method. There were several methods for making glazed carrots that had moderate success, but those all had a trade-off. Either the glaze was too thin to fully coat and flavor the carrots, or the carrots were not evenly cooked.
- The best method was one of the easiest as well. Simmer carrots with butter and brown sugar, covered, first over low heat to cook the carrots through and then over higher heat to reduce the liquid to a thick glaze. Cooking the carrots covered creates a uniform, steamy environment for quick, even cooking. Having the butter and sugar in the pan from the start infuses each slice with delicious flavor.
- Oh, and if you are wondering what I did with all these extra glazed carrots, I turned them into a fantastic carrot-ginger soup!