
How To Spatchcock a Turkey (An Easier, Simpler Way!)
While some might believe that the whole Thanksgiving meal centers around the picture-perfect carving of a whole roasted turkey at the table, we’ve found that it can be tricky to cook a bird with such out-of-proportion dimensions and a very thick breast evenly. There’s an easy technique of preparing the turkey, however, that gives you more control over the cooking process and cooks the turkey a lot faster too: spatchcocking.
This technique is borrowed from a method often used for chickens, but we’ve taken it one step further by spatchcocking in a traditional Latin American way. Here’s a new way to spatchcock your bird for faster, better cooking this Thanksgiving.

An Easier Method for Spatchcocking Turkey — the Latin American Way!
In the traditional technique of spatchcocking, the backbone is cut out of the whole bird. The result is a wide butterflied bird where the breast is in the center with a leg on either side. This allows the bird to cook more evenly and more quickly.
A few years ago, however, I learned an alternative way of spatchcocking that I liked even better. In Argentina and other parts of Latin America, the backbone is kept intact. Instead, the cook pulls the legs away from the body, and uses scissors to cut through the thin ribcage on either side of the breast. The breast is pushed up and away from the legs.
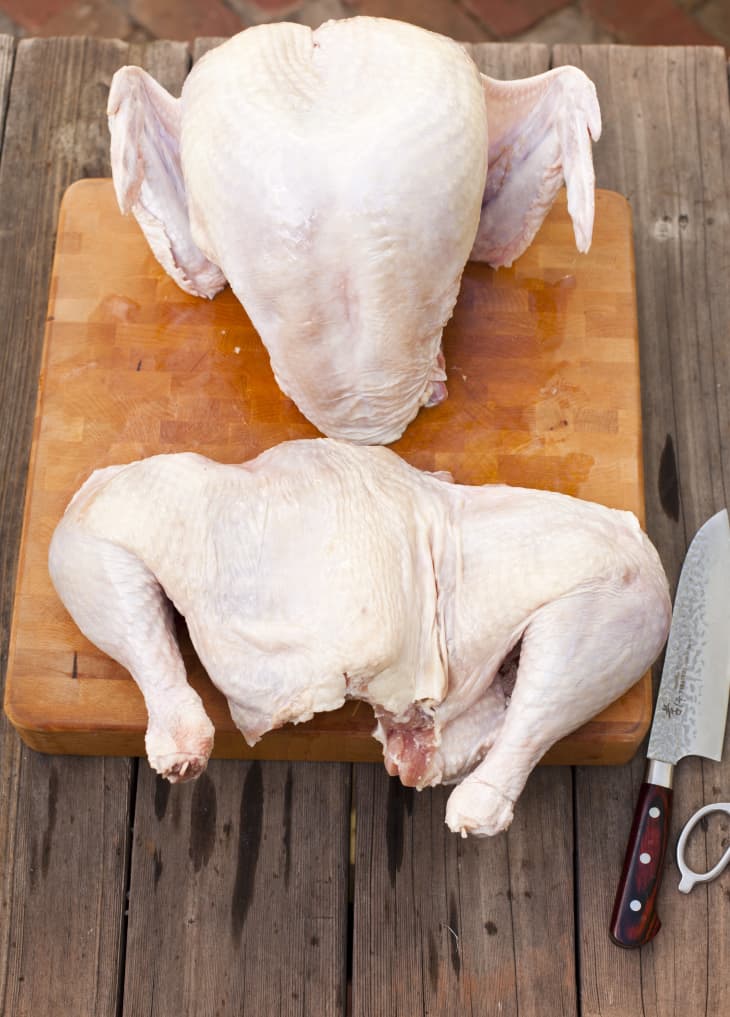
The result here is a long butterflied bird with the breast and wings sitting away from the legs. It’s definitely odd-looking, a bit like a frog, but it also cooks more quickly (only about 1 1/12 hours for a 15-pound turkey on a grill) and evenly than a bird that is not butterflied.
In this tutorial we show you how to spatchcock a bird in this way, but we also go one extra step of completely removing the legs from the rest of the turkey’s body.

Why Try Our Spatchcock Method?
Here’s why I like the Latin American way of spatchcocking for turkey, as opposed to the more traditional “flattened butterfly” method.
- A simpler method: Traditional spatchcocking means cutting out the backbone with scissors or a knife. It’s not too hard to do with a chicken, but a turkey is a whole different story. The bones of the turkey are much thicker and the whole thing can be a bit of a slippery mess, but the Latin American way uses scissors and just hands to do most of the hard work.
- More control over cooking white and dark meats: In traditional spatchcocking, the white and dark meats still sit next to each other, so if one part is done before the other, you can’t pull it out. With Latin American spatchcocking and the fact that I cut the turkey into two pieces after spatchcocking, you can pull out whichever meat, white or dark, is done first so that it doesn’t overcook. You can also start cooking the thick breast first before adding the legs since the breast takes longer to cook with this technique.
- Easier handling and carving: Let’s face it, it’s sometimes tough enough to maneuver a hot roasted chicken, and a whole turkey is much larger and many times more awkward to handle. A flattened turkey that is cut into two pieces is way easier to move around and some of the carving is already started for you.
- Better presentation: With traditional spatchcocking, the flattened turkey can’t really be put back together to look un-butterflied. With the Latin American technique, you can actually position the breast back onto the legs to proudly present at the Thanksgiving table.
Our Spatchcocking Tips for Success
If you plan to try this technique with your Thanksgiving turkey, here are a few things to keep in mind.
- It can be done with any size or variety of turkey.
- Just make sure it is defrosted first. (This takes about one day in the refrigerator for every five pounds of bone-in turkey.)
- If you plan to brine, dry brine, or season the turkey, do the spatchcocking first. You can season more evenly after the turkey is flattened. If the two pieces don’t fit in your roasting pan, they can overlap slightly with no issues.
- A spatchcocked turkey can be cooked any way you like: grilled, roasted, or even fried if you’re feeling adventurous.
Keep in the mind that this style of spatchcocking means that the thick breast is not flattened out very much so in my testing, I found that the legs actually cooked faster than the breast. To deal with this, I start cooking the breast first and then add in the legs a bit later so that the white and dark meats were done at approximately the same time.
How To Spatchcock a Turkey
Makes 1 turkey
Nutritional Info
Ingredients
- 1
thawed whole turkey, any weight
Equipment
Cutting board or large rimmed baking sheet
Chef's knife
Poultry shears or kitchen scissors
Instructions
Remove the turkey from the packaging and remove any unnecessary parts: Take the turkey out of the packaging and place on a cutting board. Remove the giblets and neck from inside the cavity and discard or save for another use. Remove or discard any plastic or metal cages or pop-up thermometers.
Pat the turkey dry: Pat the outside of the turkey dry with paper towels.
Pull the legs away from the body: Pull one of the legs away from the body and use a knife to slice through the skin and membrane between the leg and body to expose the thigh. Repeat with the other leg.
Expose the thigh joints: Push one of the thigh joints up toward you until it pops out of the socket. Repeat with the other thigh.
Cut through the ribs to the wing joints: Using poultry shears or kitchen scissors, cut along the bottom side of the breast from the bottom cavity to the wing joint (you are not cutting all the way through the side of the turkey). Repeat on the other side.
Open up the turkey: Pull the breast up and away from you, pushing it until the turkey is completely opened up.
Cut the turkey into two parts: Using the kitchen or poultry shears, cut through the backbone right above the legs to separate the turkey into 2 parts. Pat the inside dry with paper towels.
Flip the two parts over: Flip the two parts over, now you have a whole bone-in turkey breast and whole bone-in legs. Proceed with seasoning and cooking the turkey.