
Baking School Day 15: Croissants


The Kitchn’s Baking School Day 15: All about croissants.
Join The Kitchn’s Baking School: Sign up and see all The Kitchn’s Baking School assignments
Anyone else dream of waking up to warm, flaky croissants in the morning? Their crispy shells and a whisper of steam from between the buttery layers calling you out from slumber? There truly is nothing better than a fresh-from-the oven croissant. And with a bit of planning, you can make your croissant-eating dreams a reality in your own kitchen.
We won’t lie; croissants do take time and commitment, but they are neither painfully difficult to make nor out of reach for the home baker. Maybe it is better this way, though, or what’s to stop us from making croissants every day? For special occasions or when you are just feeling fancy, here’s all you need to know to set some time aside and make croissants.

What Is a Croissant?
Croissants are the buttery, flaky, crispy pastries our hopes and aspirations are made of. More technically speaking, they are layers of yeasted, laminated dough that have been rolled and baked to create a pastry with a chewy interior and a crispy outer shell. They are pretty much the perfect love-child of puff pastry and yeasted dough.
Remember this: Croissant dough is basically puff pastry dough with yeast added.
Unlike plain puff pastry, the yeast in the dough makes croissants much more substantial and airy. They are
breakfast’s perfect companion
What Are Laminated Doughs?
Laminated doughs are, like their name implies, doughs that are laminated with butter. Dough envelopes a block of butter before being rolled out and folded over and over until nearly a hundred alternating layers of dough and butter are formed. Unlike most other baked goods, the butter remains separated instead of creamed together or incorporated.
The most common laminated doughs are puff pastry (as we discussed last week) and croissant dough. Croissant dough is similar to puff in the way it is prepared, but it has one huge difference: croissant dough uses yeast. Other pastries that use the laminating process include danishes and kouign-amann.
Get Your Step-by-Step Baking Lesson:
How To Make Kouign-Amann at Home

How to Make Criossants
While we first learned about laminated dough when covering puff pastry, let’s take the time to go over exactly how to take those skills and turn them into wonderfully flaky croissants.
Croissants can be made over the course of either two or three days. While we usually crave croissants in the morning, who wants to get up at the crack of dawn to get started? I’ll pass, thank you. Instead, you can prepare the dough the morning before you’d like to eat them (or even a day before that!); allow the dough to ferment for a few hours (or overnight) before you laminate it; then shape, proof, and bake it in the morning.
- Make your dough and refrigerate it for a day or two: You can always refrigerate the dough to slow down the rise; you don’t want to rush your dough as it ferments and rises. Giving the dough time to rest will develop a superior flavor and texture, so not making croissants all in one day is actually better for the final product (not just our sleeping patterns!).
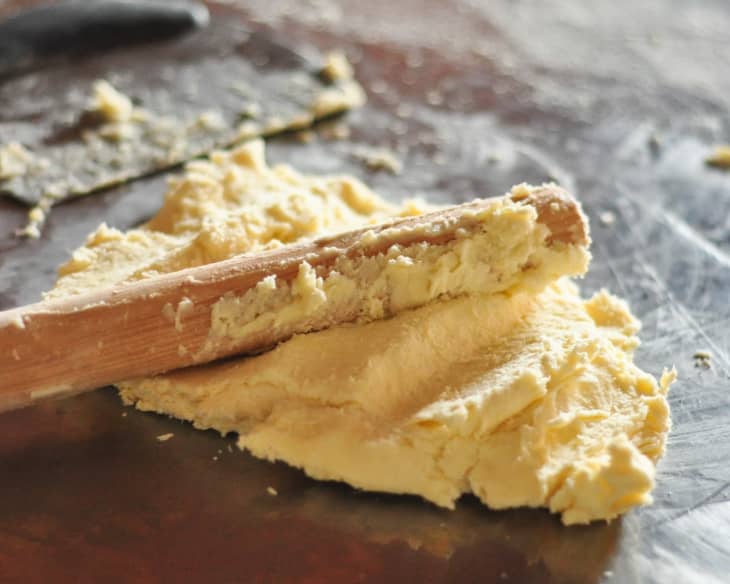
- Prepare your butter block: After your dough has fermented, prepare your butter block. As you can recall from making puff pastry, the butter should be cool yet malleable. You will want it flexible enough so it doesn’t crack when folded with the dough, but not too soft that it squishes out the sides and begins incorporating into the dough. Using just your hands, an electric mixer fitted with a paddle attachment, or a rolling pin to pound it out, work the butter until you can shape it into a large square. Keep in the refrigerator to chill as your roll out your dough.
- Roll out the dough and butter together: Once the butter is safely sealed inside your dough, begin rolling it out. Fold the top third towards the center and the bottom third up as well, like a business letter. This is one “turn.” Wrap in plastic and let it rest in the refrigerator for about 30 minutes or until the butter had chilled but is still able to roll out for the next turn.
- Repeat for six turns: You will need to complete six turns — rotating the dough 90 degrees and resting it between every couple turns.
- Chill the dough: Chill the dough after its final turn for an hour before shaping, or overnight if baking the following day.
How to Roll and Shape a Croissant
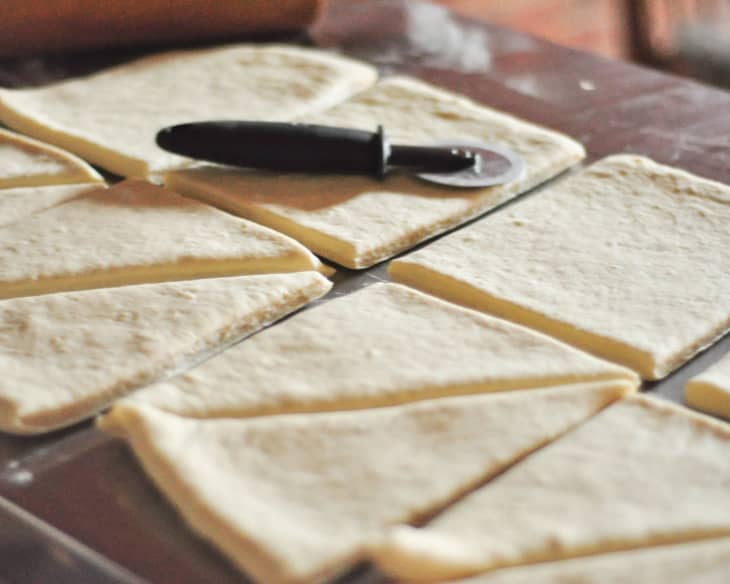
On a lightly floured surface, roll the dough out to one large rectangle. Using a pizza cutter or sharp knife, trim this rectangle in half, lengthwise. Be sure to cut — not snag or stretch — the dough. Cut each new rectangle into six to eight even triangles.
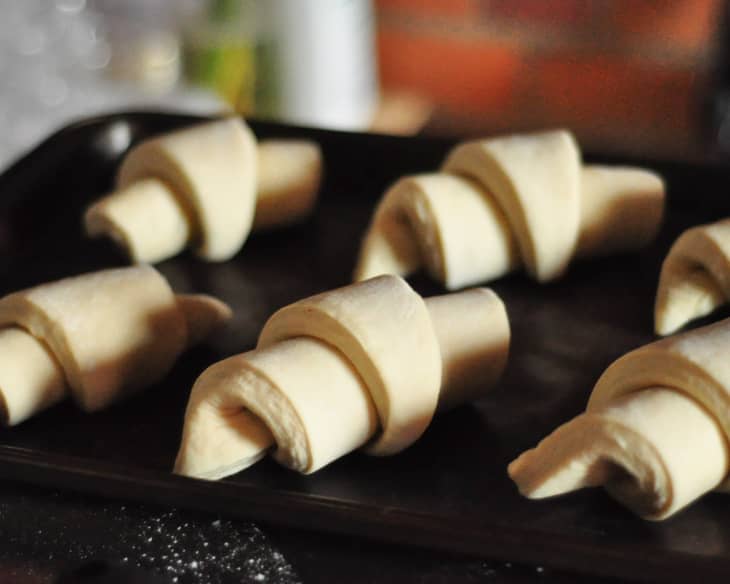
Cut a half-inch slit in the center of the base of the triangle; this will help create a crescent shape. With the slit side towards you, gently pull the cut open a bit and roll up the croissant. Tuck the tip under the base and gently shape the croissant by pulling the ends toward the center and pressing into place.
Baking Your Croissants
Once the croissants are shaped into their signature crescent shape, they will need to proof yet again. They should rise to nearly 50 percent larger in size while you preheat the oven.
Bake the proofed, shaped croissants until they are a deep golden-brown. As they bake, the gas expelled by the yeast will puff up the layers of dough, while the moisture in the butter turns to steam. Like with puff pastry, the steam between the layers forces the dough to rise to create the flaky crust and chewy, airy, melt-in-your-mouth layers.
An egg wash will help with the browning and give them a nice, crackly, crisp outer shell. They should feel light when picked up when done.
Get Your Step-by-Step Baking Lesson:
How to Make and Shape Homemade Croissants
Filled Croissants
While croissants are perfect just plain and with a cup of tea, croissants may be filled with savory and sweet fillings for even tastier alternatives!
- Pain au chocolat: Instead of the classic crescent shape, pain au chocolate or chocolate croissants are traditionally cut into rectangles to encase small bars of (or chopped) chocolate. The dough is rolled or folded over, creating a pouch for the chocolate.
- Ham and cheese croissants: Before the croissants are shaped, place thin pieces of ham and cheese (making sure they do not hang off the edge of the dough) and roll the dough in a crescent shape. Alternatively, you may simply slice open a baked croissant and fill it like a sandwich!
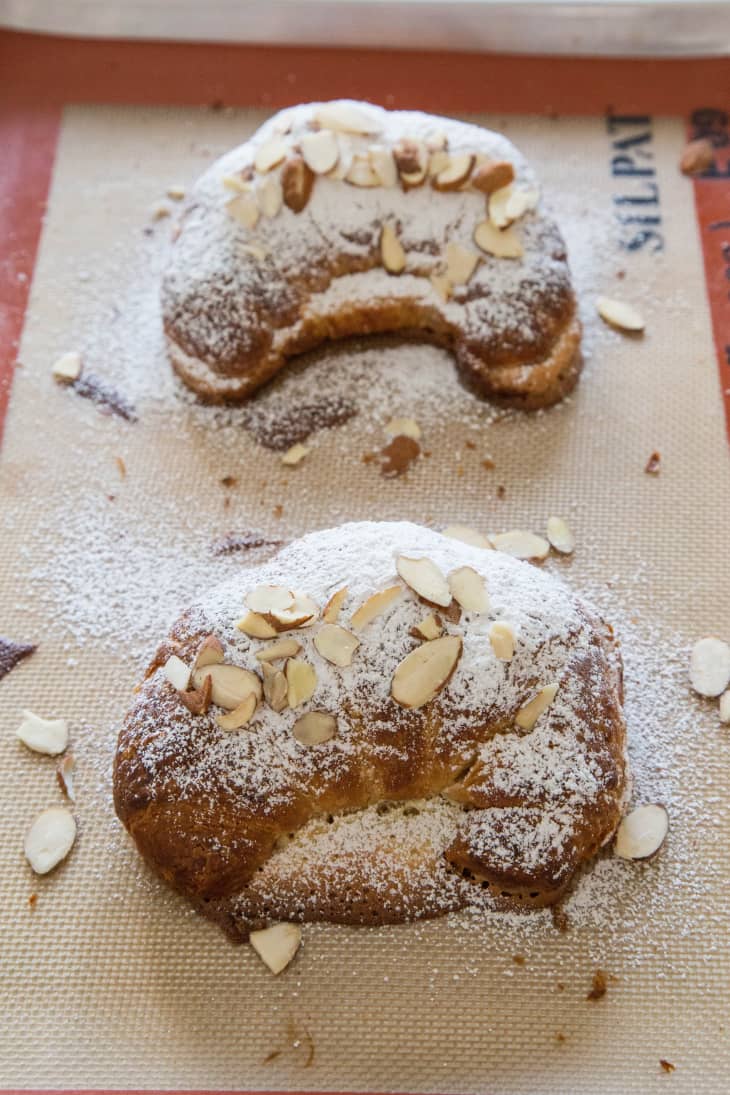
- Almond croissants: Although we doubt you will have any leftovers, use day-old or pre-baked croissants to make almond croissants. Use a serrated knife to cut the croissant in half horizontally. Dip the top crust in a simple syrup. Spread the top crust and bottom half with delectable almond cream and sandwich the pieces together. Sprinkle the top with sliced almonds and bake until crisp. Give the freshly re-baked almond croissants a shower of powdered sugar and enjoy!


Every lesson has three homework options. Maybe you’ve already got one down, or you just have time for a quick study session. So pick one, and show us by tagging it with #kitchnbakingschool on Instagram or Twitter.

Find the most over-the-top croissant on Pinterest and share it with us in the comments or on Twitter.

Make croissants with store-bought puff pastry sheets to practice shaping them.

Make croissants from scratch and share your pictures on Instagram!
Join The Kitchn’s Baking School!
SIGN UP
SHARE YOUR PROGRESS
- Follow and show your progress on Instagram, Pinterest, Facebook, and Twitter! Make sure to use the #kitchnbakingschool hashtag.