
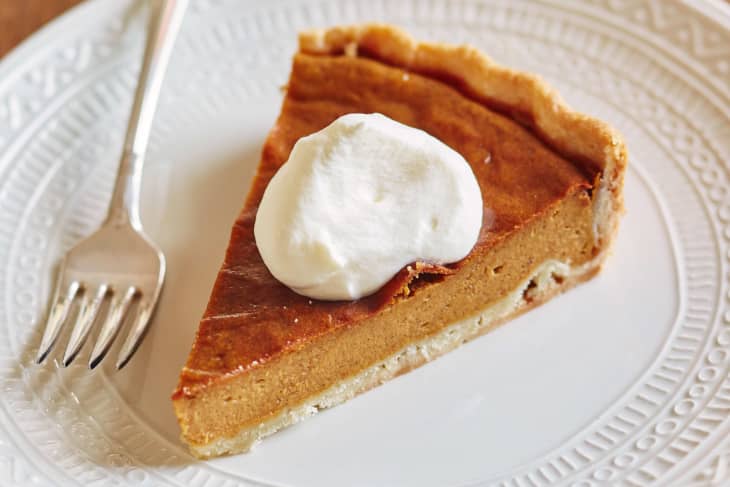
How To Make Sweet Potato Pie
“Southern as sweet potato pie” is a saying I didn’t learn until I moved to Georgia over 10 years ago, but long before I ever came to the South I had fallen in love with sweet potato pie. When I was 10, my mom dated a man from Athens, Georgia, who introduced us all to Southern cooking. Sunday supper became a feast of collard greens, cornbread, and sweet potatoes, and he introduced my family to sweet potato pie. It became a staple of our Thanksgiving table, and my sister still requests sweet potato pie instead of cake on her birthday.
Never a fan of pumpkin pie, this sweet potato pie was a revelation. It was lighter yet creamier than its pumpkin cousin, with a heavy dose of vanilla and subtle spices. Beyond tasting better, sweet potato pie is easier to bake. It doesn’t require cooking the filling, as the sweet potatoes are fully baked in advance, and the pie crust doesn’t require blind baking.
How is Sweet Potato Pie Different from Pumpkin Pie?
Sweet potato and pumpkin pie are both members of the custard pie family. Custard pies are based on a mixture of eggs, dairy, and sugar. Technically you could swap the pumpkin for sweet potato purée in any pumpkin pie recipe and make a sweet potato pie. However, traditional sweet potato pie has a higher purée-to-custard ratio, fewer spices, and more vanilla.
Like a lot of recipes with a Southern heritage, sweet potato pie relies on canned milk. In our recipe we use evaporated milk, which makes for a custard pie with a lighter and creamier texture.
The Best Sweet Potato Pie Starts with Baked Sweet Potatoes
Many sweet potato pie recipes call for boiling the sweet potatoes on the stovetop until tender, but I believe that the best sweet potato pie is made from baked sweet potatoes.
Baking sweet potatoes softens them without adding extra moisture, concentrates their flavor and sweetness, and makes sweet potato pie-making easier. Less moisture in the sweet potatoes also means a creamier pie.
Sure, whole sweet potatoes take at least an hour to bake in the oven, but that cook time is completely hands-off. There’s no peeling, no dicing, and no tending to a boiling pot on the stove, which is the last thing you want to be doing while making three or four other side dishes for Thanksgiving.
Make-ahead tip: Bake the sweet potatoes up to one week in advance and store the flesh in an airtight container in the fridge until ready to purée.
Use A Deep Tart Pan, Not a Pie Pan
Baking a pie in a tart pan instead of a pie pan also breaks from tradition, but since my pie pan is often occupied with another pie on Thanksgiving, I stumbled upon this discovery out of necessity.
A deep metal tart pan with a removable bottom is the best pan for baking sweet potato pie. The thin metal browns the crust without the need for blind baking, and the fluted sides and removable bottom makes for a better presentation, too.
Origins of Sweet Potato Pie
The conversation of sweet potato pie versus pumpkin pie usually brings into focus the regional preferences associated with these dishes, with the typical split presented as the North preferring pumpkin and the South choosing sweet potato.
If we trace the trail of how sweet potato pie came to hold such a prominent place on southern Thanksgiving tables, we find a multilayered story — one that includes a sweet vegetable brought to the Americas from Peru, a tradition of dessert imported from Europe, agriculture (historically, edible pumpkins grew better in the North and sweet potatoes better in the South), and the history of slavery and emancipation in America. Together, these factors give us the pie we enjoy today.
More on Sweet Potato Pie
- How Sweet Potato Pie Became African Americans’ Thanksgiving Dessert.
- A sweet potato pie recipe from Abby Fisher: What Mrs. Fisher Knows About Southern Cooking, 1881

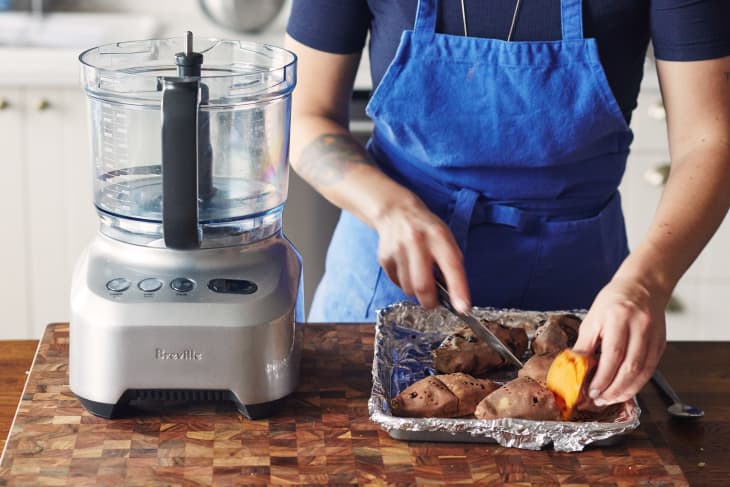
Bake the sweet potatoes: Arrange a rack in the middle of the oven and heat to 375°F. Place the sweet potatoes directly on the oven rack (place a piece of aluminum foil onto the rack below if you’re worried about drips). Bake the sweet potatoes until tender, about 1 hour. While the potatoes bake, prepare the crust for baking. (Image credit: Lauren Volo) 
Prepare the pie crust: Roll out the pie crust into an 11-inch round. Transfer it to a deep, 10-inch round tart pan and use it to line the bottom and sides of the pan, pressing the dough into the sides as needed. Refrigerate while the sweet potatoes bake and while preparing the filling, at least 30 minutes. (Image credit: Lauren Volo) 
Cool the sweet potatoes and scoop out their flesh: Cool the potatoes for about 30 minutes, or until you can comfortably handle them. Cut the sweet potatoes in half lengthwise and scoop the flesh out into a food processor fitted with the blade attachment. (Alternatively, store the sweet potato flesh in the refrigerator for up to 1 week before proceeding.) (Image credit: Lauren Volo) 
Purée the sweet potatoes: Process the sweet potatoes until very smooth. (Image credit: Lauren Volo) 
Make the filling: Add the brown sugar, vanilla, cinnamon, ginger, nutmeg, salt, eggs, and evaporated milk to the food processor and pulse to combine. (Image credit: Lauren Volo) 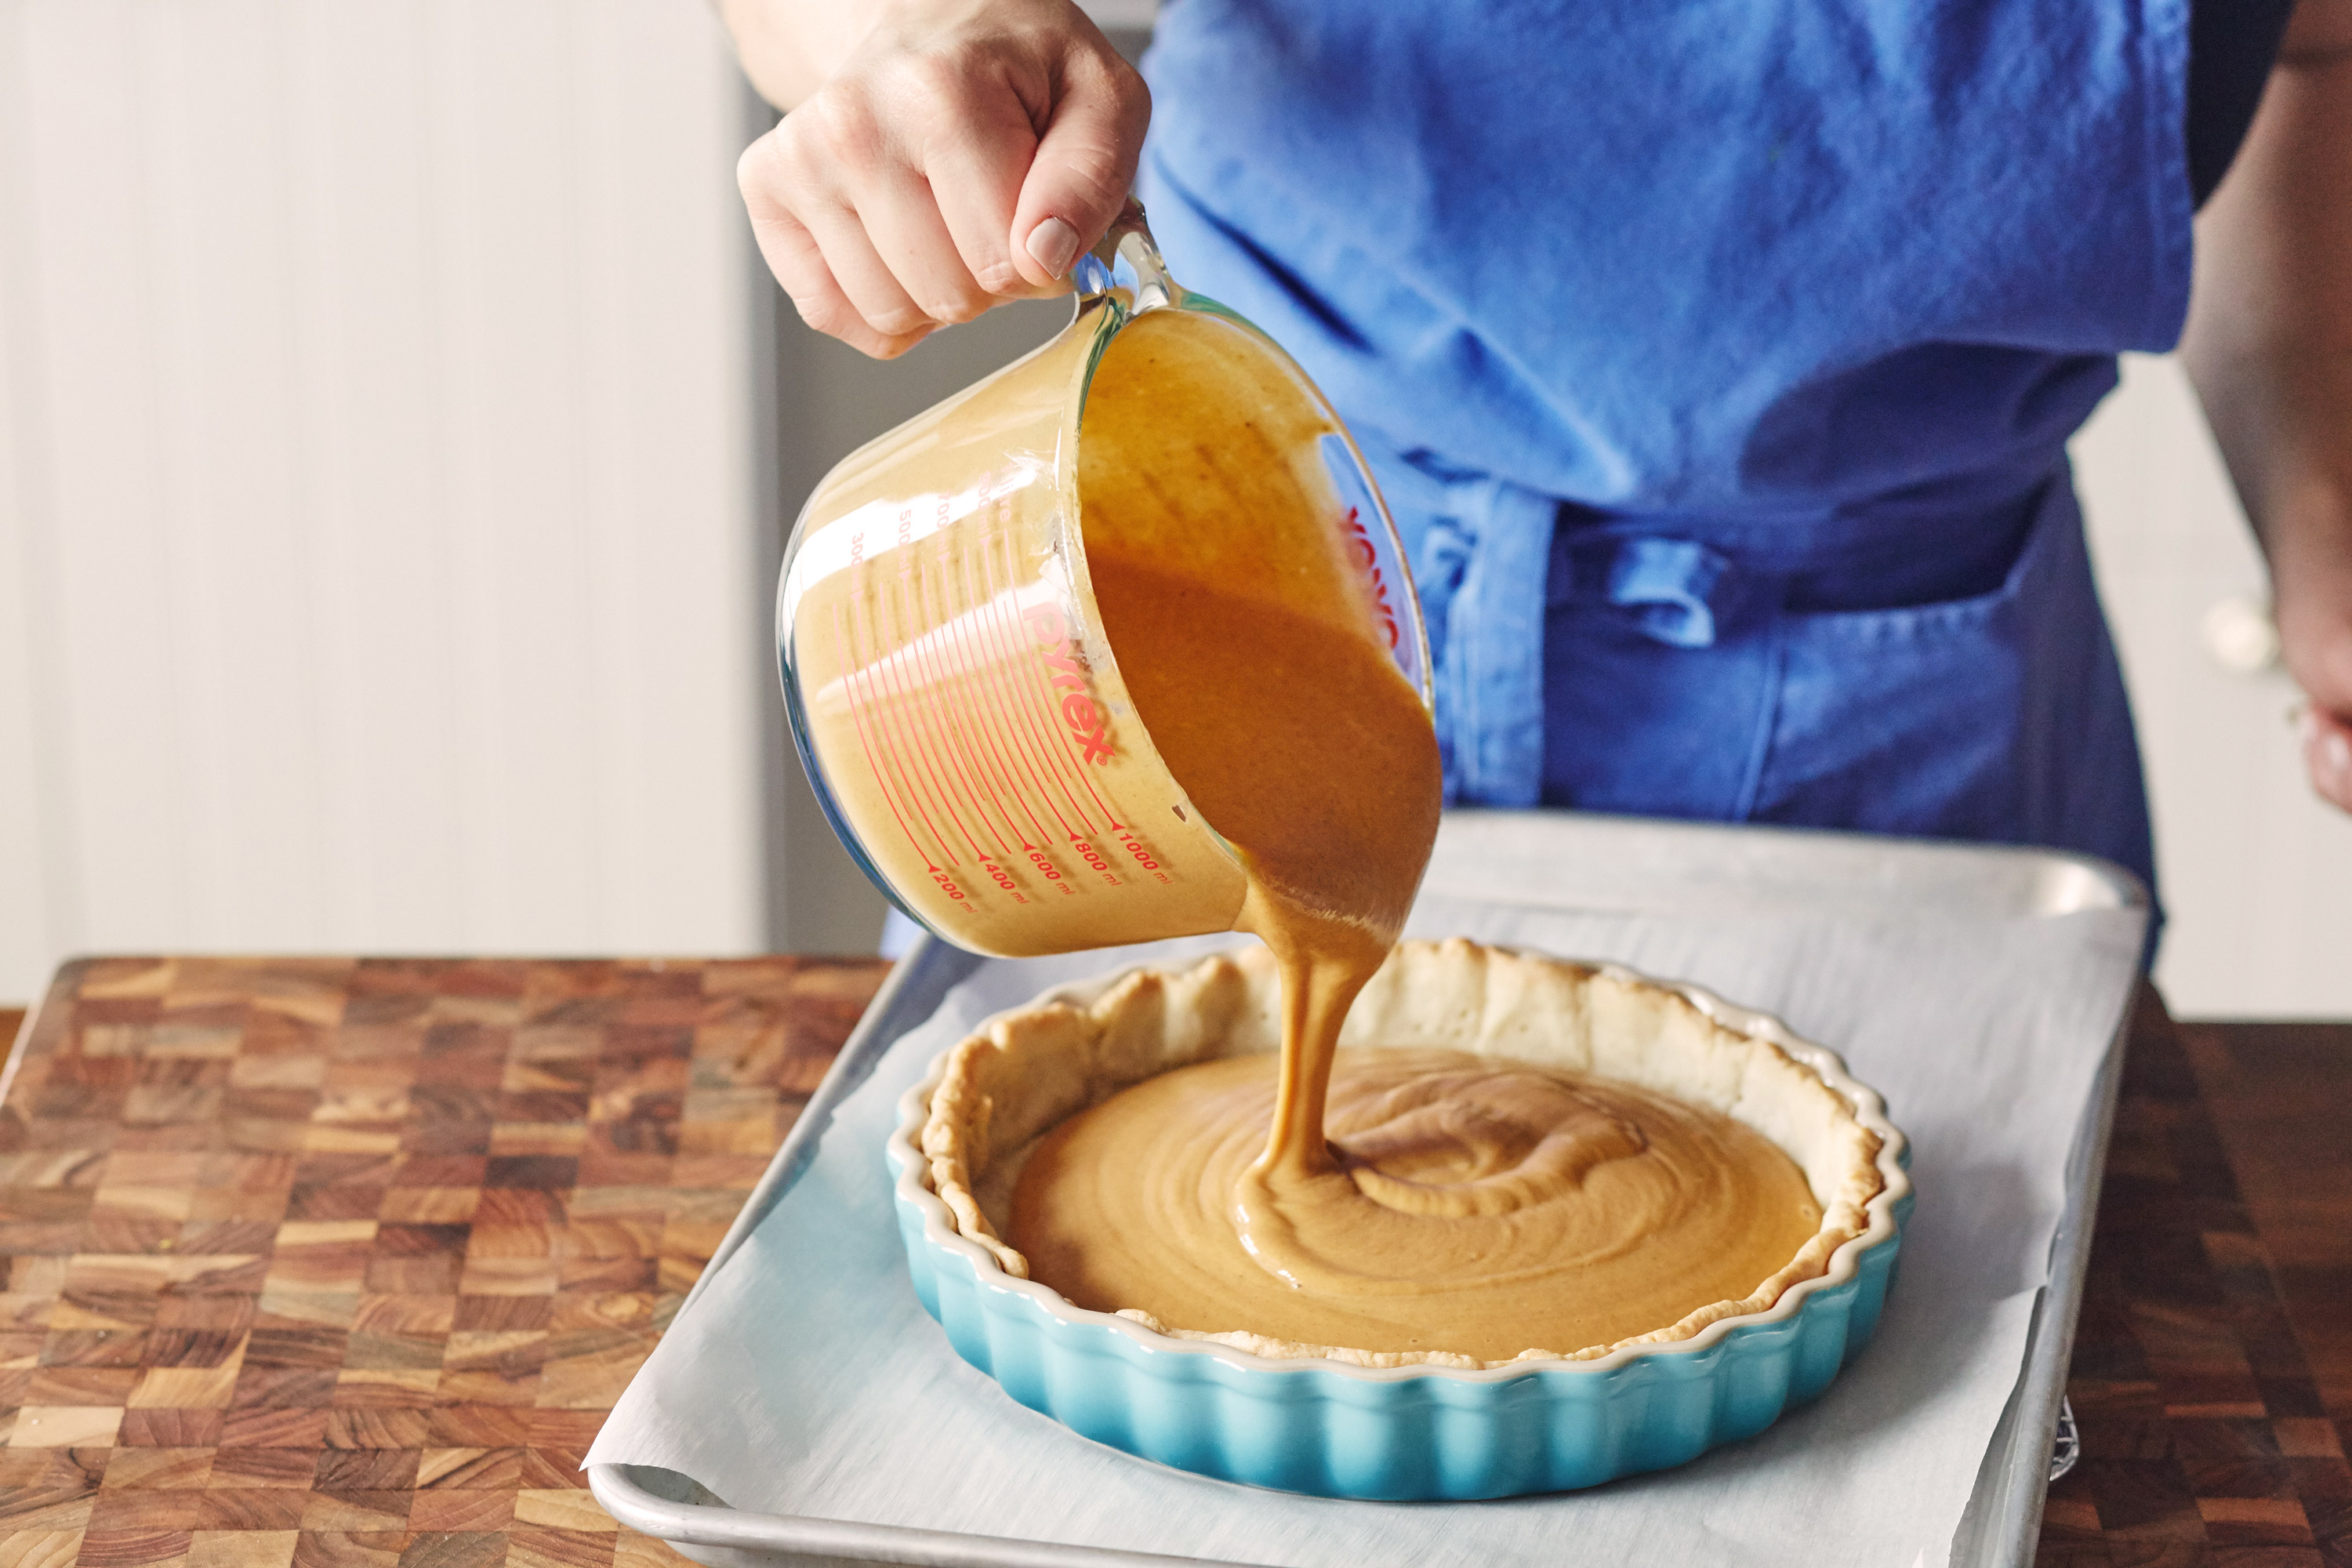
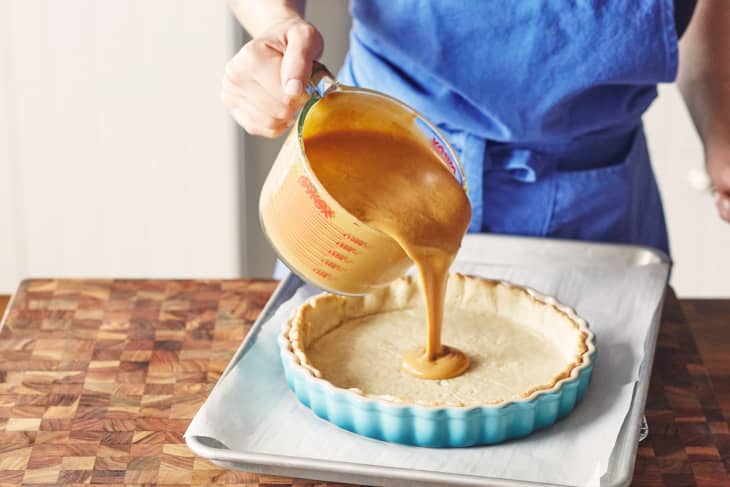
Fill the crust: Set the tart pan on a parchment lined baking sheet and pour the filling into the crust. The filling should come almost to the top of the crust, but be carefully not to overfill. You may have a 1/4 to 1/2 cup of extra filling, which you can bake along side the pie in an oven safe ramekin, if desired. (Image credit: Lauren Volo) 
Bake until the center is just set, 45 to 50 minutes: Bake the pie until the top appears dry (it may puff and crack slightly around the edges) and the center jiggles, but doesn’t wiggle, when nudged, about 45 minutes. (Image credit: Lauren Volo) 
Cool: Cool the pie completely before serving.— it will continue to set as it cools. This pie can be baked a day or two ahead. Wrap tightly in plastic wrap and refrigerate until ready to serve. (Image credit: Lauren Volo)
How To Make Sweet Potato Pie
Makes 1 (10-inch) pie
Serves 8 to 12
Nutritional Info
Ingredients
- 1
unbaked pie crust
- 2
large sweet potatoes (about 2 pounds total)
- 1/2 cup
packed light brown sugar
- 1 tablespoon
vanilla extract
- 2 teaspoons
ground cinnamon
- 1 teaspoon
ground ginger
- 1/4 teaspoon
ground nutmeg
- 1/4 teaspoon
fine salt
- 4
large eggs
- 1 (12-ounce) can
evaporated milk (1 3/4 cups)
Equipment
Measuring cups and spoons
Food processor
- 1
(10-inch) round tart pan
Instructions
Bake the sweet potatoes. Arrange a rack in the middle of the oven and heat the oven to 375°F. Place the sweet potatoes directly on the oven rack (place a piece of aluminum foil onto the rack below if you're worried about drips). Bake the sweet potatoes until tender, about 1 hour. While the potatoes bake, prepare the crust for baking.
Prepare the pie crust. Roll out the pie crust into an 11-inch round. Transfer it to a deep, 10-inch round tart pan and use it to line the bottom and sides of the pan, pressing the dough into the sides as needed. Refrigerate while the sweet potatoes bake and while preparing the filling, at least 30 minutes.
Cool the sweet potatoes and scoop out their flesh. Cool the potatoes for about 30 minutes, or until you can comfortably handle them. Cut the sweet potatoes in half lengthwise and scoop the flesh out into a food processor fitted with the blade attachment. (Alternatively, store the sweet potato flesh in the refrigerator for up to 1 week before proceeding.)
Purée the sweet potatoes. Process the sweet potatoes until very smooth.
Make the filling. Add the brown sugar, vanilla, cinnamon, ginger, nutmeg, salt, eggs, and evaporated milk to the food processor and pulse to combine.
Fill the crust. Place the tart pan on a parchment-lined baking sheet. Pour the filling into the crust. The filling should come almost to the top of the crust, but be carefully not to overfill. You may have a 1/4 to 1/2 cup of extra filling, which you can bake alongside the pie in an oven-safe ramekin, if desired.
Bake until the center is just set. Bake until the top appears dry (it may puff and crack slightly around the edges) and the center jiggles, but doesn't wiggle, when nudged, about 45 minutes.
Cool. Cool the pie completely before serving — it will continue to set as it cools.
Recipe Notes
Tart pan alternative: No tart pan? Use a deep pie plate and blind bake the crust before filling. Cover the pie crust with parchment paper and fill with dried beans (or pie weights). Bake until the edges just start to brown, 12 to 15 minutes. Remove the weights and parchment, and bake for another 5 minutes before filling and proceeding with the recipe.
Make ahead: This pie can be baked up to 2 days ahead; wrap tightly in plastic wrap and refrigerate until ready to serve. Serve cold or at room temperature.