How To Make Halloween Pumpkin Cookies

While there’s no shortage of Halloween recipes floating around these days, in order to make the cut in my household, I aim for delicious first and cute second.
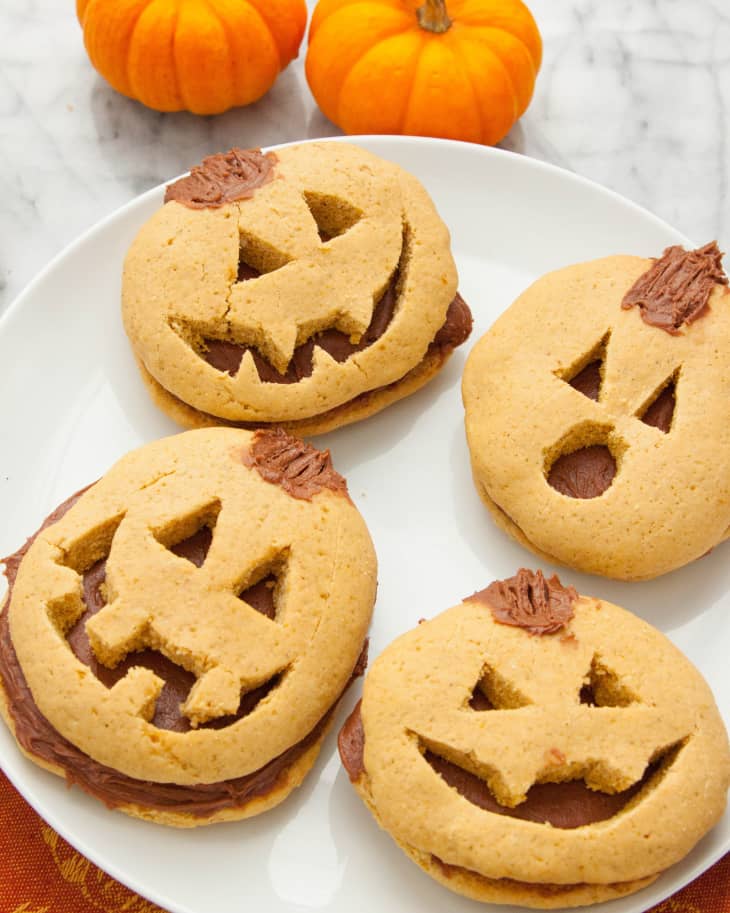
These pumpkin sandwich cookies hit all the delicious marks — they’re made with both real pumpkin and pumpkin spice, they’re perfectly soft, and they sandwich quite nicely with chocolate frosting. And could they be any cuter? Cutting out jack-o’-lantern faces makes these bake-sale-adorable, for sure. Here’s how you can make a batch for yourself.
I first noticed jack-o’-lantern cookies at Diamonds for Dessert and couldn’t get over their cute pumpkin faces. I had to try it for myself with one of my favorite cookie recipes. I also opted to make sandwich cookies — this makes their cut-out faces really stand out and the chocolate frosting is perfect paired with the pumpkin cookies.
These cookies are quite soft with a hint of pumpkin puree and just the right amount of pumpkin spice.
Pumpkin Cookie Tips
The dough will be loose and sticky before baking, so pop the bowl in the refrigerator for a bit to help when portioning the dough on the cookie sheets.
Also, be sure to flatten them to about a quarter of an inch thick. This is key for successful carving once they’re baked — too thick and the cookies can crumble when you try to carve the faces.
The soft texture of the baked cookies also helps when scoring the cookies with pumpkin-like vertical lines (if you choose to do this step). Carving the faces, much like carving actual pumpkins, is a labor of love (and at times, frustration), but if you stick with it, the result is well worth the effort.
Pull these out of the oven just as they’ve set and the edges have become golden, so they’re still soft but fully baked inside.
Go thick on the frosting — this is Halloween, after all! Treat yourself!
How To Make Halloween Pumpkin Cookies
Makes 12 sandwich cookies
Nutritional Info
Ingredients
For the cookies:
- 9 tablespoons
unsalted butter, softened
- 1/4 cup
pumpkin puree
- 3/4 cup
sugar
- 3/4 cup
brown sugar
- 3
large eggs
- 3 1/2 cups
all-purpose flour
- 1 teaspoon
baking soda
- 1 teaspoon
pumpkin spice mix
- 1/4 teaspoon
salt
Orange food coloring (or a mix of red and yellow), optional
For the frosting:
- 1/4 cup
unsalted butter
- 3 tablespoons
cocoa powder
- 1/4 cup
milk
- 2 cups
powdered sugar
- 1 teaspoon
vanilla
Equipment
Mixing bowl
Measuring spoons and cups
Stand mixer or hand mixer
Baking sheets
Parchment or nonstick baking mats
Whisk
Paring knife
Butter knife
Instructions
Preheat the oven to 325°F: Place one rack in the top third of the oven and another rack in the bottom third. Line two baking sheets with parchment or nonstick baking mats.
Make the cookie dough: In the bowl of a stand mixer (or in a large bowl with a hand mixer), cream together the butter and sugars until they're smooth. Mix in the pumpkin puree. Mix in the eggs one at a time. In a separate bowl, whisk together the flour, baking soda, salt, and pumpkin pie spice, then slowly stir the dry ingredients into the creamed mixture. Mix just enough to combine the ingredients. Add a few drops of orange food coloring if you'd like a deeper orange color.
Chill the dough: Chill the dough in the refrigerator for 30 minutes.
Portion the cookie dough onto the baking sheets: Scoop up about 2 tablespoons of dough and transfer to the baking sheet. Continue with the remaining dough, positioning the cookies a few inches apart. You should have about 24 cookies.
Flatten the dough: Dip your fingers in water and use them to flatten each mound of dough to about 1/4-inch thick.
Bake the cookies: Bake the cookies for 10 to 12 minutes, rotating the pans and swapping shelves once during baking. The cookies are done when they're slightly puffed and just starting to turn a darker shade of golden around the edges. Cool completely.
While the cookies cool, make the frosting: Melt the butter in the microwave, then whisk in the cocoa powder. Add the milk and vanilla, and whisk until frothy. Make sure the cocoa powder has completely dissolved. In a stand mixer with a beater attachment, with a hand mixer, or by hand with a whisk (and a strong arm!), work the powdered sugar into the liquids a little at a time until fully incorporated. The frosting should be thick but spreadable. If runny, add more powdered sugar; if too stiff, work in a teaspoon of milk.
Cut out Jack-o'-Lantern faces: Set aside half of the cookies as the "bottoms". With the remaining cookies, use a sharp paring knife to cut a notch from the top of the cookie for the pumpkin stem and then to cut jack-o'-lantern faces.
Make the "pumpkin" lines (optional): This is optional because scoring the pumpkin lines is adorable, but can make the cookie a bit fragile. Use a paring knife to score 3 to 4 lines down each cookie to make pumpkin-like lines. Press lightly, just enough to make a clear line. The dull edge of a butter knife works well for this too, pressing the lines rather than breaking the surface of the cookie.
Assemble the sandwich cookies: Spread a thick layer of frosting over the "bottom" cookies. Top with Jack-o'-Lantern cookies. Add an extra dollop of frosting in the notch at the top for the stem.
Enjoy! These cookies are best if eaten within 2 to 3 days. Store in an airtight container on the counter.
Want more smart tutorials for getting things done around the home?
See more How To posts
We’re looking for great examples of your own household intelligence too!
Submit your own tutorials or ideas here!
