
How To Make Russian Pelmeni, the Meat-Filled Dumplings Everyone Should Stock in Their Freezer

Pelmeni are tiny round dumplings stuffed with a blend of pork and beef. We cover the filling and the dough, forming them, and cooking them to perfection.
Serves8 to 10
Makesabout 100
Prep2 hours
Cook25 minutes to 45 minutes
We all connect over our shared love of boiled dough stuffed with a filling of sorts, which is what makes dumplings so universal. And while there are many types of dumplings native to different parts of the former Soviet Union, Siberia’s claim to fame is the Siberian pelmeni.
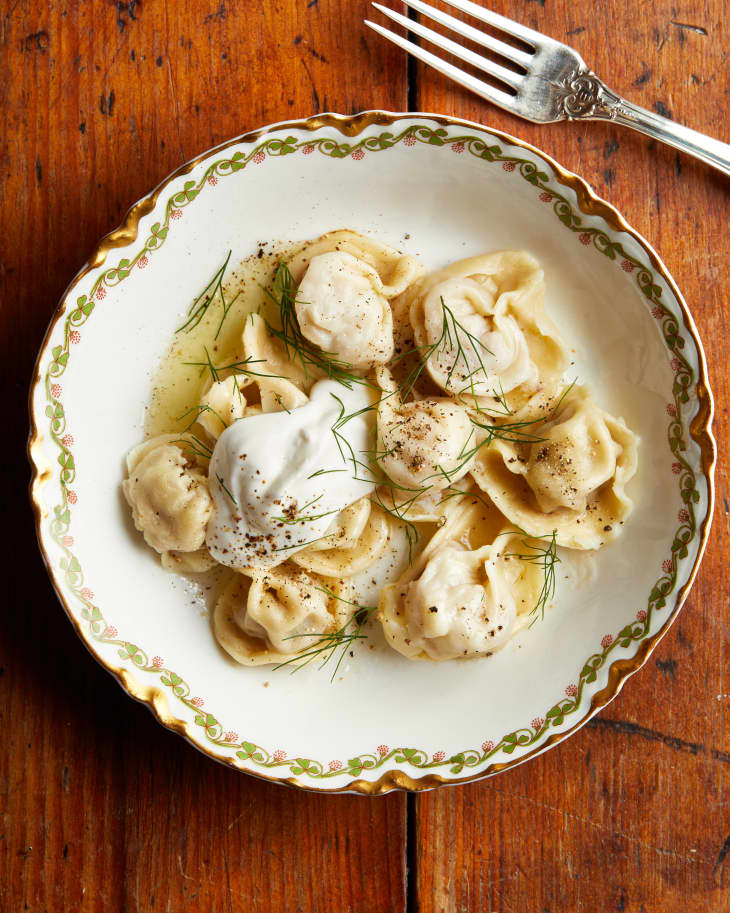
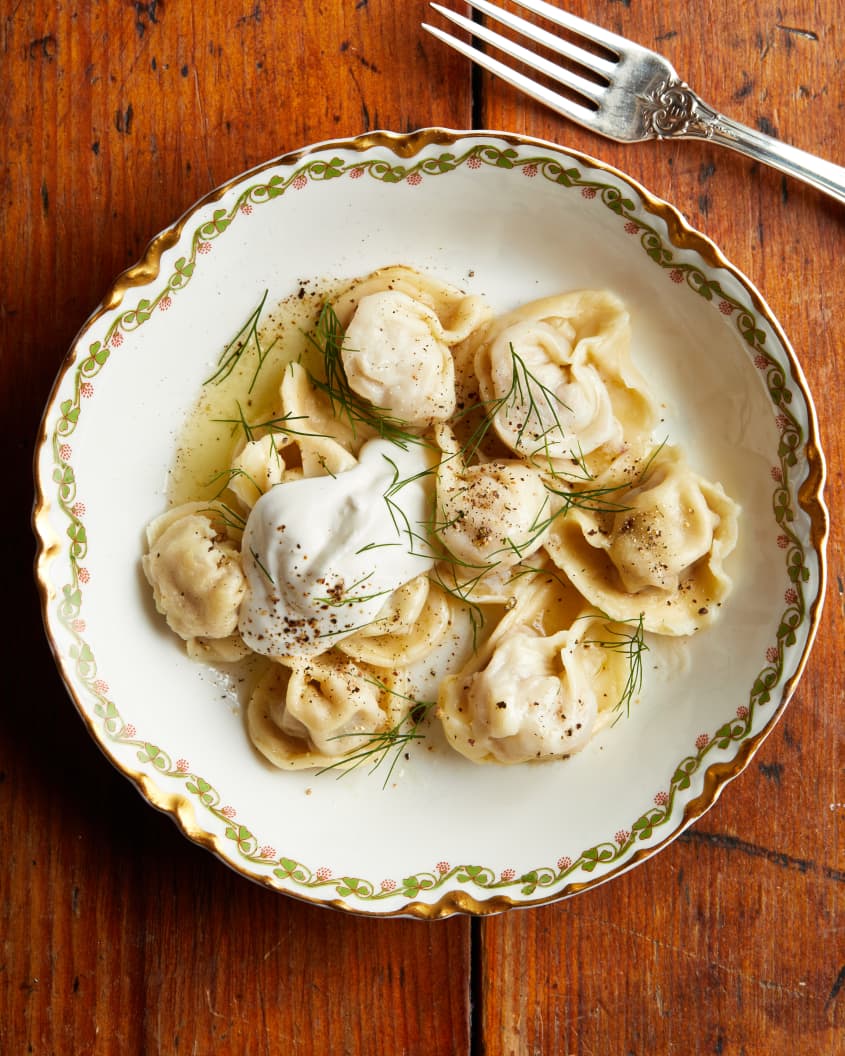
Pelmeni are tiny round dumplings stuffed with a blend of pork and beef. They’re either consumed with a generous chunk of butter and a dollop of sour cream, or — and this is my family’s favorite — in their own richly flavored cooking broth with plenty of black pepper. No matter how you serve them, they’re always made in big batches, and when cooked from frozen they’re ready in just 10 minutes.
Here, I’ll show you how to make the dough and filling, form them into dumplings, then cook them from fresh or frozen for instant bowls of comfort.

Pelmeni: The Ultimate Freezer Food
Pelmeni’s popularity and longevity can easily be explained by how fitting they are for the cold climate. Believed to have come to Siberia from China by way of Mongolian settlers many, many centuries ago, they’ve since become a staple of Siberian and Russian cuisine due to their long-lasting quality.
For those living in villages, pelmeni became a means of preserving meat during the cold months. Made in bulk, they hold up well in freezing temperatures by simply being kept outside. But they found equal popularity with the town and city folk, as even in the absence of a freezer, the dumplings can be kept on a balcony, or even hung outside the window in a tote bag. It really is an iconic image of the Soviet era: a large bag of pelmeni dumplings suspended in an avoska, or string bag. To this day, pelmeni are still kept on the balcony if the household doesn’t have a freezer of if the freezer is not large enough.
There’s No Such Thing as a Small Batch of Pelmeni
While the pelmeni filling can vary — lamb, chicken, fish, and mushrooms are all good alternatives — the one thing that always remains constant is the quantity. Pelmeni are made in huge batches, and the quantity itself is part of the pelmeni ritual.
Before they were widely available for purchase, families would come together for pelmeni-making parties, gathering around the kitchen table with some grinding the meat, others making the dough, and the most dexterous and patient ones shaping the dumplings. Singing and vodka-drinking were often an important part of the ritual. And as a practical joke (and a sign of good fortune), a clove of garlic or, worse, a coin, would be hidden in one of the dumplings. I wouldn’t recommend introducing that peculiar Russian custom, though! Pelmeni tend to dry out quite quickly, so they would always be kept under a kitchen towel, and as soon as they lost their stickiness would be packed into bags and sent off to the freezer, the balcony, or indeed the avoska bag to hang out of the window.
These days, many families own a special pelmeni mold, or simply buy them in bulk from a local granny at the farmers market or from the supermarket, which stocks dozens of different brands. Although they’re eaten primarily in winter, pelmeni make the most comforting, nourishing meal all year round. And if you’ve lovingly made them yourself, they always bring back the memories of the wonderfully meditative experience of doing so. Here, I’m sharing my favorite from-scratch recipe, which I’ve scaled down just a bit in case you don’t have a party full of hands to help you.

Freezing Pelmeni
If you’re planning to freeze your pelmeni for a future date, set them on a sheet tray in the freezer until they’re frozen solid, then transfer them to zip-top bags. They will keep in the freezer for up to three months. The only difference when it comes time to make them is that you’ll need to tack on an additional minute to the cook time.
Serving and Eating Pelmeni
Every family makes and serves their pelmeni differently. My dad would often have his (as well as pretty much anything else) with soy sauce, which his mother would send us from their hometown of Khabarovsk before it became widely available in the shops all over Russia. As pelmeni were usually eaten in winter and no fresh herbs were around, adding fresh dill was not a common practice, but I would highly recommend this to you today as well as experimenting with other non-Russian herbs. Why not try pelmeni in sage butter?
When you’re ready to eat them, the real question, aside from which filling to go for, is how many you’ll eat. Some pelmeni lovers can consume as many as 30 to 40 dumplings at a time. Are you up for the challenge?


How to Make Russian Pelmeni
Pelmeni are tiny round dumplings stuffed with a blend of pork and beef. We cover the filling and the dough, forming them, and cooking them to perfection.
Prep time 2 hours
Cook time 25 minutes to 45 minutes
Makes about 100
Serves 8 to 10
Nutritional Info
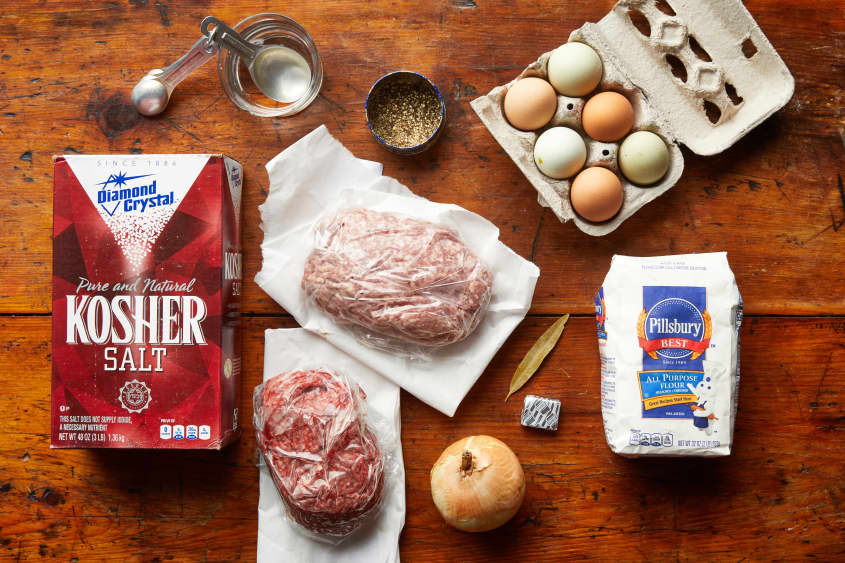
Ingredients
For the dough:
- 2 1/2 cups
all-purpose or Italian ‘00’ flour
- 1 teaspoon
kosher salt
- 1
large egg
- 7 tablespoons
water
For the filling and serving:
- 1
small yellow onion, very finely diced
- 4 ounces
ground beef
- 4 ounces
ground pork
- 1 teaspoon
kosher salt, plus more for cooking
- 1 teaspoon
freshly ground black pepper, plus more for garnish
- 1
bay leaf (optional)
- 1
stock cube, such as Knorr Vegetable Stock (optional)
Serving options: sour cream, chopped fresh dill, butter
Equipment
Pasta machine
Cutting ring (or a glass)
Large saucepan or medium pot
Slotted spoon
Measuring cups and spoons
Fork
Baking sheets
Parchment paper
Kitchen towels
Instructions
Make the dough:
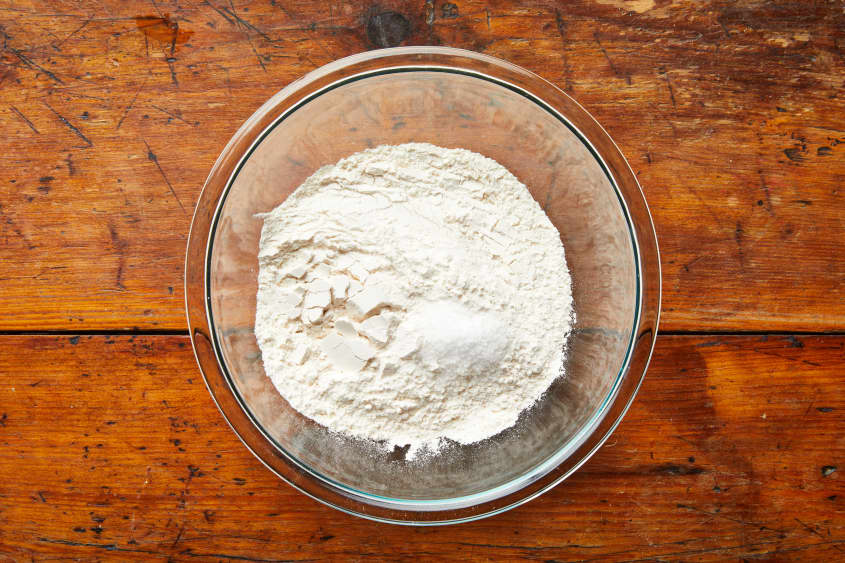
Combine the flour and salt. Place 2 1/2 cups flour and 1 teaspoon kosher salt in a large bowl and stir with a fork to combine.
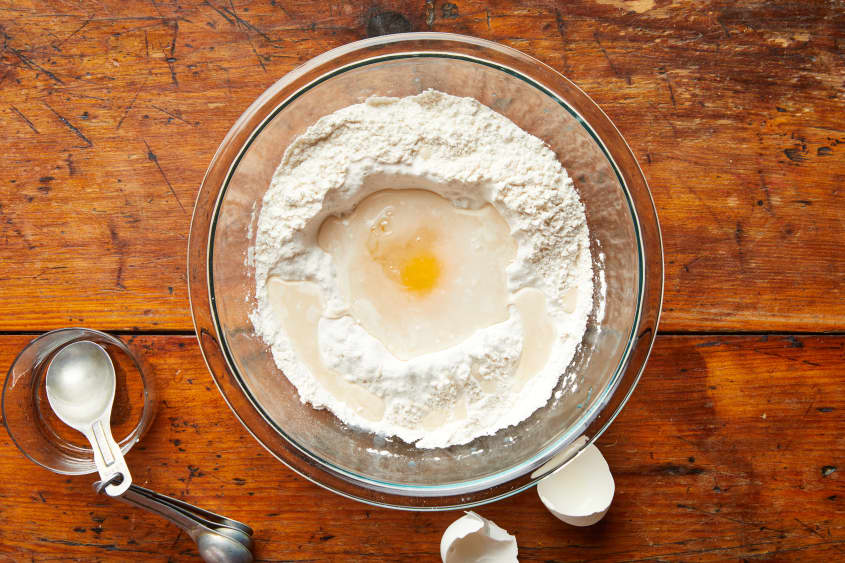
Add the eggs and water. Create a deep well in the middle of the flour. Crack 1 large egg and add 7 tablespoons water into the well. Whisk the eggs with the fork to combine.
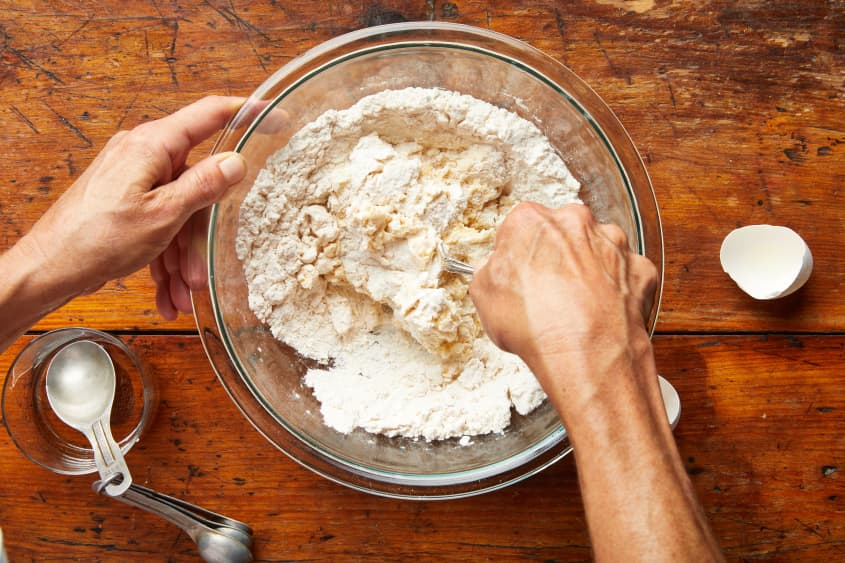
Begin combining the flour and wet ingredients. As you whisk the eggs, begin gradually pulling in flour from the bottom and sides of the bowl. Don't rush this step. At first, the eggs will start to look like a slurry. Once enough flour has been added, it will start forming a very soft dough. Don't worry if you haven't used all the flour.
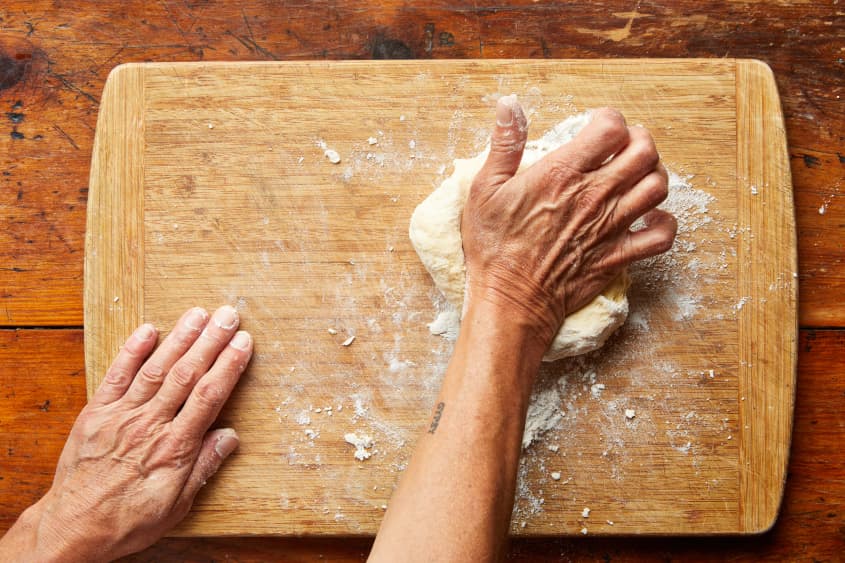
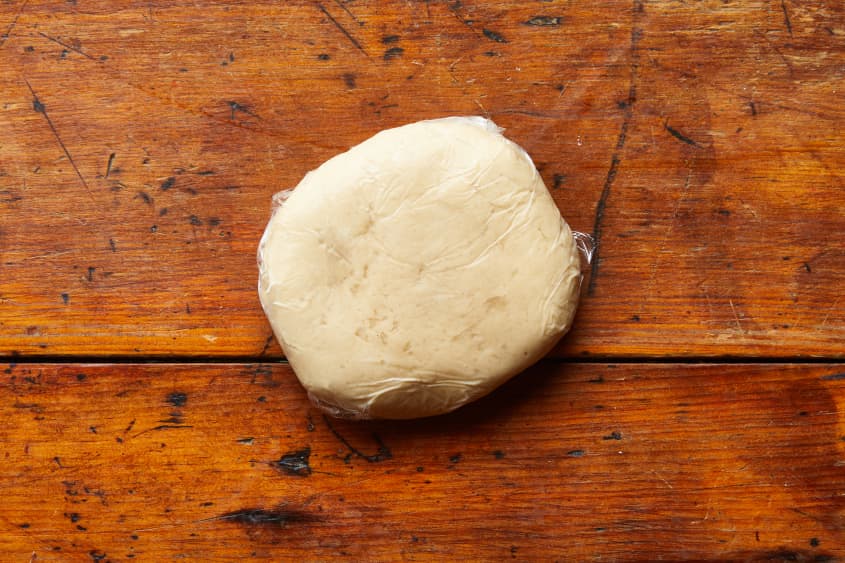
Knead the dough. Turn the dough and any excess flour out onto a clean work surface. Begin gently folding the dough on itself, flattening, and folding again. It will be extremely soft at first, then gradually start to firm up. Once it's firm enough to knead, begin kneading the dough until it forms a firm, smooth, elastic ball, 5 to 7 minutes.
Wrap and chill the dough. Wrap the dough in plastic wrap and refrigerate for 30 minutes. Meanwhile, make the filling.
Make the filling:
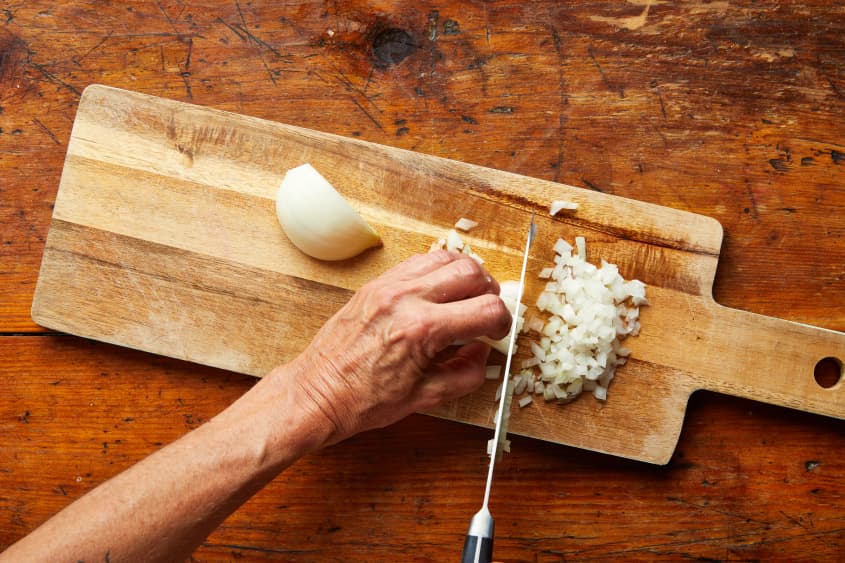
Chop the onion. Very finely chop 1 small yellow onion and place in a large bowl.
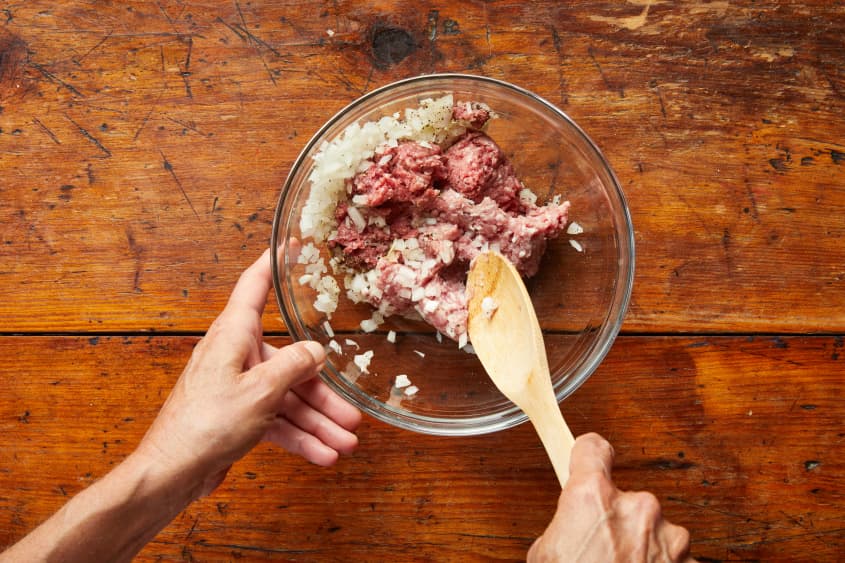
Make the filling. Add 4 ounces ground beef, 4 ounces ground pork, 1 teaspoon kosher salt, and 1 teaspoon black pepper and mix until thoroughly combined. Refrigerate until ready to use.
Make the wrappers and form the pelmeni:
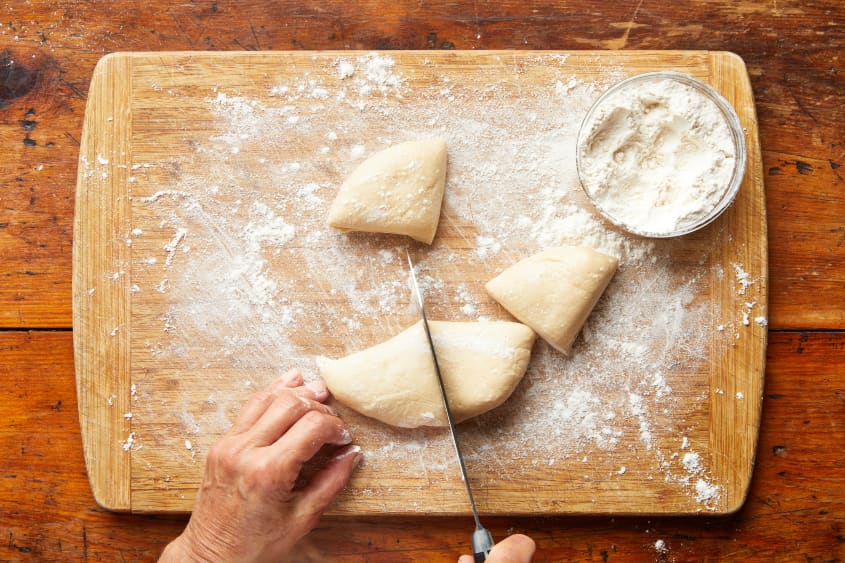
Divide the dough. Divide the dough into 4 portions, then form each into a ball. Flatten each ball into disk.
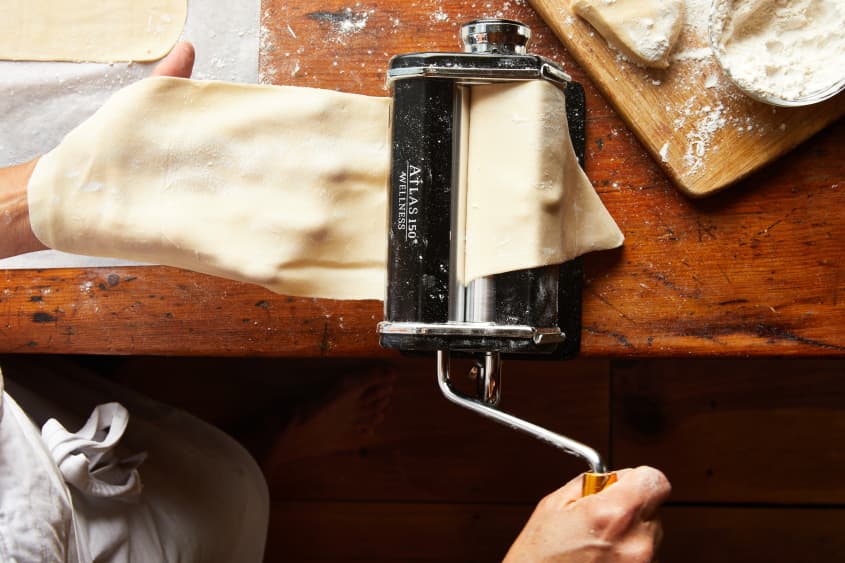
Roll the dough into sheets. Working with 1 disk at a time, pass through a pasta machine through the thickest setting. Repeat passing through the machine, incrementally going up in each setting, until the sheet is about 1.5mm thin and almost see-through (setting 6 or 7 on a manual machine).
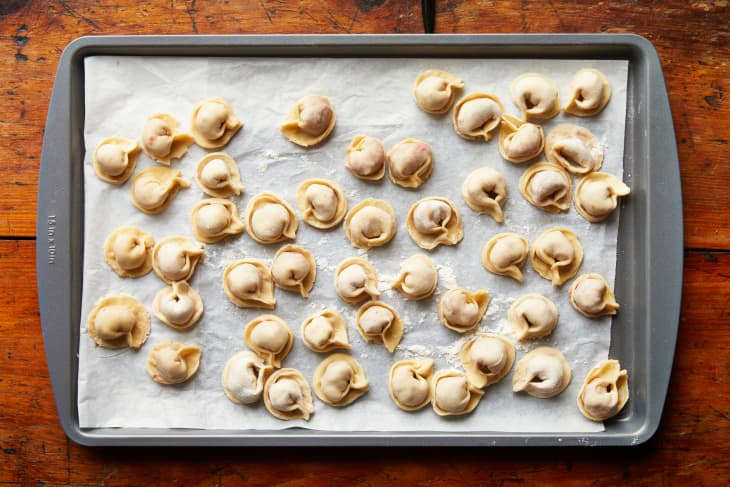
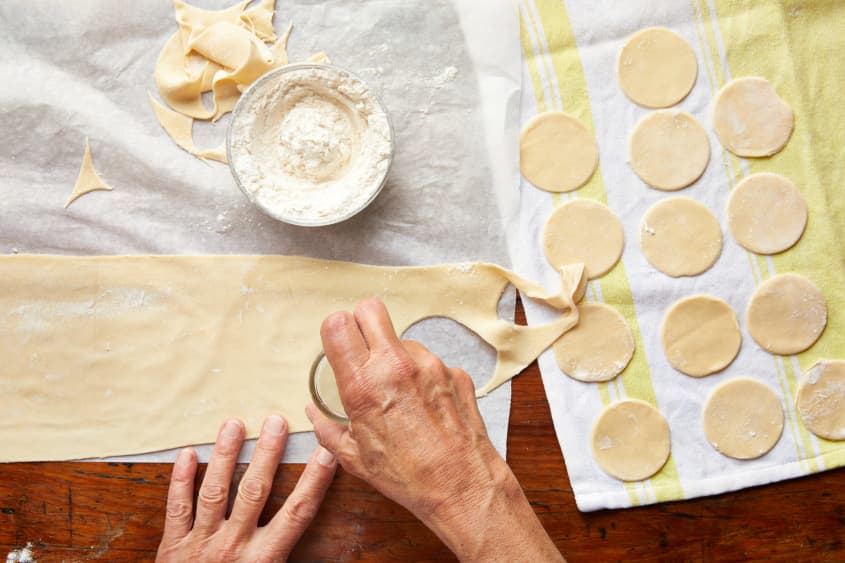
Cut out 2-inch dough rounds. As each sheet is ready, cut out rounds with a 2-inch round cutter. Place each round on a clean kitchen towel in a single layer without touching. Cover each layer with a kitchen towel. After rolling out all the disks, gather the scraps and re-roll and cut until you have about 100 dough rounds.
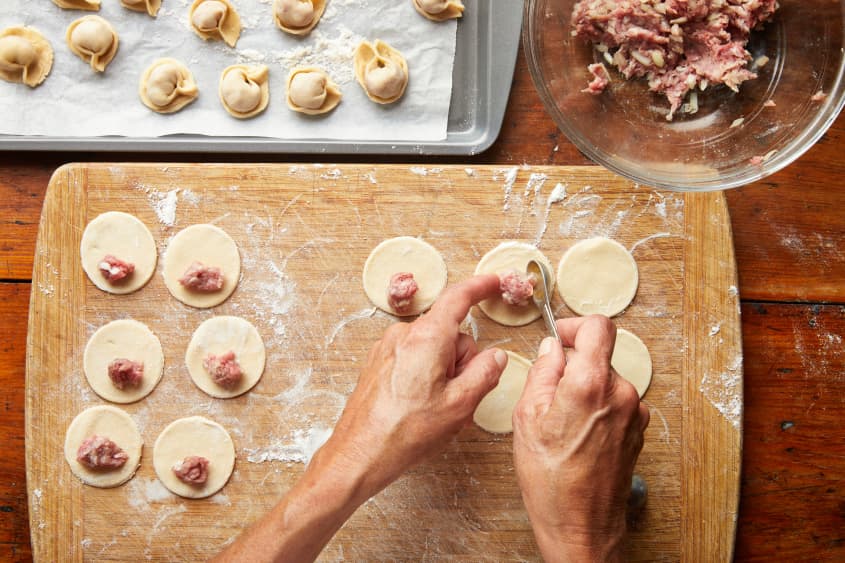
Add the filling. Line a baking sheet with parchment paper and have a small bowl of cold water ready. Place 1 teaspoon filling in the middle of a dough round.
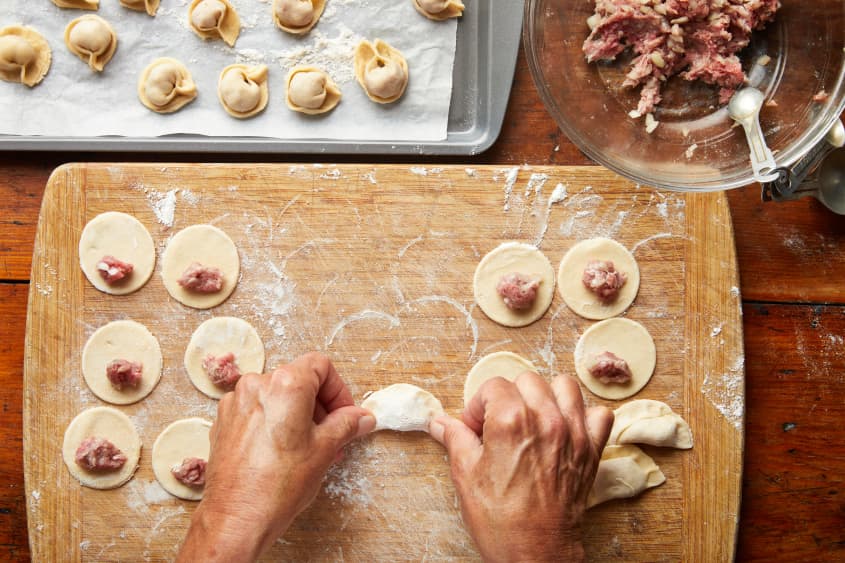
Fold the pelmeni. Dip a finger in cold water and trace the top edges of the dough round. Fold in half to make a half-moon shape, pressing against the edges so that they seal. Fold the two ends toward each other until they overlap slightly, then press so that they stick together. (Use some water here as well if they don’t stick together.)
Repeat folding. Place on the baking sheet and repeat with the remaining dough rounds and filling, placing them in a single layer without touching. When the baking sheet is full, place a sheet of parchment paper on the first layer and top with more pelmeni.
Cook or freeze. The pelmeni can be cooked immediately, refrigerated for a few hours, or frozen to be cooked at a later date.
Cook the pelmeni:
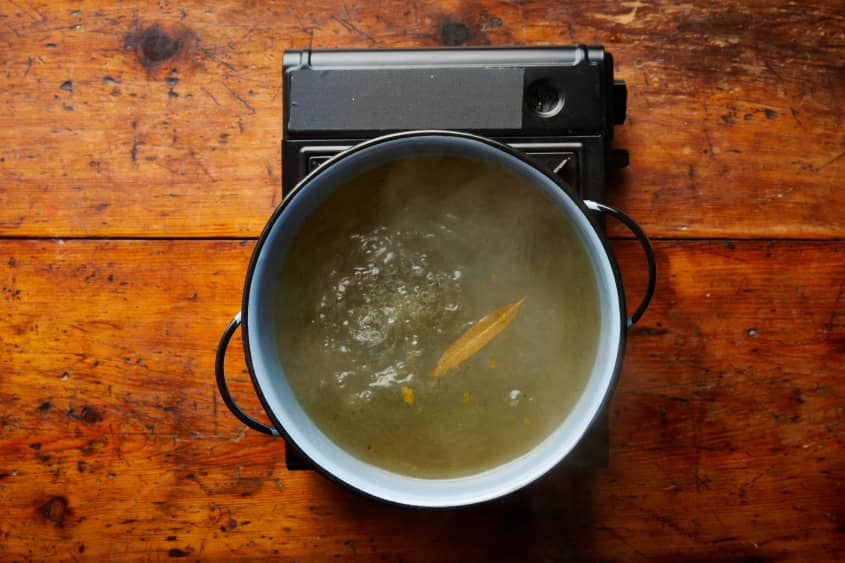
Bring water to a boil. Boil a large pot of salted water, adding bay leaf and a stock cube if desired.
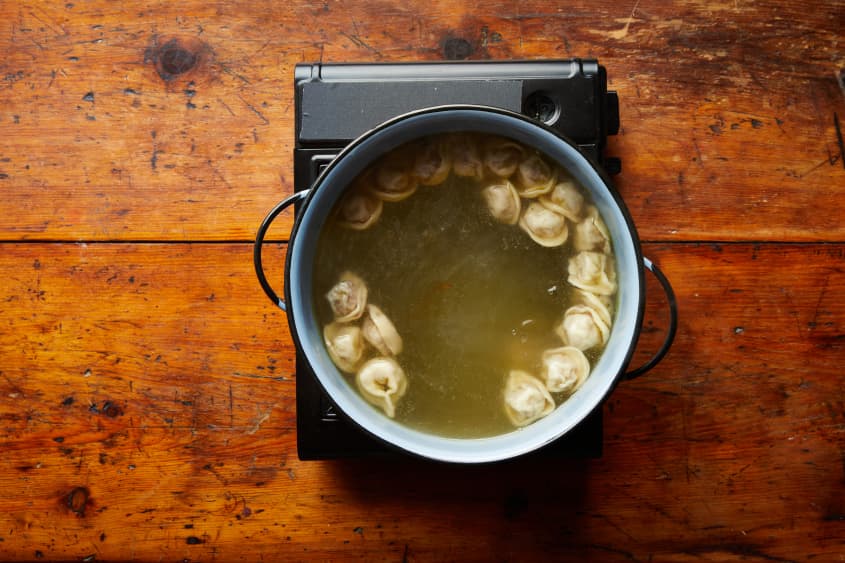
Cook the pelmeni in batches. Place 15 to 20 pelmeni into the boiling broth and cook for 5 minutes. You know they are ready when they float up to the surface.
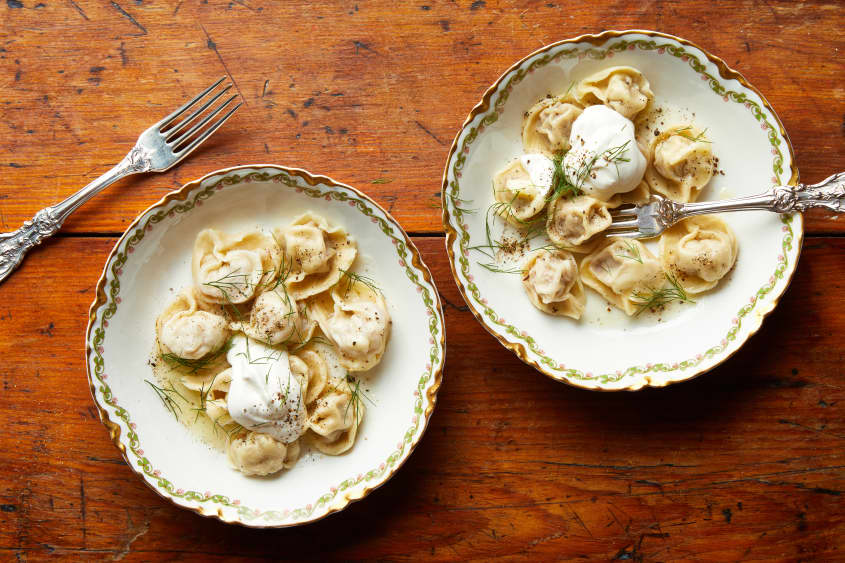
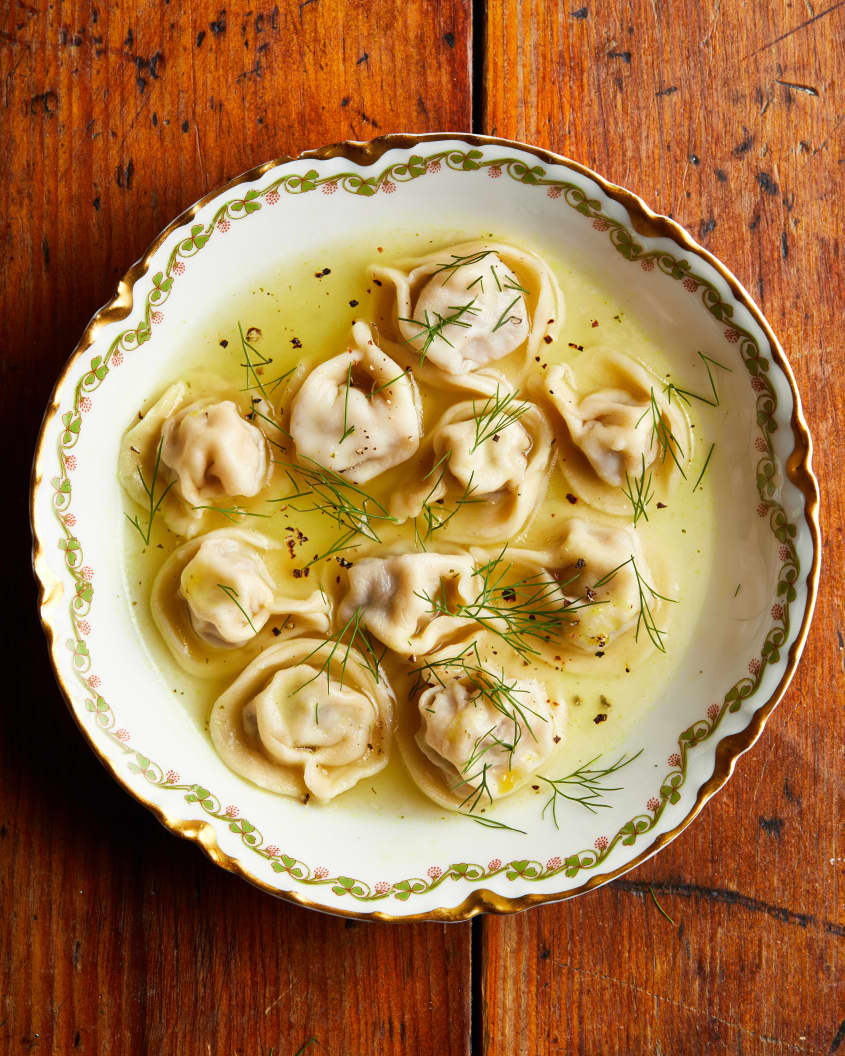
Serve the pelmeni. Transfer the pelmeni using a slotted spoon into soup bowls. Repeat with the remaining pelmeni. Top with butter, fresh dill, sour cream, and black pepper. If you prefer to have them with the cooking liquid, ladle it over the pelmeni and garnish with fresh dill and black pepper.
Recipe Notes
Make ahead: The dough and filling can be made in advance and refrigerated up to 24 hours.
Storage: The pelmeni can be refrigerated for a few hours, or frozen until solid, then transferred to zip-top bags and kept in the freezer up to 3 months. If cooking from frozen, add an additional minute to the cook time.
At Kitchn, we know how important it is to find recipes that are worth your time. That’s why every tutorial — like this one — features recipes that have been tried and tested by our team of developers and at-home cooks from across the country. Questions or feedback for us? Say hello: recipes@thekitchn.com.