

We Seasoned Cast Iron Skillets with 5 Different Oils and Have a New Favorite
Whether you’re new to cast iron or a longtime fan, there’s one thing everyone always wants to know: how to season these classic pans just right. You’d think there would be a cut-and-dry answer, but the internet is overflowing with somewhat conflicting advice. Coat it in oil and bake it low and slow! Or hot and quick! Or hot and slow! Use vegetable oil or canola oil, coconut oil, flaxseed oil, or lard! Or just cook up some bacon or fry some chicken in Crisco.
The one thing all of these methods have in common is this — add some fat and cook with the dang thing. Truly that is, in a nutshell, how you season a cast iron skillet. No matter what method or oil you choose to use, the idea is the same: Add oil and heat it.
According to my favorite food science nerd, Harold McGee, seasoning is simply the act of getting a layer of oil to settle into the nooks and crannies and pores of the metal, and then heating it up, at which point the fatty acids in the oil react with the metal and the heat, become broken down (oxidized), and reform (polymerize) into larger molecules that bond with each other and the metal. This forms a tough-as-nails coating that protects the metal from rusting when it comes into contact with air and water. It will get thicker and thicker (and better and better) each time oil is applied and heated (as you do when cooking), which will eventually make the pan smooth, slick, and nonstick.
Now that we know the science and that pretty much any oil heated up will eventually polymerize, we can look at which oils and which methods will do it faster, better. McGee and other food scientists agree that highly unsaturated fats work better because they’re more prone to oxidation and polymerizing. That means bacon grease, lard, and coconut oil aren’t actually the best choices because they’re high in saturated fats. What does work are all of the “healthy” oils — like vegetable, canola, flaxseed, and grapeseed. Each of these is low in saturated fat.
Okay, now how about the method? It really comes down to applying enough heat to break down the oils and trigger the polymerization process. These oils all have pretty high smoke points, which means it takes a bit of heat to break them down. Low and slow isn’t going to work for these guys; it’ll just make them sticky. Too high and the oil will just burn. The sweet spot is 350°F to 500°F for at least an hour. And although it would be nice to pour a ton of oil in the pan and have a really thick polymerized surface, that won’t work either. You want to keep each coat of oil super thin, and repeat the process over and over to build up the thickness.
With food scientists pretty much in agreement over the best method, it made me wonder about the oils. Was one of those unsaturated oils better than the rest at creating a super-strong surface? I decided to test out five of the most popular seasoning options, using the same method, to see if one was actually better than another.
How I Tested the Different Methods
Oddly enough, I had a collection of cast iron pans that all needed to be seasoned. (A “perk” of the job, I guess.) The playing field was pretty even.
I used the same method for each: I put the pan in the oven at 200°F for at least 10 minutes to warm it, open up the pores, and make sure it was completely dry. Then I coated the pan in a thin layer of the selected oil with a paper towel and wiped it off with another clean paper towel. You couldn’t tell it had been oiled because the coat was so thin. Then I put it back in the oven upside down to prevent oil from pooling, over a baking sheet to catch any drips, and heated the oven to 400°F. I oiled each pan again (carefully) after two hours, and did this three times, turning off the oven and letting the pan cool in place after the final coat. While you wouldn’t normally do this many reps in real life, I wanted to see how the seasonings would end up over time — from start to many uses later — and this was a good way to mimic that.
After seasoning, I cooked with each pan to test the resiliency of the coating. I chose dishes that required a sauté of vegetables in oil, seared protein, and a bit of acid in the form of tomatoes. (I’ve noticed sautéing protein often strips the seasoning from new pans; same with anything remotely acidic like tomatoes.) I made two curries, a cacciatore, and two pasta sauces. After their maiden voyage, I put each pan into rotation for the week and used them to cook eggs, hash browns, bacon, pork chops, and a stir-fry. And probably a few more things that I’m forgetting.
Some will say the real test will be how they well they hold up over time, but that depends on how often each gets used. What I was looking for was reliable way to season a pan to give it a solid base I can build on — one that won’t get ruined after the first couple of uses, and one that doesn’t require 18 hours and six coats of oil.
The ratings: By and large, all of the oils performed about the same. None failed, although two seemed tougher than the others. Three coats using the scientifically approved method and all the pans came out sleek and shiny. They all held up nicely during testing — certainly better than the factory seasoning I’ve seen on other pans. However, some of the oils were needlessly pricey or easier to apply than others, and two of the pans seemed to have seasoning with a bit more oomph. Here’s how it turned out.
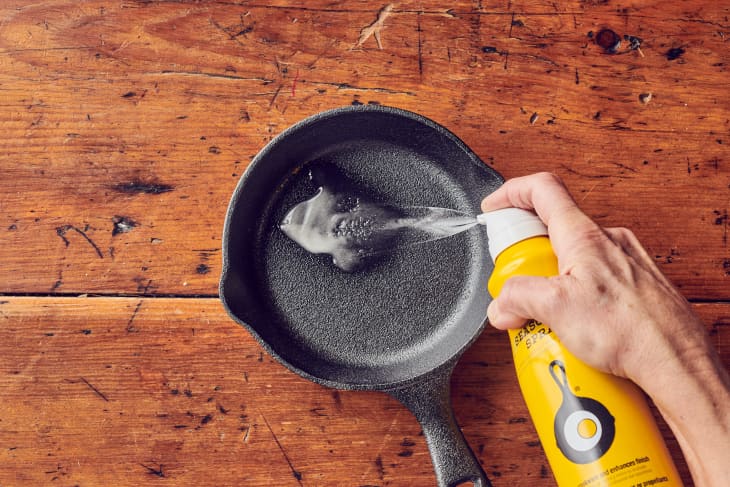
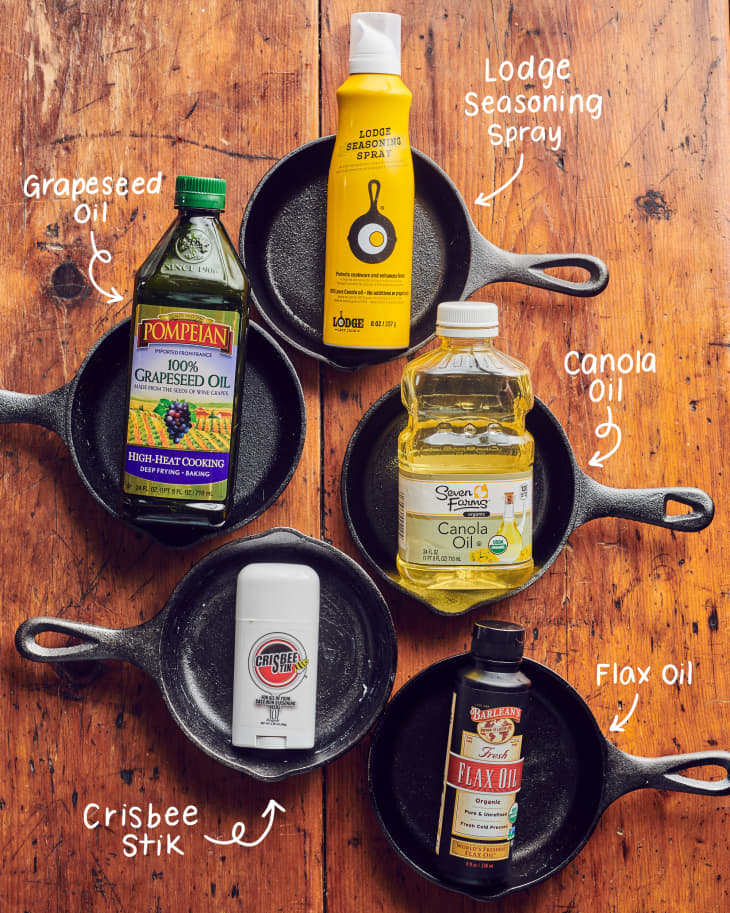
Cast Iron Seasoning Option 1: Lodge Seasoning Spray
Ease of use: 3 / 5
Performance: 3 / 5
Price: 2.5 / 5 ($12.95 for eight ounces)
Overall: 3 / 5
I know plenty of people who swear by this stuff, but it’s really just sprayable canola oil. You can use it for cooking or seasoning. There’s nothing radical about it. No additives, no propellants. The spray-on format seems like it would make it easier to apply a thin coat, but in practice that’s not really the case: The oil comes out in a thick dribble or in a huge cloud of mist that gets all over everything, and you still have to wipe it down to remove the excess. A DIY spray bottle of canola oil would actually work better. It’s also around $11 for one eight-ounce bottle. And in terms of performance, it worked well enough, but wasn’t the best of the bunch. Foods cooked in the pan were prone to sticking (even bacon!) and the seasoning lost a teeny bit of luster after the first test run.

Cast Iron Seasoning Option 2: Crisbee Stik
Ease of use: 3 / 5
Performance: 3 / 5
Price: 2.5 / 5 ($14.95 for 2.3 ounces)
Overall: 3 / 5
According to the website, this blend of soybean oil, beeswax, and palm oil is supposed to not go rancid and not get brittle and flake off. I haven’t had it long enough to attest to either claim, but I can say I enjoyed how it smelled like honey during the seasoning process. As for the downsides, I noticed that the sautéing chicken did take away a bit of its seasoning, and that the pan looked dull after cooking with tomatoes.
Also, the form-factor of this seemed like a great idea but didn’t work well in real life. It looks like a stick of deodorant and I could imagine just gliding it on effortlessly. In practice, the stick is actually fairly hard to get into the corner of the pan. Even though the site says a little goes a long way, I found that I could easily blow through it fast if I wasn’t careful. With a still-warm pan, things melt a bit as soon as the stick hits the pan. Plus, I still had to use a towel to wipe it into a thin, even coating. I think the stick would work far better as an in-between-uses kind of thing (rather than a start-from-scratch situation). And for that reason, I’m keeping this in my toolkit.

Cast Iron Seasoning Option 3: Flaxseed Oil
Ease of use: 4.5 / 5
Performance: 4.5 / 5
Price: 2.5 / 5 ($34.99 for 32 ounces)
Overall: 3.5 / 5
This is supposed to be the gold standard of oils for seasoning pans. Ever since Sheryl Canter wrote her blog post 10 years ago and Cook’s Illustrated echoed it, everyone seems to think flaxseed is the way to go. I’m not disagreeing … I’m just not convinced it’s the best. First of all, it’s expensive, at more than a dollar an ounce. Second, it’s kind of a one-trick-pony in my kitchen. It’s a drizzling oil for health benefits, not one I turn to for its flavor or to cook with because its smoke point is too low. I know me, and eventually that bottle is going to end up in the back of my fridge and when I unearth it a year later it’ll be rancid and destined for the trash. What a waste.
As for performance, some people have found that flaxseed coatings get brittle and flake off over time. I haven’t experienced this myself, but it’s something to keep in mind. During my testing, the pan got super dark everywhere but the very middle after the first use. It wasn’t shiny black, but it seemed promising. It’s eventually getting darker with use, although it’s not truly nonstick yet. None of the seasoning shows signs of budging, so it gets high marks for performance. The price and the fact that I’d only use it for seasoning my pans, however, keep this from finishing higher. (Note: I know there are going to be lots of you who disagree with me!)
Read more: I Seasoned My Cast Iron Pan with Flaxseed Oil, and Here’s What Happened

Cast Iron Seasoning Option 4: Canola Oil or Vegetable Oil
Ease of use: 4.5 / 5
Performance: 3.5 / 5
Price: 5 / 5 ($2.99 for 32 ounces)
Overall: 4 / 5
A lot of people talk about — and use! — canola oil and vegetable oil interchangeably, and luckily, they both performed the exact same way in my testing. (If you’re wondering, vegetable oil is a blend of various oils — usually including sunflower, corn, soy, and safflower — whereas canola oil is made from the canola plant. Both are dirt cheap and likely to be in any pantry.)
With both, I first found it hard to keep the oils from creating a mottled surface on my pan, even though I wiped all the excess off and turned the pan upside down. But subsequent coatings filled in the blanks pretty well. Either of these oils tend to be my go-to (I’ll just grab whichever I see first!), so I was surprised to see that, when I really paid attention, I found foods were prone to sticking just a bit. And after my tomato test there were a few teeny-tiny, shiny spots peeking through the seasoning. These oils had always been totally fine. But I kept testing and now I have a new favorite. Keep reading!

Cast Iron Seasoning Option 5: Grapeseed Oil
Ease of use: 4.5 / 5
Performance: 5 / 5
Price: 5 / 5 ($13.83 for 68 ounces)
Overall: 5 / 5
This is, hands-down, my new favorite seasoning oil. Not only is the price right, but it’s also a super-versatile cooking oil, which means I won’t end up wasting it. And this oil produced the most impressive seasoning of the bunch. At first I was concerned: The oil baked onto the pan in a mottled way, even though I wiped the pan down again after 20 minutes in the oven. It got much better after a few more coatings and was almost completely even in color by the end.
The surface was incredibly smooth and quite nonstick right from the get-go. My protein-acid test didn’t faze it, except if I squinted I could see it was almost imperceptibly a tad bit less shiny. That’s it. My grapeseed-seasoned skillet has only gotten darker with each use. Durable, cheap, versatile, easy to find at any grocery store. What’s not to love?
What do you use to season your cast iron skillets? Tell us in the comments below.