
6 Simple Ways (Under $20!) I Added Instant “Character” to My Basic Rental Kitchen
I spend a lot of time in my kitchen — whether it’s working through a new recipe for dinner, making coffee in the morning, or mixing up drinks for guests, it’s probably the room in my apartment that works the hardest for me. Given how small it is (roughly 24 square feet of floor space), my first priority was making things more efficient and focusing on the right flow, but beyond that I wanted it to feel as custom and intentional as possible — even though it’s a rental.
The kitchen started out with stark white walls, builder-grade tile flooring, and no real character to speak of. But after about a year of incremental improvements, I’ve finally turned my rental kitchen into a space I’m happy to spend all my time in. Here are six renter-friendly ways I made that happen.

1. Paint the walls.
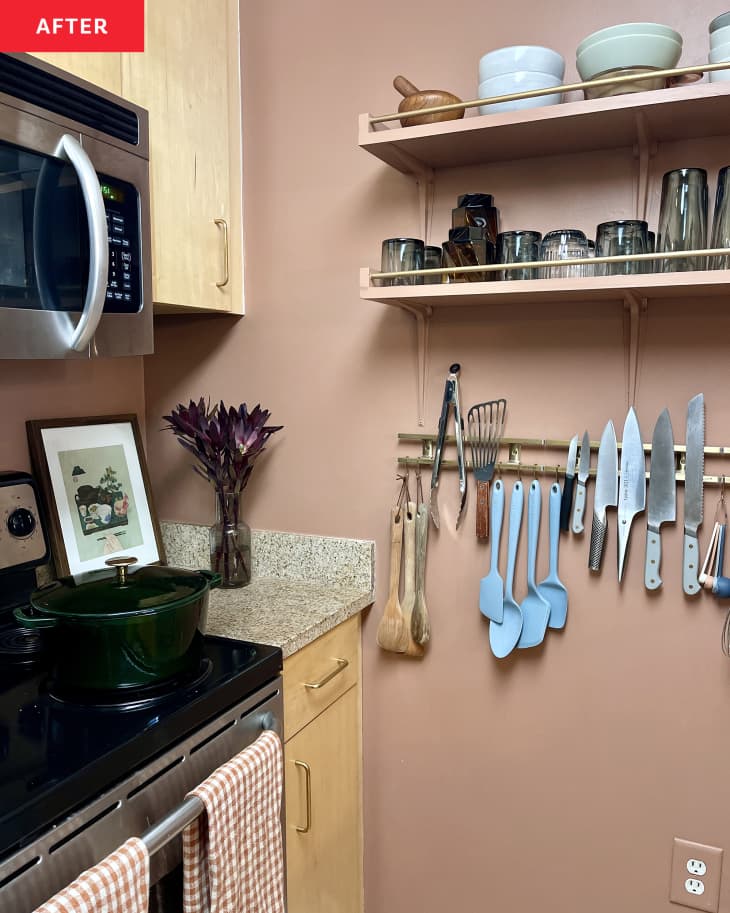
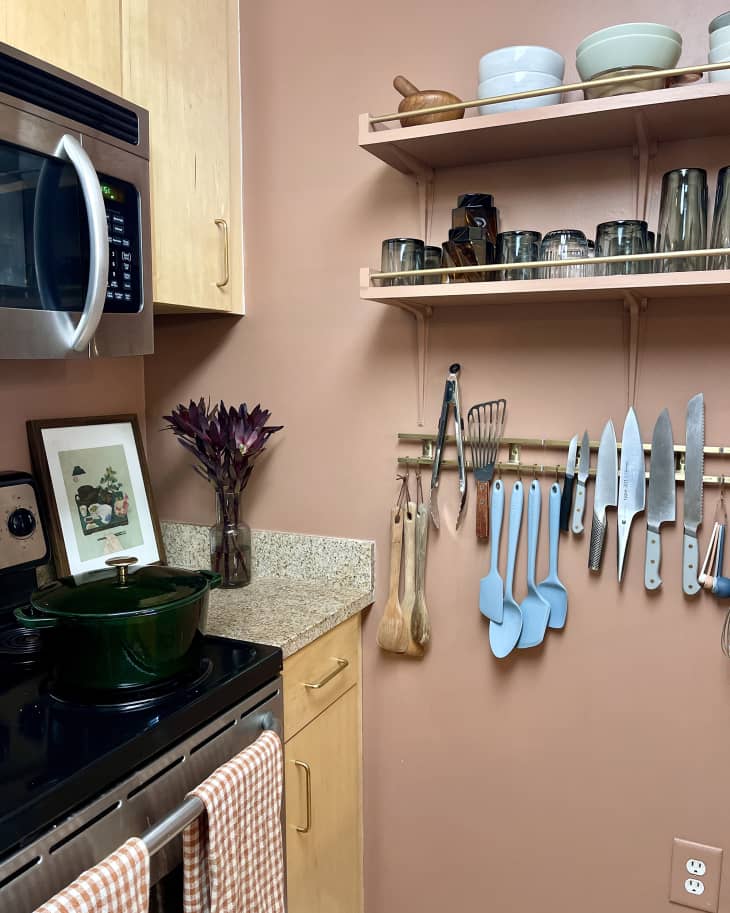
First, the kitchen needed a serious upgrade from the “landlord white” walls. After lots of Pinterest-ing (this kitchen and this kitchen, in particular, inspired me) and plenty of paint samples hung on the wall, I settled on “Minestrone” by Behr in an eggshell finish. Even with the original floor and cabinet hardware, this deep, dusty pink immediately made the space feel more considered and put-together. Of course, not all renters are allowed to paint their walls (or want to go through the trouble of painting them white when the lease ends), but peel-and-stick wallpaper is a great removable alternative. Painting just one wall is also a more affordable, easier-to-cover option that adds a pop of color!
2. Swap out the switch plates.
Something super-low-lift and budget-friendly to do in any room in a rental is swapping out the plastic outlet covers and switch plates for ones that are slightly more upgraded. In our bathroom, for example, I added brass switch plates to coordinate with the other gold and brass accents. In the living room, I added a bit of character with traditional-inspired switch plates and outlet covers. In the kitchen, though, I decided to blend the switch plates and outlet covers into the background by sanding and painting them the same color as the walls. I may end up changing them out one day, but for now, I love that the kitchen feels far more cohesive than if there were white plastic outlet covers breaking the sight lines up.
3. Add custom shelving.
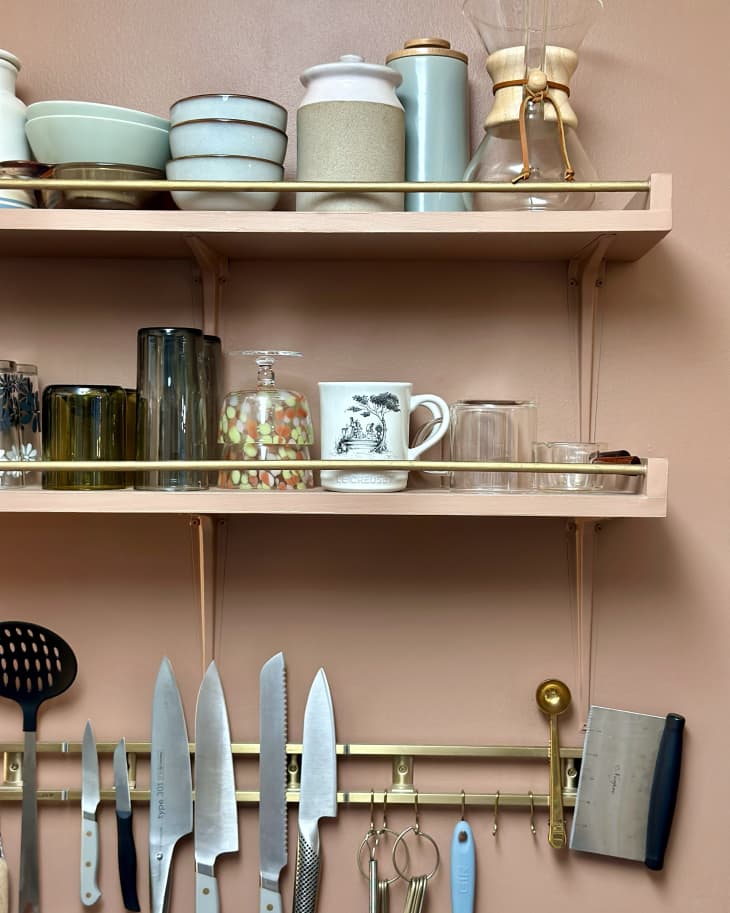
One thing I absolutely knew I’d need to add in the kitchen was open shelving, as we just didn’t have enough cabinet space to house all our dishes, appliances, and food. I toyed with the idea of simple planks of wood with metal brackets, but I got swept up in the DIY and ended up creating something totally custom to hold bowls, jars, and glassware. I basically created shelves with wooden dowels on the front to prevent anything from sliding off, just in case. Then I painted the shelves and the brackets the same color as the walls, so they really blend in and feel like they were custom-made at the time of the kitchen’s construction. They turned out to be one of my favorite projects ever, and they majorly improved the function of our kitchen by housing all of our most-used dishes. (Here’s more on my open shelving if you want the exact materials and process breakdown.)
4. Change the cabinet hardware.
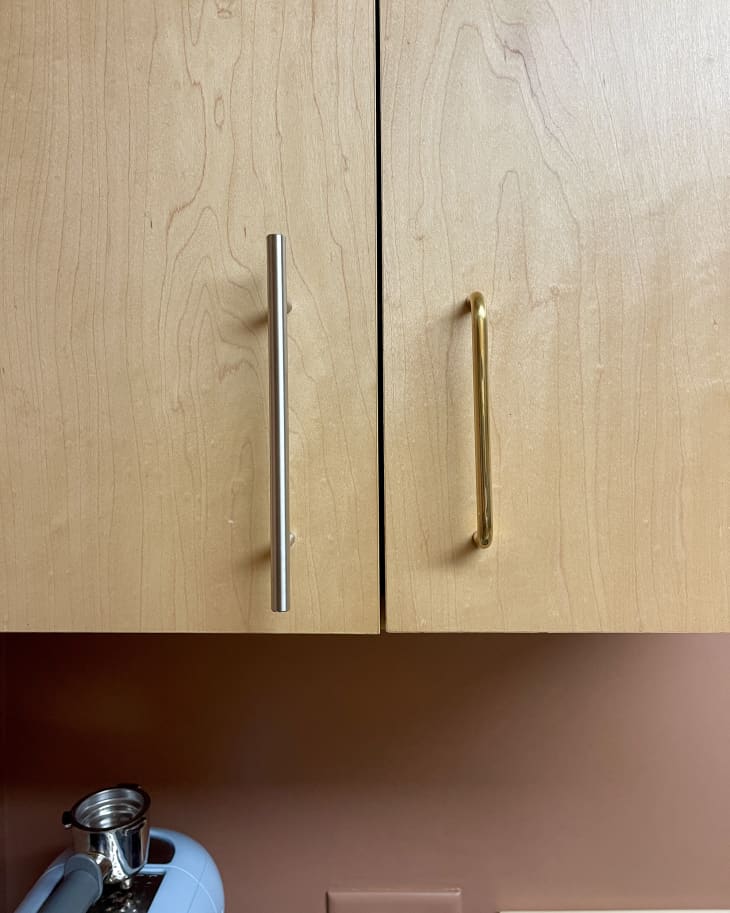
The cabinets in our kitchen are a pretty neutral base for the rest of the room. They’re made with maple veneer and have clean, modern lines without much detail, so they were actually quite simple to spruce up with just a change in hardware. Originally, they had brushed nickel hardware that was … fine, but the cabinets needed a little warmth. I sourced these minimal unlacquered brass handles from Rental Re/Do and within the span of 20 minutes, the kitchen had a totally different feel. It no longer felt like a ’90s/early 2000s holdover, but a room with much more character. The brass will age over time as well, giving them a lovely patina and texture instead of that brand-new shine.
5. Apply peel-and-stick floor tiles.
Among all the changes I made to the kitchen, perhaps the most impressive before and after is the floor. I lived with the faux natural stone tile in the kitchen for quite a while, but eventually I realized that if the kitchen were to feel really put-together, I’d need to temporarily cover the floor. I opted for peel-and-stick vinyl tiles from Chasing Paper in black and white marble print and arranged them in a very classic harlequin pattern to evoke traditional British kitchens. It’s not perfect — you can see some of the grout lines through the tiles — but it’s so much better than it was, and I’m very pleased with the outcome. It’s lasted very well since I put it down, and if any tiles get scratched or worn, I simply peel it up and replace it!
6. Make room for a magnetic utensil rack.
Instead of a knife block or a smaller magnetic utensil rack, adding three of these brass-toned knife racks to the wall underneath the open shelves makes the kitchen feel more “designed” than decorated — like it was conceptualized from the beginning and not just pieced together over time. Of course, there’s the bonus of freeing up counter space and having all my knives and utensils handy while cooking.
What’s your favorite way to spruce up a rental kitchen? Let us know in the comments below!