
How To Dry Brine a Turkey
Thanksgiving planning often starts with the turkey. There are questions that immediately emerge: How much turkey should I buy? What’s the best way to cook a turkey? And should I brine the bird? If so, wet brine or dry brine?
Our opinion: You should always dry brine your roast turkey. Learning how to brine a turkey is the key to making sure your bird is super flavorful and moist.
Even if you’re hosting Thanksgiving for the first time and are a bit nervous about cooking your inaugural turkey, here’s how to dry-brine your turkey like a pro and turn out an impeccably juicy and crispy bird.
What Is Dry Brining?
A dry brine, also called pre-salting, seasons the turkey like a more traditional wet brine, but it does not use any water. Instead, a dry brine involves rubbing the salt, seasonings, and/or sugar directly onto the meat and skin, and then letting the meat rest in the refrigerator for a period of time before cooking.
How Does Dry Brining Work?
When you’re dealing with a large piece of lean meat like a whole turkey, it’s easy to overcook it into a dry, unappealing texture. Also, just seasoning it right before cooking means there’s no time for the salt to penetrate into the meat, especially for thick cuts.
Brining, or soaking a piece of meat in salty seasoned water, is a way to inject both flavor and moisture at the same time.
How does a dry-brine work, exactly? First, the salt draws out the meat juices through osmosis. Next, the salt dissolves into the juices, essentially turning into a “natural” brine even though there isn’t any added liquid. And finally, this brine is reabsorbed into the meat and starts breaking down tough muscle proteins, resulting in juicy, tender, seasoned meat.
The larger the piece of meat, the more time is needed for the brine to be effective. This method was made popular by chef Judy Rodgers, who dry-brined her famous roast chicken at San Francisco’s Zuni Cafe.
Why You Should Dry-Brine Your Turkey
Now that we know what dry-brining is, what are its advantages, especially when cooking a Thanksgiving turkey?
The turkey is prepped ahead of time.
Since a whole turkey needs one to three days of brining time, the dry-brining can be done in the quiet days before Thanksgiving Day madness sets in, when you have time to focus without any distractions. In fact, prepping and brining a turkey can be quite relaxing if you turn some music on and reward yourself with a glass of wine!
There’s no sloppy water.
With a dry brine, you just mix the salt and spices, rub it on the meat, throw it in the fridge, and you’re done! You can basically forget about it until you’re ready to cook the turkey. This is in contrast to a wet brine, which requires a container big enough to hold the turkey, submerged in water, and space in your fridge to store it.
No special equipment needed.
Dry-brining can be done on anything big enough to hold the turkey, such as a roasting pan or sheet pan.
You get truly crispy skin.
The turkey sits uncovered in the fridge while sitting in its dry brine. This can seem a little scary (raw turkey, eek!), but it really helps to dry out the skin, which in turn gives you incredibly crispy, golden-brown skin on the roasted bird. If you’re worried that space in your fridge will be tight and other foods might bump up against the turkey, you can cover it loosely with plastic wrap or foil and just pat the skin dry right before you cook it.
Essential Tips for Dry Brining a Turkey
When starting on this magical adventure of dry-brining, here are a couple of things to know.
Pick the right turkey.
Since you’ll be doing your own seasoning with salt and spices, you want to start with a bird that has no seasoning in it at all. Stay away from kosher turkeys, which have been pre-salted, as well as self-basting turkeys, which have been injected with a salt solution. Go for a natural or heritage turkey, and if you’re not sure if it’s already been seasoned, just check the label to make sure it has no added salt.
Thawed is best.
While you can definitely dry-brine a still-frozen turkey (see Recipe Notes below), I like starting with a thawed one so that I can separate the meat from the skin and put some of the dry brine directly on the meat. If the turkey was frozen solid when you bought it, the turkey needs approximately 24 hours for every five pounds of turkey to thaw completely. For quicker thawing, place the turkey in a cold water bath and change the water every 30 minutes until it’s thawed.
Whole or cut-up turkeys can be brined.
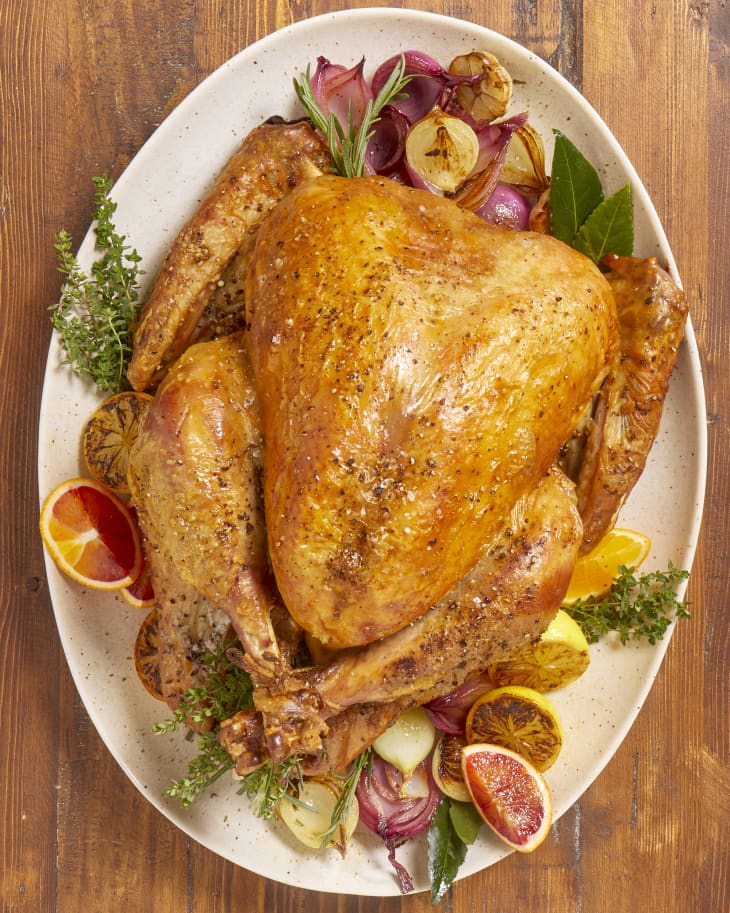
It doesn’t matter if you have a whole turkey, a bone-in turkey breast or a spatchcocked (or butterflied) turkey, the brining process is the same. In our photos below, we’re showing how we dry brine a spatchcocked turkey.
Where the dry brine goes matters.
I like to separate the skin from the meat so that I can rub some of the brine directly on top of the meat — just sprinkling the brine on the skin means it will need more time to penetrate the skin to get to the meat. It’s also important to put more dry brine on the turkey breast, which is much thicker than the legs — just think of it in proportions.
Plan for brining time.
Brining needs adequate time in order to be effective, so the thicker the piece of meat, the more time you want to give it so that the salt has enough time to work its way down from the surface. Although you can cook a dry-brined turkey after one day, giving it three days yields a much more tasty bird.
Use any cooking method.
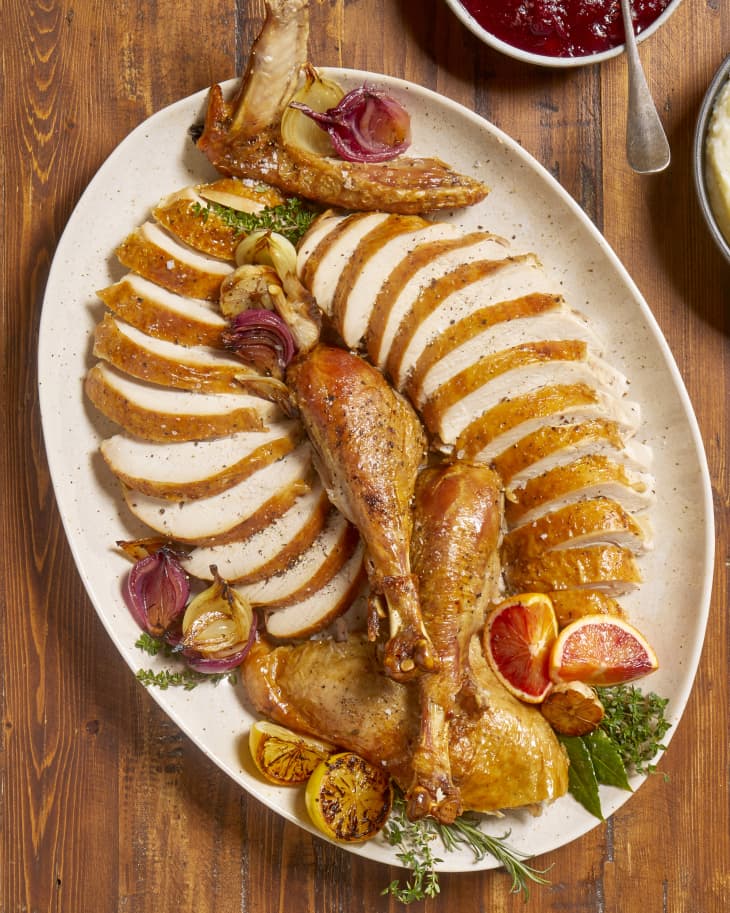
Once your turkey is brined, you can choose whatever method you like for cooking it: traditional oven-roasting, deep-frying, or even grilling are all fine to do with a brined bird.
Dry Brine vs. Wet Brine
Both dry brines and wet brines are popular methods for preparing a whole turkey that is flavorful and moist, though each has different requirements. Dry brines call for applying a large amount of salt (mixed with other seasonings such as herbs) to the dried surface of a cut of meat or poultry. A wet brine, however, involves submerging and soaking the turkey in salted and seasoned water.
While wet brines are favored because they provide a lot of moisture, they’re often difficult for most people to do from a practical standpoint — it requires a large container that can fit a whole turkey as well as enough fridge space to chill it. A dry brine, though, can be done on a baking sheet and doesn’t require working with large containers or amounts of water.
How To Dry-Brine a Turkey
Nutritional Info
Ingredients
- 3 tablespoons
kosher salt
- 1 1/2 teaspoons
dried herbs, such as thyme, sage, and rosemary, or blend
- 3/4 teaspoon
freshly ground black pepper
- 1
(14-to-16 pound) thawed whole turkey (not kosher or pre-salted)
Equipment
Small bowl
Measuring spoons
Cutting board
Large rimmed baking sheet or roasting pan
Instructions
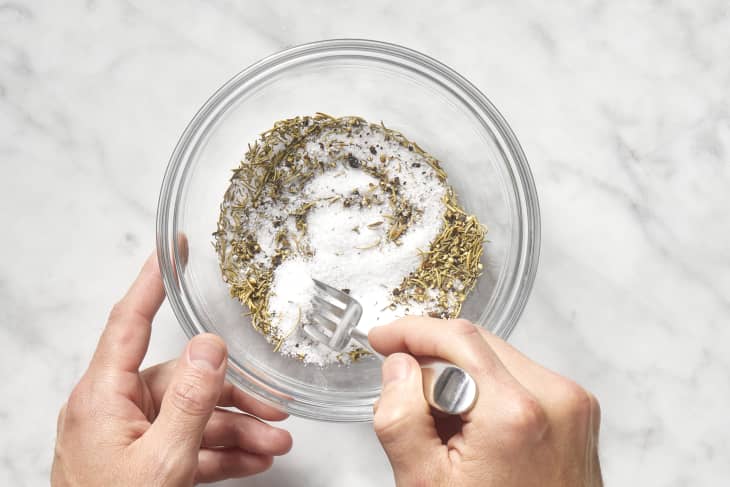
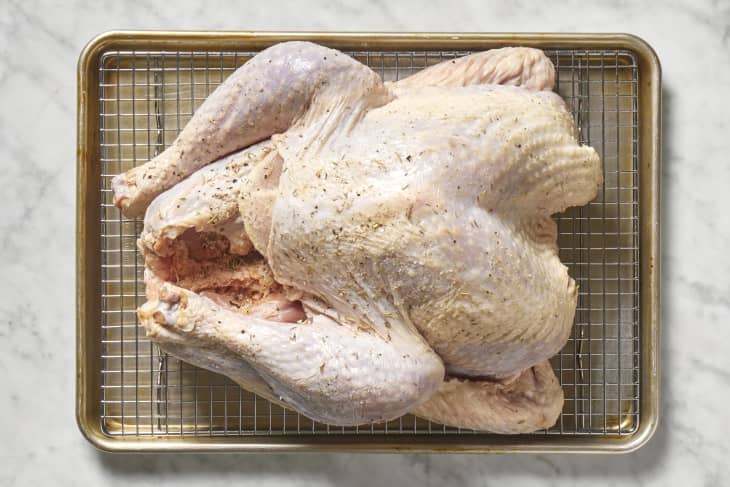
Mix the dry brine together. Mix the salt, pepper, and herbs together in a small bowl.
Remove the turkey from the packaging and remove any unnecessary parts. Take the turkey out of the packaging and place on a cutting board. Remove the giblets and neck from inside the cavity and discard or save for another use. Remove or discard any plastic or metal cages or pop-up thermometers.
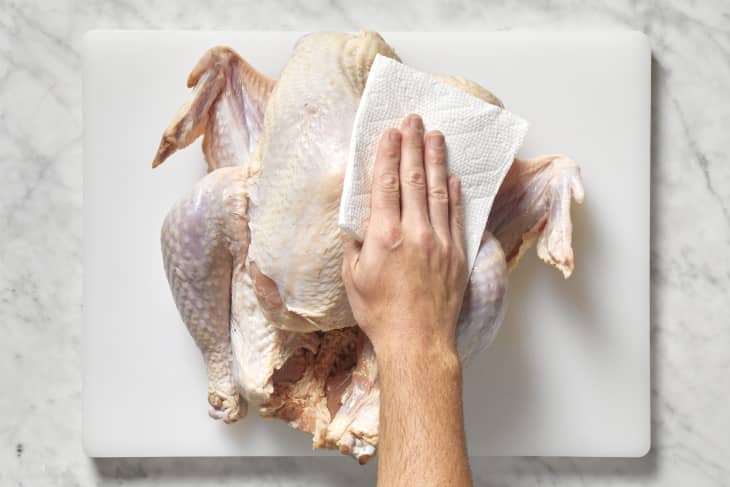
Pat the turkey dry. Pat the outside of the turkey dry with paper towels. (If you are planning to spatchcock your turkey, do it now before you proceed with the next step.)
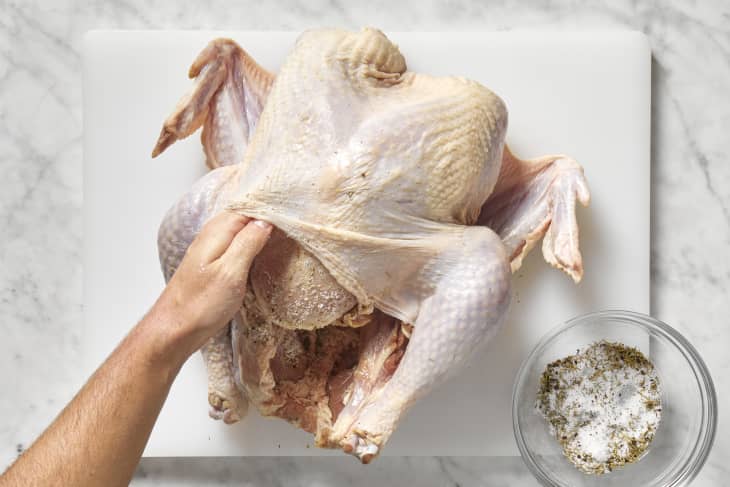
Loosen the skin. Using your hands, loosen the skin over the breast and separate it from the meat, making sure to break through the thin membrane between the skin and breast while leaving the skin itself intact. Loosen the skin over the meaty part of the legs.
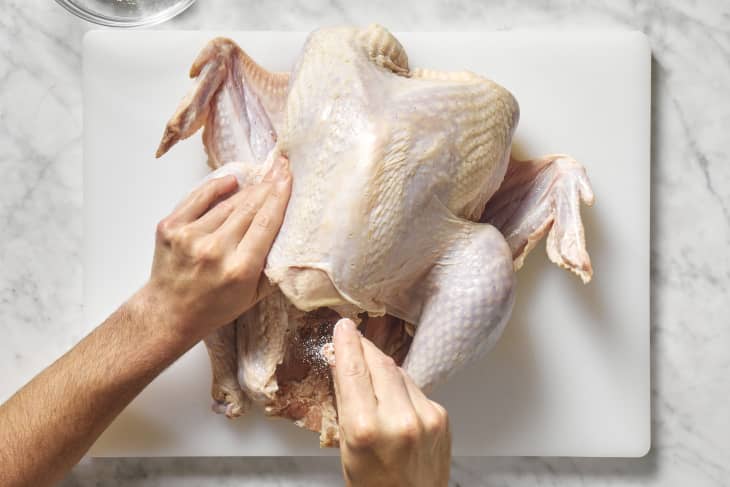
Season the cavity and meat. Sprinkle 2 teaspoons of the salt mixture into the cavity of the turkey. Then, rub another 2 teaspoons of the salt mixture into the meat of the legs (under the skin). Rub 4 teaspoons of the salt mixture into the meat of the breasts (under the skin).
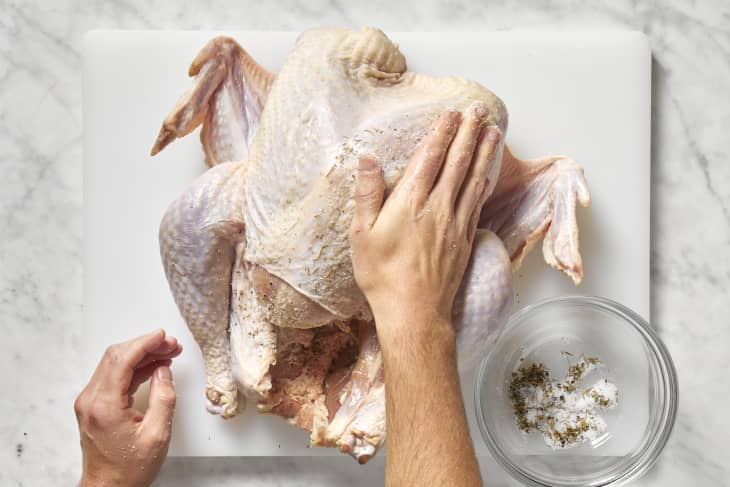
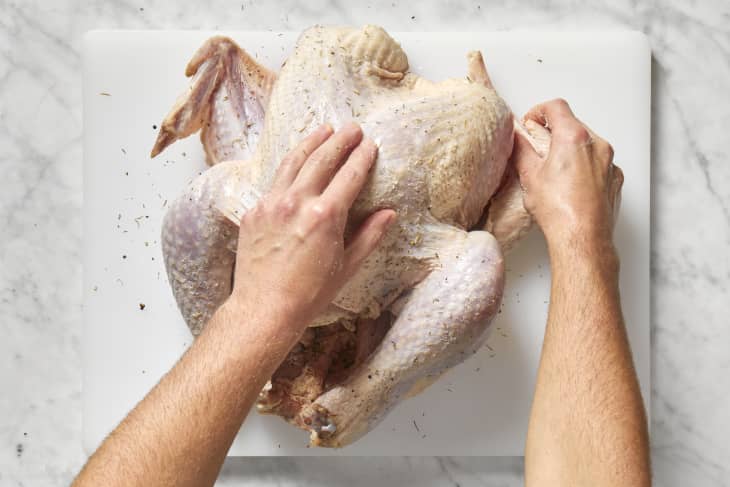
Season the skin. Sprinkle the remaining salt mixture over all the skin of both the breasts and legs.
Tuck the wings back. Bend the wings back and tuck under the breast.
Recipe Notes
You can dry-brine a partially frozen turkey: While I prefer starting with a thawed turkey because you can separate the skin from the meat for more even seasoning, you can dry-brine a frozen turkey. See some tips here.
Type of salt: The type of salt here is very important. I used Diamond Crystal kosher salt, which is coarser than regular table salt. If you only have a fine salt, use half the amount called for.
Brine proportions for a smaller turkey: Turkey sizes vary, so if you have a larger or smaller bird, go by these proportions instead: For every 5 pounds of turkey, you will need 1 tablespoon of kosher salt, 1/2 teaspoon dried herbs, and 1/4 teaspoon black pepper.
Fresh herbs substitution: Instead of dried herbs, you can substitute 1 tablespoon finely chopped fresh herbs (or 1 teaspoon per 5 pounds of turkey).
Other flavoring ideas: While we use a traditional mix of Thanksgiving herbs here, you can substitute with your favorite dried herbs or spices instead. You can also add in a little brown sugar to the dry brine for a touch of sweetness.