
Why Small Batch Canning Is Awesome: And What You Need To Get Started
When I first started canning, I made huge batches of jam. Between the cleaning, peeling and chopping, I’d be dripping with sweat and every inch of my kitchen would be covered in sticky fruit residue. Despite the fact that each jamming session took hours and hours, I did it that way because that’s just how I thought canning was supposed to be.
However, at the end of that first year, I discovered that even after eating jam on a daily basis and giving away many, many jars, I was still swimming in preserves. I knew that I really enjoyed the process of preserving, so giving it up until the first year’s jams were gone wasn’t an option. I needed to find a way for it to take less time and yield smaller amounts.
And so I started tearing down the recipes, dividing the amount of produce required and finding pieces of cookware that worked best with these small batches. I also developed techniques for breaking up the work, so that I could do it when it was most convenient for me without sacrificing anything in freshness.
These days, I do a lot of very small batches. The jams, jellies and chutneys yield just two or three half pints. My small batches of pickles tend to be just a couple pint jars. Canning on this scale means that I get to play with lots of different flavor combinations and varieties of produce without looking like I’m preparing for the end times.
Equipment for Small Batch Canning
There are just two pieces of cookware that I really recommend if want to do these tiny batches.
1. The first is a basic, 12-inch stainless steel skillet.
This is an amazing pan for cooking small batches of jam. The wide base gives the fruit a lot of surface area on which to cook and the sloped sides encourage evaporation. Four cups of combined fruit and sugar take just seven or eight minutes to cook to a jammy consistency in a wide skillet.
Stainless steel is the best material because it won’t leach metallic flavors into your jam (cast iron and aluminum can give jam a tinny taste) and it is durable enough for you to cook at high temperatures (something that’s not recommended for non-stick cookware).
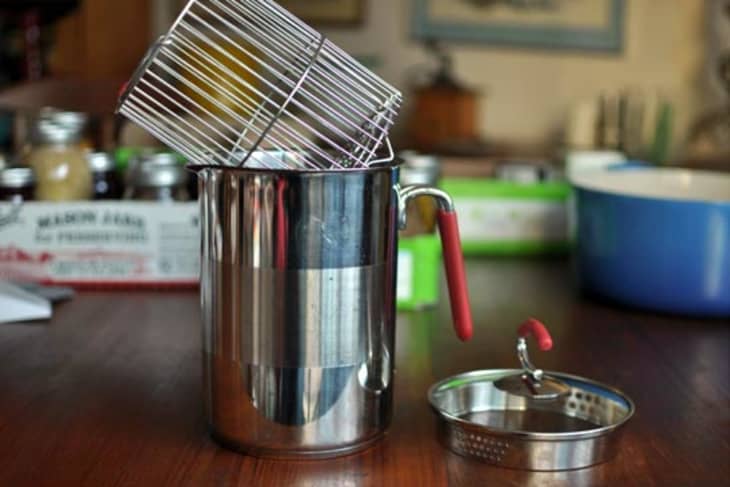
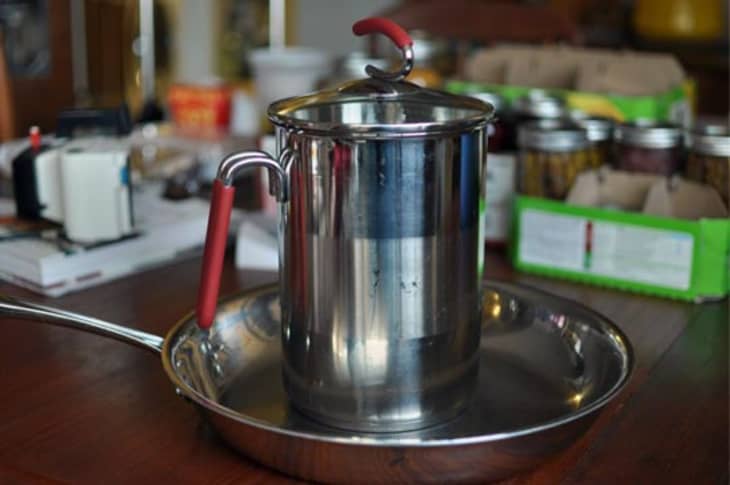
2. The second piece of cookware that makes for easy small batches is a tall, skinny pot, preferably fitted with a rack.
Asparagus pots do the job nicely, but my favorite is one called the 4th burner pot. It’s made by Kuhn Rikon and works well as either a processing pot (you can fit either two wide mouth half pints or three Collection Elite half pint jars in it) or as a pot for heating up pickling liquid. Thanks to the pour spout and coated handle, you can heat the vinegar in it and the pour directly into prepared jars. I am ridiculously fond of this little pot. (Read more about the Kuhn Rikon 4th burner pot here.)
I’ll be back next week with a recipe for a small batch strawberry jam with honey and thyme. If you can’t wait until then to try out small batch canning, make sure to check out the recipes on my site under the category “Urban Preserving.”
More Food In Jars
• Visit Food in Jars, Marisa’s blog
• Find Food in Jars: Preserving in Small Batches Year-Round, Marisa’ new book, at your local library, independent bookstore, or on Amazon.com
Marisa McClellan is our guest feature writer for June. She is a food writer, canning teacher, and dedicated farmers’ market shopper who lives in Center City Philadelphia with her husband Scott McNulty. She’s the author of the blog Food in Jars and spends most of her days cooking up jams, fruit butters and pickles in her 80 square foot kitchen. Food in Jars: Preserving in Small Batches All Year Long is her very first cookbook.
(Images: Marisa McClellan)