
Cake Pops by Bakerella: Yummy Mummies Cake Pops

Cake Pops by Bakerella (Angie Dudley)
Bakerella has been creating cake pops, cupcake pops, and other sweetly amazing treats for a long time now. Her beautifully detailed treats and lovely photos quickly earned her a huge following, some TV appearances, and a book deal. And the book itself really does not disappoint. Even if you have been following Bakerella for a long time, you may want this book. It presents all the basics of cake pops along with fun decorating tips in one hardback, spiral-bound book. It’s nicely done, and beautifully photographed.
Yes, cake pops are a narrow topic, but the topic is thoroughly explored in this little book. It also has a really great visual index (see not martha’s review for more on this and some other inside page shots). It has details on all the props, tools, and decorative bits that Dudley uses to create her cake pops, and it manages to make even the most elaborate cake pop feel accessible. This isn’t a Martha-style set of projects — beautiful yet out of reach. These look like they each could be achieved in a real kitchen.
If you are not a fan of cake pops, then this probably isn’t the book for you. But if you are, and if you love Bakerella’s cute and colorful style, pick this one up. It’s a visual treat and well-organized for achieving just the same results in your own kitchen.
• Get the book: Cake Pops: Tips, Tricks, and Recipes for More Than 40 Irresistible Mini Treats by Bakerella (Angie Dudley), published September 2010 by Chronicle Books. $11.97 at Amazon.
• Bakerella – The blog that started the cake pop craze!
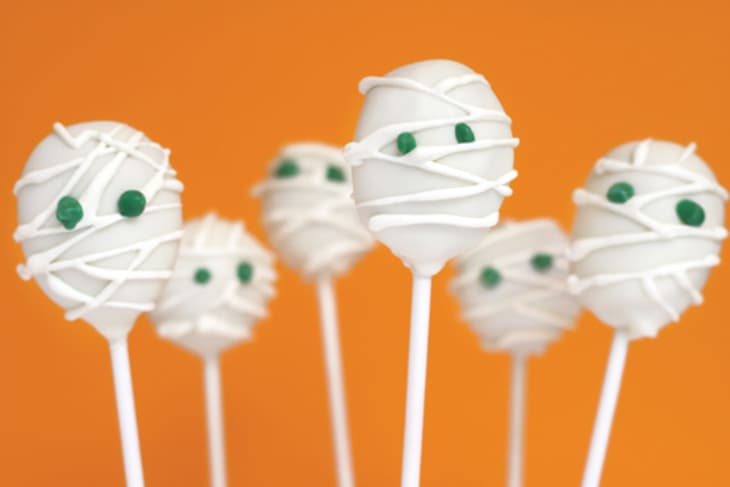
Yummy Mummies Cake Pops Recipe
Yummy Mummies
Use a squeeze bottle to pipe on white candy coating for easy mummy faces.
You’ll need:
48 uncoated Basic Cake Balls (please see separate recipe), formed into oval shapes
64 ounces (4 pounds) white candy coating
Deep, microwave-safe plastic bowl
48 paper lollipop sticks
Styrofoam block
Large squeeze bottle
Green candy writer
To decorate:
Have the oval cake balls chilled and in the refrigerator.
Melt the white candy coating in a microwave-safe plastic bowl, following the instructions on the package. The coating should be about 3 inches deep for easier dipping. (I usually work with about 16 ounces of coating at a time.)
When you are ready to dip, remove a few cake balls from the refrigerator at a time, keeping the rest chilled.
One at a time, dip about 1/2 inch of the tip of a lollipop stick into the melted candy coating, and insert the stick straight into the bottom of an oval-shaped cake ball, pushing it no more than halfway through. Dip the cake pop into the melted coating, and tap off any excess coating: Hold the pop over the bowl in one hand, and tap your wrist gently with your other hand. If you use the hand holding the cake pop to shake off excess coating, the force of the movement will be too strong and could cause the cake ball to loosen or fly off the lollipop stick. Tapping the wrist holding the cake pop absorbs some of the impact. The excess coating will fall off, but you will need to rotate the lollipop stick so the coating doesn’t build up on one side, making it too heavy on that side. If too much coating starts to build up at the base of the stick, simply use your finger to wipe it off, spinning the lollipop stick at the same time. This can happen if the coating is too thin or too hot. It’s not as hard as it sounds; it just takes a little practice.
Let dry completely in a Styrofoam block.
Pour the remaining melted white coating into a plastic squeeze bottle and pipe lines across the front of each mummy face. Let dry completely in the Styrofoam block.
Use a green candy writer to pipe two dots of dark green candy coating on the front of each cake pop for the eyes.
Let dry completely.
Basic Cake Balls
Cake balls are bite-sized balls made of crumbled cake mixed with frosting and covered in candy coating. They are super-easy to make and form the basis of endless variations of decorated cake pops, cupcake pops, and cake bites.
You’ll need
18.25-ounce box cake mix
9-by-13-inch cake pan
Large mixing bowl
One 16-ounce container ready-made frosting
Large metal spoon
Wax paper
2 baking sheets
Plastic wrap
32 ounces (2 pounds) candy coating
Deep, microwave-safe plastic bowl
Toothpicks
Resealable plastic bag or squeeze bottle (optional)
Bake the cake as directed on the box, using a 9-by-13-inch cake pan. Let cool completely.
Once the cake is cooled, get organized and set aside plenty of time (at least an hour) to crumble, roll, and dip 4 dozen cake balls.
Crumble the cooled cake into a large mixing bowl. The texture of the cake causes it to crumble easily. Just cut a baked 9-by-13-inch cake into 4 equal sections. Remove a section from the pan, break it in half, and rub the two pieces together over a large bowl, making sure to crumble any large pieces that fall off. You can also use a fork to break any larger pieces of cake apart. Repeat with each section until the entire cake is crumbled into a fine texture. If you have large pieces mixed in, the cake balls may turn out lumpy and bumpy. You should not see any large pieces of cake.
Add three-quarters of the container of frosting. (You will not need the remaining frosting.) Mix it into the crumbled cake, using the back of a large metal spoon, until thoroughly combined. If you use the entire container, the cake balls will be too moist.
The mixture should be moist enough to roll into 1 1/2-inch balls and still hold a round shape. After rolling the cake balls by hand, place them on a wax paper–covered baking sheet.
Cover with plastic wrap and chill for several hours in the refrigerator, or place in the freezer for about 15 minutes. You want the balls to be firm but not frozen.
If you’re making a project that calls for uncoated cake balls, stop here and proceed to decorate the cake balls, following the project instructions.
Place the candy coating in a deep, microwave-safe plastic bowl. These bowls make it easier to cover the cake balls completely with candy coating while holding the bowl without burning your fingers. (I usually work with about 16 ounces of coating at a time.)
Melt the candy coating, following the instructions on the package. Microwave on medium power for 30 seconds at a time, stirring with a spoon in between. You can also use a double boiler. Either way, make sure you do not overheat the coating.
Now you’re ready to coat. Take a few cake balls at a time out of the refrigerator or freezer to work with. If they’re in the freezer, transfer the rest of the balls to the refrigerator at this point, so they stay firm but do not freeze.
Place one ball at a time into the bowl of candy coating. Spoon extra coating over any uncoated areas of the cake ball to make sure it is completely covered in candy coating. Then lift out the cake ball with your spoon. Avoid stirring it in the coating, because cake crumbs can fall off into the coating.
Holding the spoon over the bowl, tap the handle of the spoon several times on the edge of the bowl until the excess coating falls off and back into the bowl. This technique also creates a smooth surface on the outside of the cake ball.
Transfer the coated cake ball to another wax paper–covered baking sheet to dry. Let the coated cake ball slide right off the spoon. Some coating may pool around the base of the ball onto the wax paper. If so, simply take a toothpick and use it to draw a line around the base of the cake ball before the coating sets. Once the coating sets, you can break off any unwanted coating.
Repeat with the remaining cake balls and let dry completely.
If you have extra candy coating left over, pour it into a resealable plastic bag (and then snip off the corner) or into a squeeze bottle and drizzle it over the tops in a zigzag motion to decorate.
You can make the cake balls ahead of time and store them in an airtight container on the counter or in the refrigerator for several days.
Makes 48 cake balls
Tips
The cake balls will be easier to roll if you wash and dry your hands periodically during the rolling process. Dry your hands completely each time, and make sure you don’t get water in the candy coating, as it can make it unusable.
You can use a mini ice cream scoop to get uniform-size cake balls.
If you don’t need or want to make 48 cake balls, simply divide the cake in half for 24 cake balls or in quarters for 12 and freeze the remaining cake for later use. Remember to reduce the amount of frosting proportionally.
Related: How To Make Cake Pops
(Images and recipe reprinted by permission of Chronicle Books)