
We Tried 6 Methods for Breading Chicken and the Winner Was Crispy, Crunchy Perfection
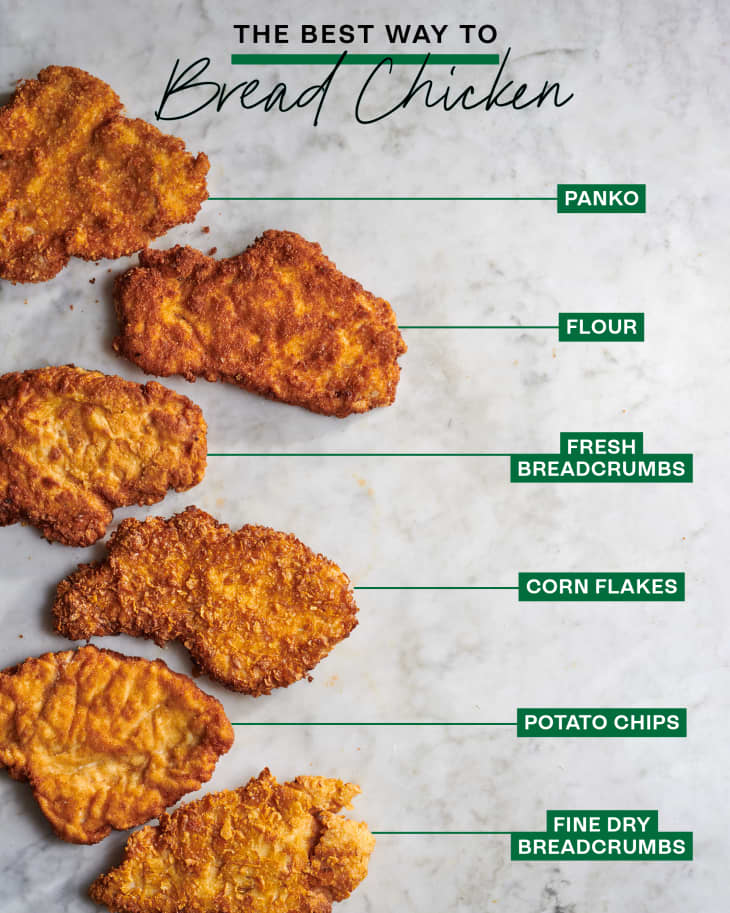
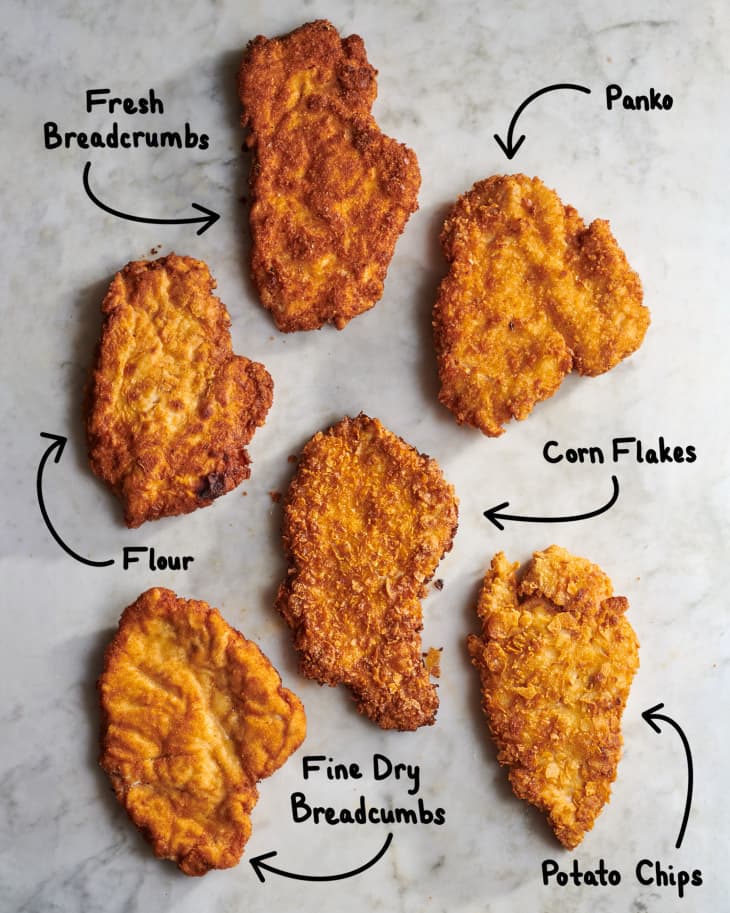
Breaded chicken breasts are a versatile option to have in your cooking repertoire. They can stand on their own as an entrée, serve as the beginnings of chicken Parmesan, go on top of a leafy salad, or get tucked into a bun for a killer chicken sandwich. Breading options abound — all-purpose flour, panko, potato chips, and more — so which method should you go with?
To find out, I tried six different type of breading to see which ones worked best. But how to define “best”? These kinds of tests are always subjective, but for me it wasn’t necessarily about how crispy, crunchy, delicate, or hearty the breading was but more about how well each breading method worked for what it was. A flour-coated breast is never going to be as crunchy as a corn flake–crusted one, but it might still be just as good. I felt like my job was to judge how well each method held up for what it was supposed to be. Did the breading stay on the chicken? Did it have a pleasing, non-greasy texture? Did it brown evenly? Did it keep the chicken juicy and moist? (The answer to the last question was a resounding yes with every method I tested.) Some methods definitely rose to the top, while a couple of others just didn’t hold up.
So What Is the Best Way to Bread Chicken?
In the end, my favorite way to bread chicken was panko breadcrumbs, but there were many other delicious breading options. Read on for all the details.
A Few Notes About Methodology
Chicken: I purchased air-chilled chicken breasts that had not been enhanced or plumped with any sort of brine. Each breast weighed six ounces (if they weighed more, I trimmed them to that weight), and I lightly pounded each breast to an even 3/4-inch thickness. I cooked two breasts for each method to ensure consistent results.
Seasonings: I standardized as many variables as I could, starting with equal-sized chicken breasts (noted above) that I lightly seasoned with a pinch each of salt and pepper. Each breading option was seasoned with 1/2 teaspoon each of kosher salt, paprika, and garlic powder, plus 1/4 teaspoon black pepper.
Breading process: Each method followed the same three-step breading process: Coat the lightly seasoned chicken in all-purpose flour, dip in beaten egg, and dredge in the breading ingredient being tested (the amount of breading is specified for each method).
Cooking: I cooked each batch in the same pan — an All-Clad nonstick skillet — in 1/4 inch of canola oil over medium heat for 5 minutes on each side.
Time: The time indicated includes the cooking time and the prep time for the breading method being tested. It does not include the time spent trimming and pounding the chicken.
Ratings: Each method is rated on a scale of 1 to 10, with 10 representing perfection. The ideal outcome was a non-greasy coating that adhered well to the chicken.
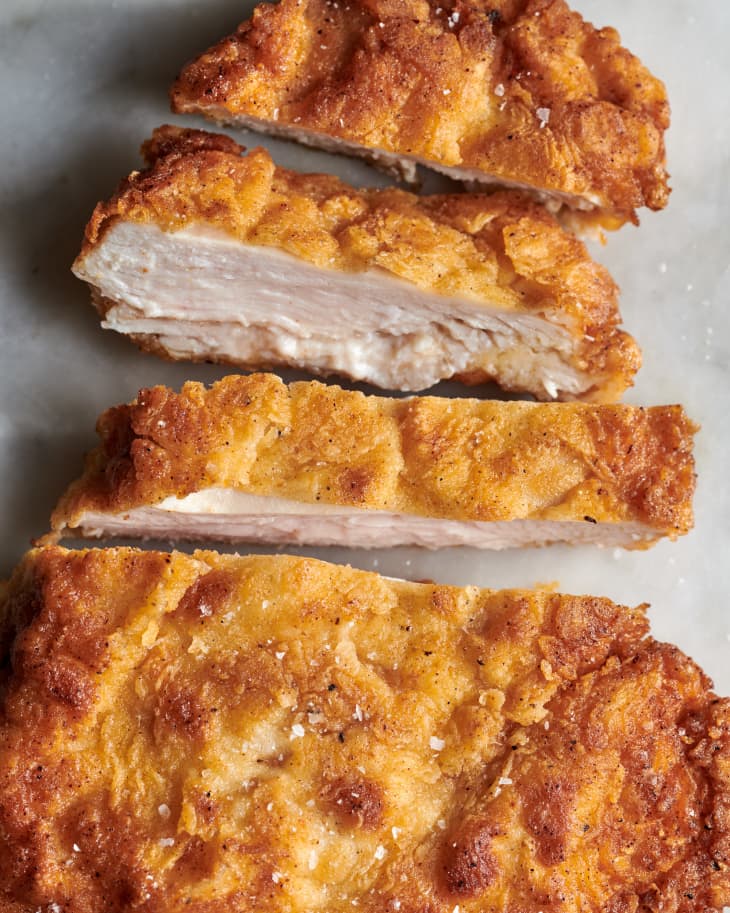
Chicken Breading Method: Potato Chips
- Total time: 13 minutes
- Amount of breading needed for 2 breasts: 1 cup crushed chips (3 cups whole)
- Rating: 5/10
About this method: I used plain (salted but not flavored) kettle-style potato chips that I crushed by hand into small pieces about the size of instant mashed potato flakes. I then seasoned them as described above in the methodology notes. After dredging each chicken breast in flour and dipping in egg, I dredged in the crushed chips (pressing down gently to help the chips adhere), and then cooked as detailed above.
Results: The chicken stayed moist and juicy, but the breading was lackluster. I had hoped that more potato flavor would come through, but it was lost. The crust was thick, hearty, craggy, and quite crunchy overall, but it was a bit tough and just felt too oily (this method is no doubt better suited to baking than pan-frying). In a few spots, the crust was soggy.
Chicken Breading Method: Fine Dry Breadcrumbs
- Total time: 11 minutes
- Amount of breading needed for 2 breasts: 1/2 cup
- Rating: 6/10
About this method: I went with plain dry breadcrumbs — the kind that come in a cardboard tube — and seasoned them myself as described instead of using pre-seasoned crumbs. I dredged each chicken breast in flour, dipped in egg, and dredged in the breadcrumb mixture, which adhered easily without my having to pat it onto the chicken.
Results: The breading cooked to a rich brown color, but it tended to buckle away from the chicken in places when I sliced the breasts. The texture of the breading was not particularly crispy or crunchy, but it wasn’t soggy, either. It was just sort of … there. There was a slight musty/dusty flavor to the breading, which my kids (teenage twin boys) didn’t detect, but my husband and I definitely did.
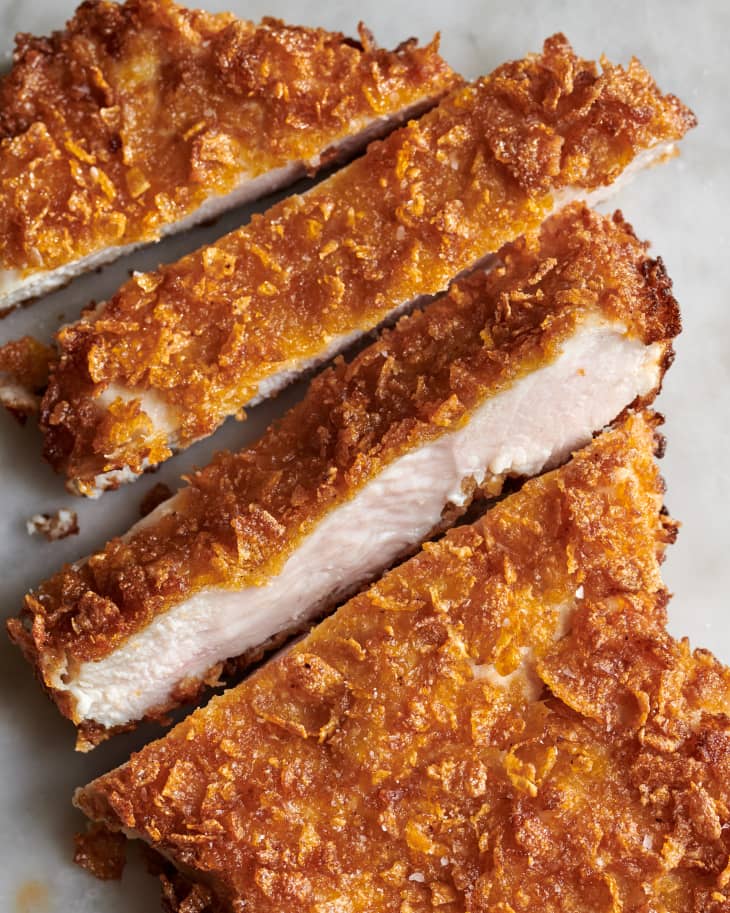
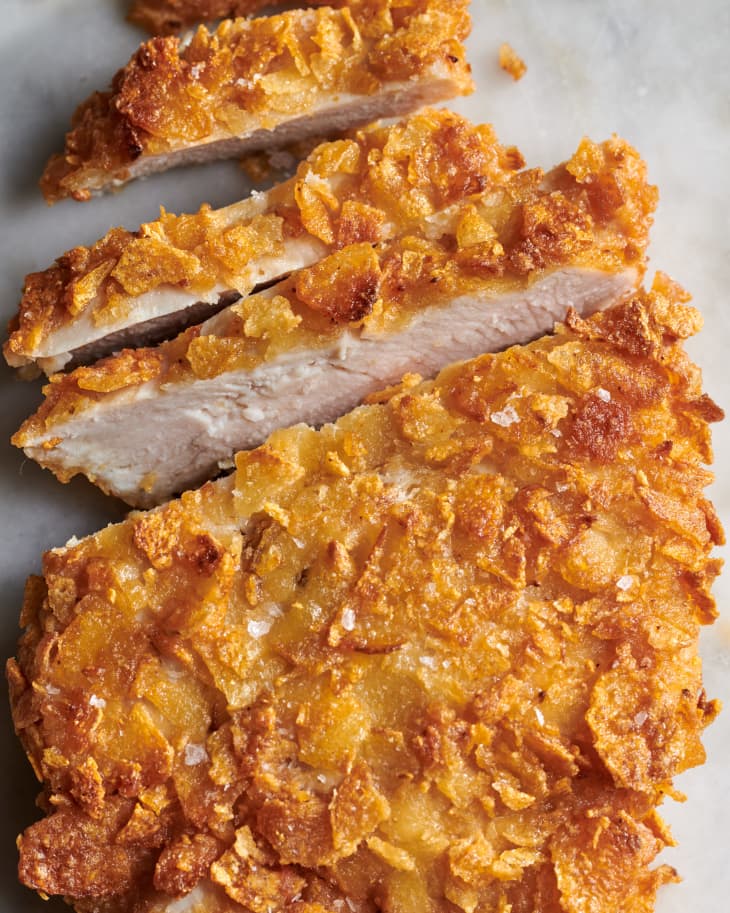
Chicken Breading Method: Corn Flakes
- Total time: 13 minutes
- Amount of breading needed for 2 breasts: 1 cup crushed flakes (3 cups whole)
- Rating: 7/10
About this method: As with the potato chip breading, I used my hands to crush the cereal into small flakes and then seasoned them the same way as the other breading methods. The flour-egg-coated chicken then went into the corn flake crumbs, which I pressed on lightly to help them adhere.
Results: The breading produced a thick, crunchy crust that was just beautiful — a gorgeous burnished brown. When I sliced the chicken, the crust slid off in a few places but stayed put over most of the breasts. The cereal crumbs had a pronounced corn flavor, with that bit of malty sweetness from the added sugar and malt flavoring in the cereal. I found this to be a little off-putting, but if you like a bit of sweetness, this method might be your match.
Chicken Breading Method: Flour
- Total time: 11 minutes
- Amount of breading needed for 2 breasts: 1/2 cup
- Rating: 7.5/10
About this method: Each chicken breast was dredged in flour and egg, then coated in all-purpose flour seasoned as detailed above. Because the flour is so finely textured, it coated well and evenly without any assistance from me (I didn’t have to pat the flour on to get it to stick).
Results: The chicken had the slightest whisper of a crust — a thin layer with a hint of crisping. Perhaps more importantly, though, it had a similar flavor to what you get in traditional fried chicken or a roux: that deep, savory taste from flour browned in fat. If you’re not looking for a hearty, crunchy crust, this method is ideal.
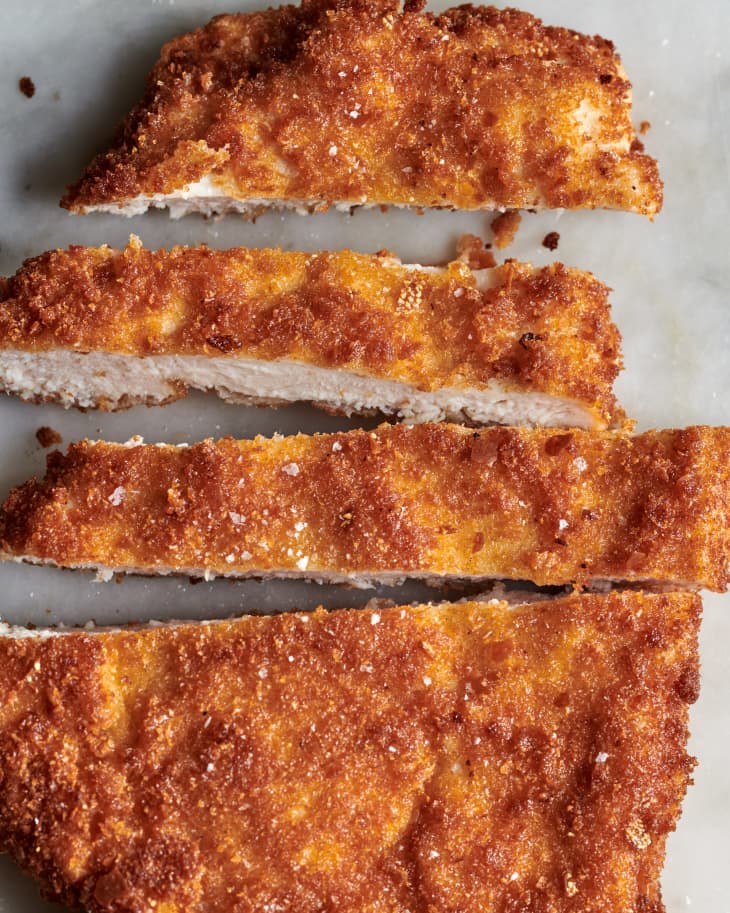
Chicken Breading Method: Fresh Breadcrumbs
- Total time: 18 minutes
- Amount of breading needed for 2 breasts: 2 cups (about 6 slices white sandwich bread with the crusts removed)
- Rating: 8/10
About this method: This method started with my making fresh breadcrumbs by pulsing torn bread in a food processor. I then dried them out using a clever method I found from Food Network: Spread the crumbs onto a microwave-safe plate and microwave on high until dry to the touch; I did 2 batches at 1 1/2 minutes per batch. The “stale” breadcrumbs then got the same seasoning as the other methods, and I had to pat it onto the floured, egg-dipped chicken to get it to adhere well.
Results: This breading browned more deeply than any other method. The crust was fantastically fluffy and crisp (as opposed to hearty and crunchy). While the crust was thick, because it had some fluffiness to it, it felt more delicate than some of the other methods. What prevented this method from getting a higher rating was that the breadcrumbs absorbed a good bit of oil and felt a little heavy — but overall this method produced strong results.
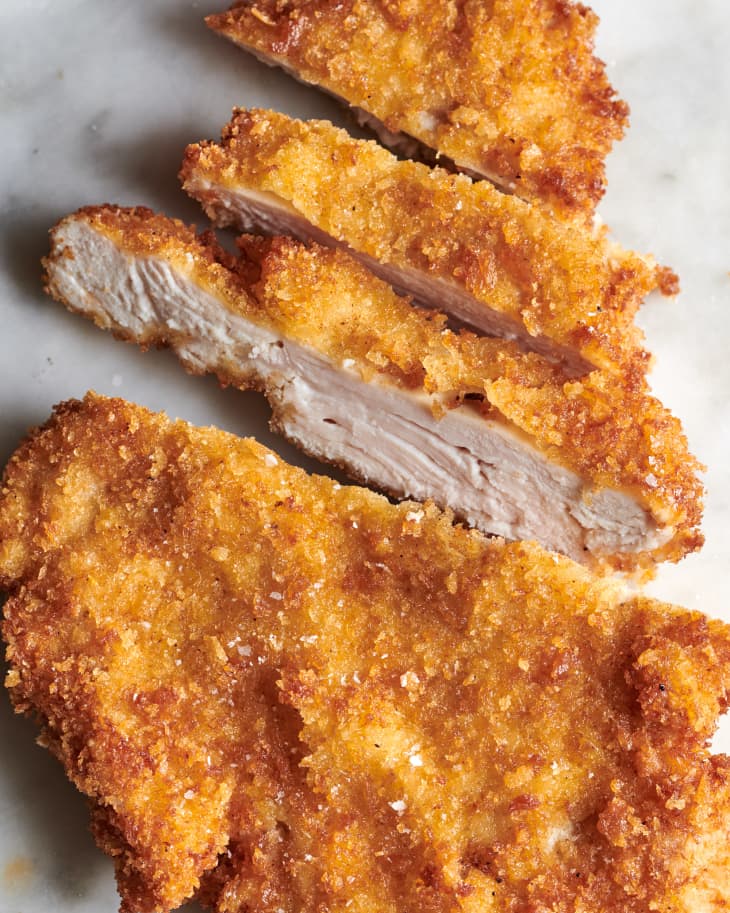
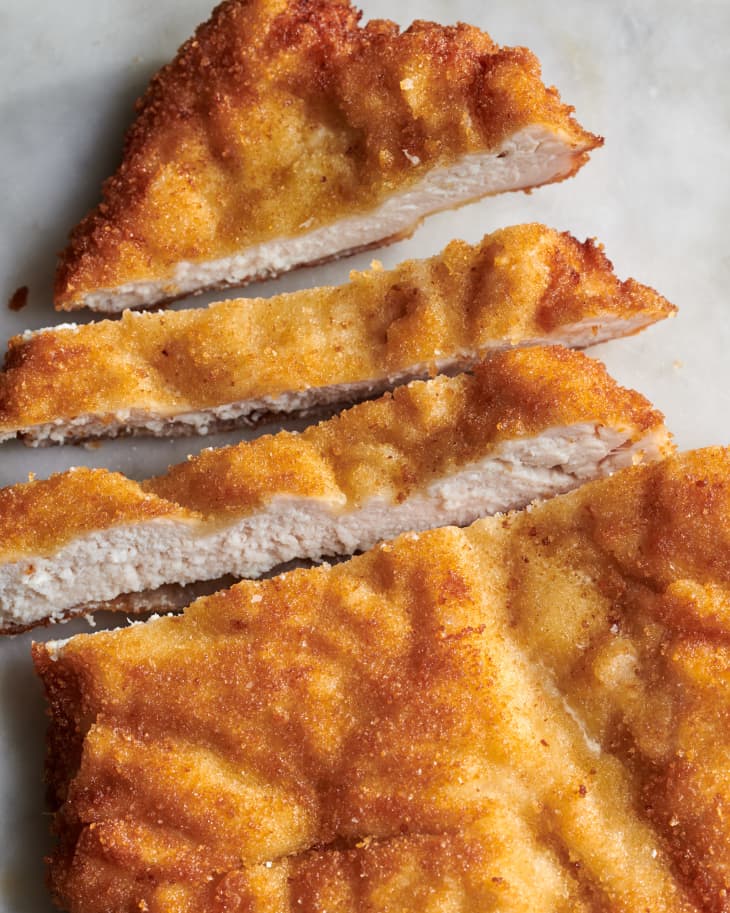
Breaded Chicken Method: Panko Breadcrumbs
- Total time: 11 minutes
- Amount of breading needed for 2 breasts: 1 cup
- Rating: 10/10
About this method: I simply shook the panko out of the container into a measuring cup, poured it onto a plate, and mixed with the seasonings. I had to pat the panko onto the floured and egg-drenched chicken to get it to adhere well.
Results: This method definitely produced the most alluring crust of all. It was a beautiful golden-brown color and had the kind of texture that makes you want to drag a fork across the surface for the sound effect. While the crust was incredibly crunchy and hearty, since the panko particles are small and individuated, it somehow also felt crisp and delicate at the same time. After slicing the breasts, the breading stayed intact on each piece — and I could hear that wonderful crunch with each bite I took.
Final Thoughts
While the potato chips and dry breadcrumbs weren’t my cup of tea, the other methods all fared quite well and can suit your own individual taste. If you like a little sweetness, try corn flakes. Not looking for a robust, hearty crust? Go with good ol’ flour. For a thicker, softer crust, try the fresh breadcrumbs (you’ll get a kick out of the microwave-drying trick). And to get your super-crunch on, you can’t beat panko.