
I Tried Cooking a Steak in 3 Cups of Oil, Because TikTok Said So
Not so long ago, many cookbooks didn’t include images because publishers assumed readers had sufficient-enough cooking skills. Now, the pendulum has swung to the other extreme. Many TikTok cooking videos are all about the visuals, but viewers still need sufficient cooking skills to make whatever they’re seeing. At least that’s the case with the latest viral TikTok video I saw about poaching a steak in oil at a low oven temp before searing it just before serving (which is basically a reverse-sear technique I’ve been raving about for years).
The best part of this steak video is that it might introduce more cooks to the game-changing, ingenious method of reverse-searing — but there are less oily ways to go about it. Let me explain.
@meatlikemike Anyone try this method to cook steak? ##confit ##homecook ##steaktok
♬ original sound – Meat Like Mike
How to Oil-Poach and Reverse-Sear a Steak
This TikTok technique for cooking steak isn’t hard, but it does take time — even if most of that time is hands-off. Basically, you submerge a steak in oil and poach it in the oven until it reaches an internal temperature of 120°F, and then sear it just before serving. Here’s my step-by-step breakdown of the video.
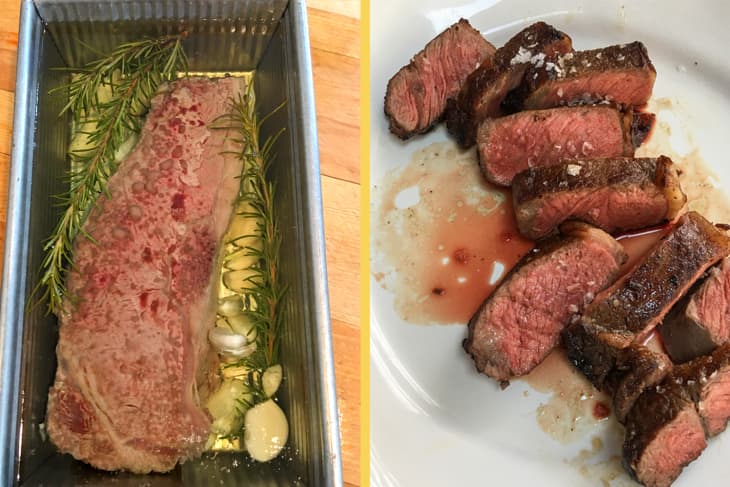
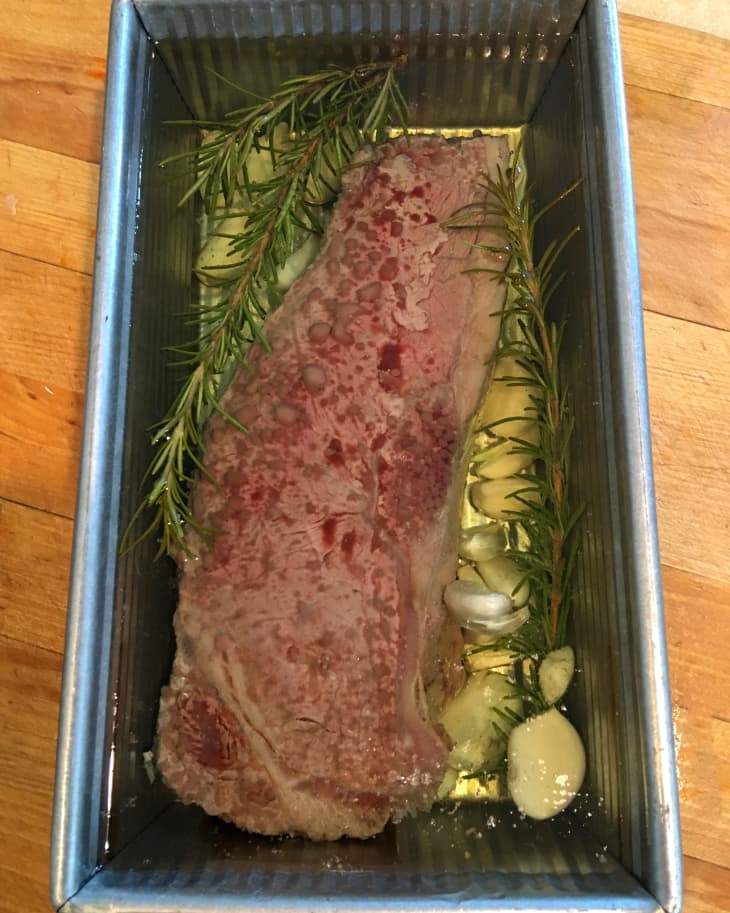
- Place a high-quality steak, a handful of peeled garlic cloves, and rosemary sprigs in a loaf pan. He used a prime steak, which I couldn’t find, so I used a choice strip steak.
- Pour in enough oil to submerge all the ingredients.
- Bake the steak in a low oven until the steak reaches 120ºF in the center.
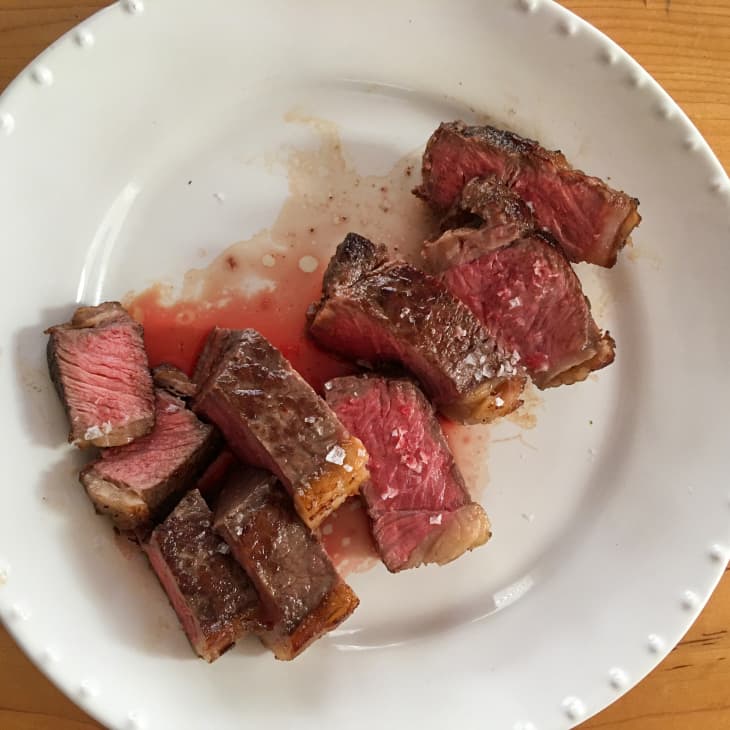
- Use tongs to lift the steak out of the oil and transfer to a hot skillet to sear for 30 seconds on all sides.
- Transfer to a plate, slice, and sprinkle with coarse salt.
The video omitted crucial details, which I figured out on my own and will share with you.
- He doesn’t say how much garlic or rosemary, but I based on what I saw and used a whole head of garlic and two rosemary springs. Turns out that the steak doesn’t pick up any of that flavor anyhow, so I could have skipped it.
- He doesn’t say what kind of oil, but knowing that a high-temp sear was coming, I used peanut oil because it has a high smoke point. It took 3 cups of oil to submerge one steak in a loaf pan.
- He doesn’t say what he means by a “low oven.” Since I’ve tested reverse-seared steaks in the past, I knew the recommended range is usually 200°F to 275°F. When dry-roasting steaks I usually opt for 250°F, but just in case the oil changed anything, I compared 200°F, 225°F, 250°F, and 275°F — with 200°F being the best of the bunch. It took my steak, pulled straight from the fridge, 45 minutes to reach that internal temperature.
- He says to sear the steak for 30 seconds per side and edge. That’s just not long enough for a sear. It’ll take at least 60 seconds per surface.
My Honest Review of the Tik Tok Oil-Poached, Reverse-Seared Steak
I’ve cooked a lot of steaks in my day, both for my dinner table and for my job. I came into this already believing that the reverse-searing technique is the best way to cook a steak, indoors or out.
The video implies that poaching the steak in oil is superior to the usual dry-roasting step. I found that it was instead an impediment to the process. The worst problems with the oil bath are the following, in escalating order of alarm and regret:
- It’s hard to check internal temperature. Cooking a steak in a loaf pan of oil makes it very difficult to check its internal temperature, and accuracy is integral to reverse searing. I learned that I needed to lift the steak out of the oil and insert the probe through one end of the steak instead of down from the top, making sure it reaches the center of the meat. This is messy, drippy work, but warranted. I was getting false, too-low readings when I was inserting the probe through all that oil into the top or tip of the steak, winding up with meat that was essentially raw instead of rare. You’ll need to use tongs with a good grip to wrangle the slippery steak that will try to get away, splashing back into the pan full of warm oil. I had to get out my mop.
- The video doesn’t show blotting the steak before searing, but it’s necessary. The oil-poaching causes blood and other proteins to form in taupe-colored globs on the outside of the steak, and you are going to want to wipe that away so that it doesn’t create a mottled sear and leave a gamey taste. Beyond that, a slick of surface oil can make the steak taste fried instead of seared.
- As the TikTok guy admits, you can’t salt the steak if you submerge it in oil. This is the deal-breaker for me. An under-seasoned steak offends all of our taste expectations. One of the glories of salting a steak and letting it rest uncovered in the fridge overnight (essentially dry-brining) before it’s cooked is that the meat winds up deeply, deliciously seasoned throughout, plus it makes the surface of the steak dry, which is key to a great sear. Even though his recommended final sprinkle of crunchy salt flakes were nice, they couldn’t make up for inadequate seasoning during the cooking.
8 Tips for Making the TikTok Oil-Poached Reverse-Seared Steak at Home
- Read up on how and why to reverse-sear a steak. It’s a brilliant technique based on food science and tastes tests that you’ll use for years. But then don’t poach the steak in oil, opting instead for the usual dry-roasting first step. All that oil (not to mention all that wasted garlic and rosemary) added nothing but mess and expense to an otherwise great technique. But if you’d like to see for yourself, read on.
- Don’t attempt this (or any) reverse-sear technique without a reliable instant-read thermometer. Cooking a perfect steak is a game not of inches, but of degrees. A narrow range of only 5 to 10 degrees can determine whether your steak will turn out raw, gray, or just right. I’m a big fan of a Thermapen for its long, slender, sharp probe and easy-to-read digital face.
- Calculate the internal temp to your doneness preference. The video advises an internal temp of only 120°F, which results in a very rare steak, even after the additional cooking from the sear. If you prefer steak that is medium-rare or medium, pull the steak from the oven when it is 10 to 15 degrees lower than your desired serving temperature. There’s no need to let a reverse-seared steak rest before serving, so you’ll get no additional cooking from carry-over heat.
- Use a thick steak, preferably 2 inches. A great sear on both sides and the edges in a heavy skillet is imperative to flavor, but thin steaks might overcook. Plus, it’s difficult to insert the thermometer probe into a thin steak and get an accurate reading. Heck, it’s really hard to get an accurate reading on a steak of any size when it’s sunk down in all that oil.
- Use one loaf pan per steak. I now understand why the TikTok guy chose a deep-sided loaf pan and put only one steak in it. Other than my loaf pans and the roasting pan I use for big birds, none of my bakeware was deep enough. (And if I’d used that roasting pan, I would have needed at least a gallon jug of oil.) I placed each steak I tested in its own loaf pan.
- Blot the steak dry after removing it from the oil. Make the steak as clean and dry as possible before searing.
- Use a large, sturdy skillet — preferably cast iron or carbon steel, and never nonstick. Make sure the skillet is screaming-hot before you add the meat. A sprinkle of water drops should turn white and evaporate away immediately. Crowding interferes with the sear, so if you need to sear multiple steaks, consider doing them one at a time.
- Embrace the salt. I found that no amount of salt sprinkled on the cooked steak could compensate for a lack of proper seasoning during cooking, although the chunky grains of a great finishing salt did add pleasing crunch. I wound up placing grains of Maldon on each bite as though gluing sequins to a craft project. All that salt added up to too much, but still tasted like too little, too late.