
Smitten Kitchen’s Twist on Cinnamon Buns Is Honestly Brilliant (I Still Can’t Believe the Results)
While I grew up popping open tubes of canned cinnamon buns, I’m now firmly in the made-from-scratch camp. And although I already have a go-to recipe — which I look for just about any excuse to make — I’m always intrigued when I come across new approaches.
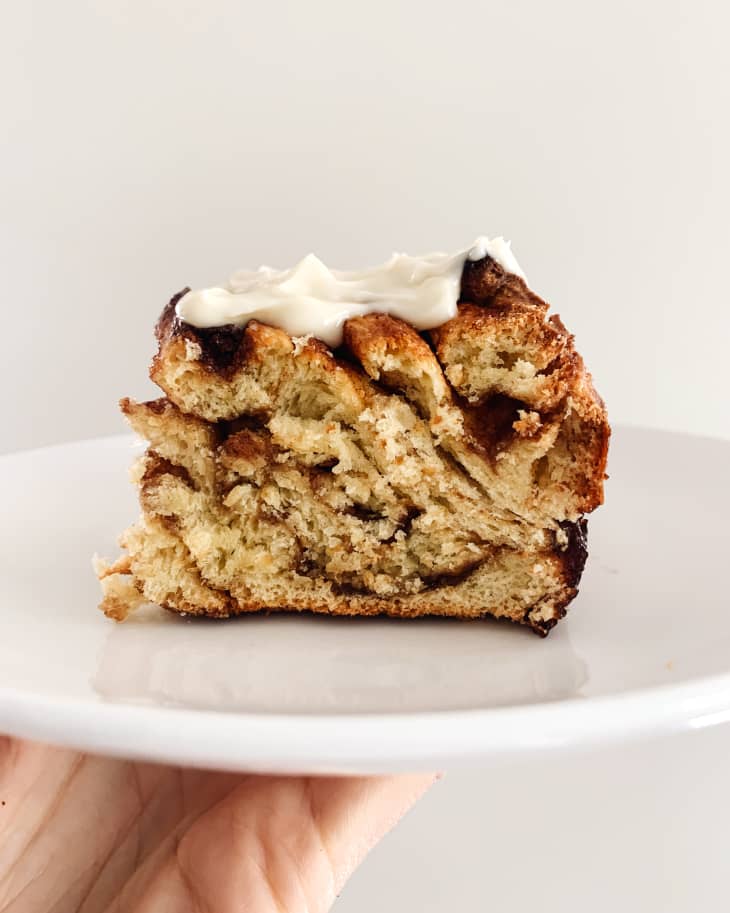
Enter: Smitten Kitchen’s eye-catching Twisty Cinnamon Buns. Instead of round buns, the layers of cinnamon sugar are exposed, twisted, and baked together, leaving you with a babka-like iteration of the classic morning sweet. The whole thing is then cut into squares and individually frosted. I had no choice but to give it a try.
Get the recipe: Smitten Kitchen’s Twisty Cinnamon Buns
How to Make Smitten Kitchen’s Twisty Cinnamon Buns
You’ll start by making the dough, which is a simple mix of flour, instant yeast, sugar, salt, butter, eggs, and milk. Deb warns that the dough will be much wetter than other enriched doughs, but that its stickiness is intentional. Once you get the sticky dough into a smooth, cohesive ball, you’ll drop it into an oiled bowl, cover with plastic wrap, and either let it rise at room temperature for a couple of hours until doubled in size, or let it rise slowly in the refrigerator overnight.
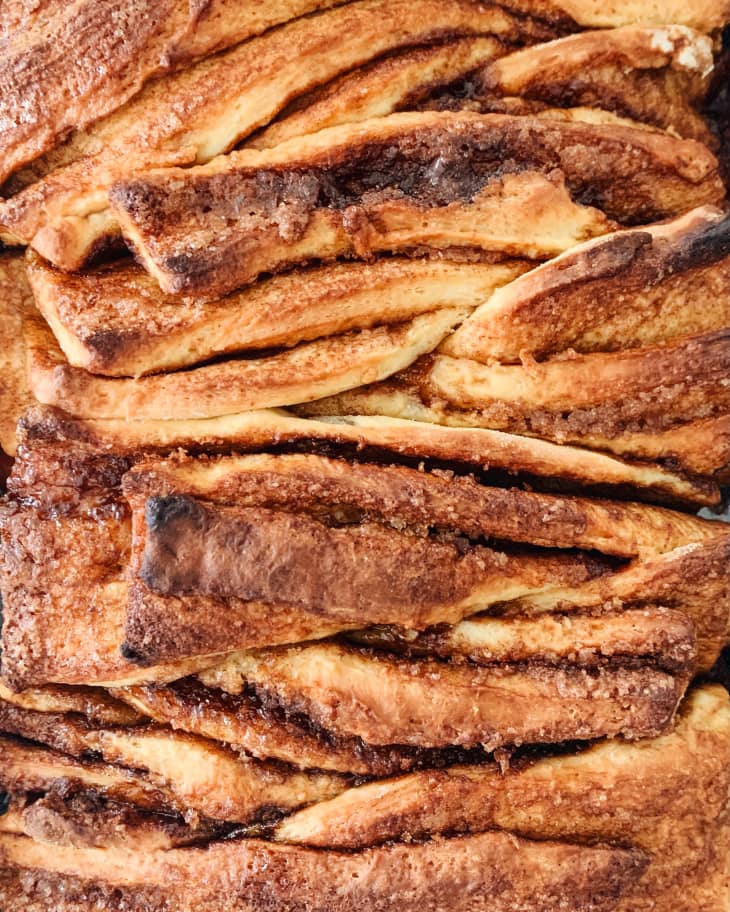
If you’ve let it rise at room temperature, toss it in the fridge for at least an hour to make it easier to roll out. If you let it rise overnight, you’ll simply remove it from the fridge when you’re ready to roll it out. Roll the chilled dough into a very large rectangle, brush melted butter over the top, and sprinkle it generously with a brown sugar and cinnamon mixture. Roll it tightly into a long cylinder.
It sounds just like making regular cinnamon buns, right? Here’s where the recipe diverges. You’ll chill the cylinder, then slice it in half crosswise. Next, working with one piece at at time, slice each piece in half lengthwise, exposing its cinnamon layers, then twist the cut halves together. This twist is then cut in half crosswise and placed in a greased baking pan. You’ll repeat with the remaining piece so you have four twists side by side in the pan.
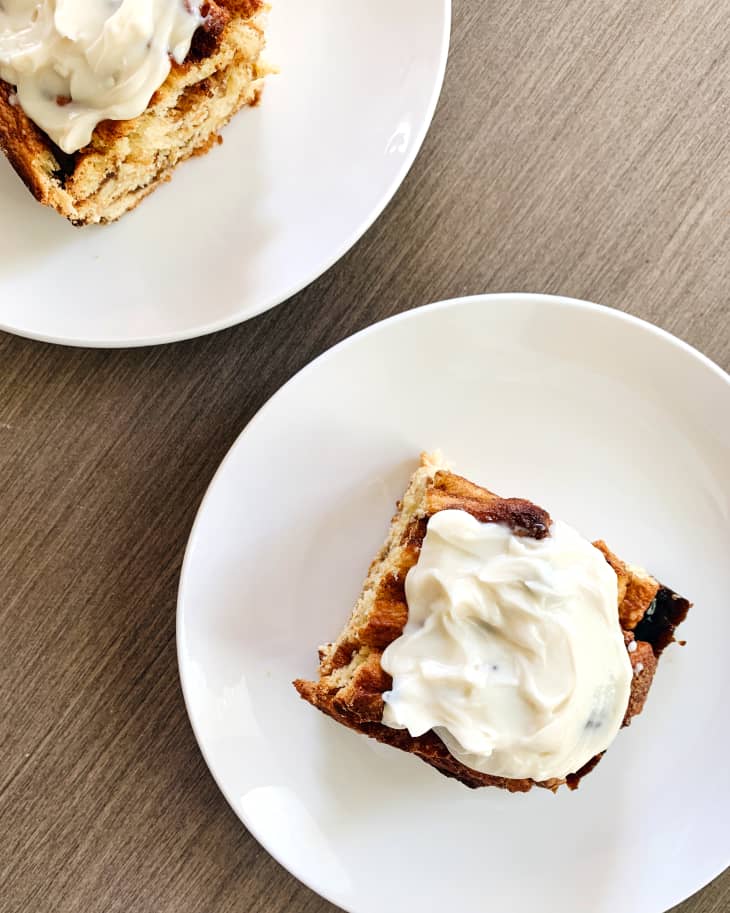
Finally, the twisted cinnamon buns are baked, cooled slightly, then cut into squares and served with a simple cream cheese icing, which everyone can slather on as they like.
My Honest Review of Smitten Kitchen’s Twisty Cinnamon Buns
To be honest, I started having doubts about this recipe almost as soon as I committed to trying it. I’m currently without my stand mixer, and Deb highly recommends using one because of how wet and sticky the dough is. But after scrolling through every single comment on her blog and Instagram, I found all sorts of suggestions on how to make them without a mixer, both from readers and Deb herself. Some readers had success with a food processor, while others said their food processor smoked up. Deb recommended using a Danish dough whisk to mix the dough by hand, but before I added it to my shopping cart, I thought I’d give it a go with my own two hands and a rubber spatula.
Truthfully, it wasn’t the dough that gave me trouble. In fact, I’m happy to report I had no trouble mixing the dough by hand. It was messy and sticky, yes, but it came together. Where I struggled was the cutting and twisting. This process was tricky, and my twists didn’t end nearly as pretty as Deb’s. I also wasn’t as exact as I should have been when measuring the length of my twists, so they were too small for my pan and didn’t completely fill out the pan when baked.
But after all was said and done, and I sat down to my warm square topped with icing, my qualms were settled. These buns were so perfectly moist, fluffy, and cinnamon-kissed, I forgot about my struggles with rolling and twisting them. While I might not bother with their extra fussiness on most occasions, I do think they’re worth the effort as part of a special, show-stopping brunch spread. Since they can be cut into any size squares you like, they’d accompany a mix of other brunch dishes particularly well.
My absolute favorite part about this recipe wasn’t actually the rolls themselves, but how tangy the cream cheese icing was. Unlike a lot of icings, it wasn’t enriched with butter, so the cream cheese was allowed to be front and center. This is an icing I’ll make again and again — even if I’m not making these rolls.
If You Make This Recipe, a Few Tips
Most importantly, don’t let this recipe intimidate you like it did me. Yes, it’s a bit fussy, but these tips will help set you up for success.
- Don’t sweat it if you don’t have a stand mixer. I am proof this recipe can be made without a stand mixer or other special tools. Yes, the dough is quite wet and sticky, but if you use a sturdy rubber spatula to help you knead it, you should be fine. Do your best to knead it into a cohesive ball — it doesn’t need to be perfectly smooth.
- Switch the order of ingredients if mixing by hand. That said, I made a slight change to help make it easier to combine the dough by hand. Instead of mixing the wet ingredients and then adding the dry ingredients, I made the dough like I would pie crust or biscuits. I put the flour in a large bowl, added diced butter to it, and combined it by hand until crumbly. Then I microwaved the milk in a large liquid measuring cup for 30 seconds; whisked in the yeast, sugar, salt, and eggs; then added it to the flour-butter mixture. I used a fork to gently mix before using my hands and spatula to fully combine and knead the dough.
- Pay attention to the measurements. I kind of winged it when I rolled and shaped the dough, but I wish I had taken out a ruler and measured the slab and cylinder as Deb suggests. My twists ended up being smaller than the baking pan and they don’t spread lengthwise when baked, so they didn’t fill the pan. Use a ruler for the best results.
- Feel free to shape the buns, refrigerate overnight, then bake. While the instructions call for making the dough ahead but rolling and shaping the buns right before you bake them, Deb does say in the comments that they can probably be shaped ahead of time, too. I gave this a try and it worked perfectly. I covered the pan of twisty buns with plastic wrap and refrigerated them overnight. In the morning, I let the pan sit at room temperature while the oven preheated to take the chill off, them baked them as directed.
Have you tried Smitten Kitchen’s Twisty Cinnamon Buns? Let us know in the comments!