
We Tried 6 Ways of Cooking Spiral-Cut Ham and the Winner Was a Juicy, Flavorful Showstopper
When you think of Easter food, chances are good that a centerpiece Easter ham comes to mind — not to mention the wonderful leftover ham soup, ham sandwiches, and ham casseroles you can enjoy downstream of the big event.
Although many people traditionally enjoy lamb on this spring holiday, ham has risen in popularity in the United States. Originally — starting around the mid-20th century — hogs would be slaughtered in the fall, the meat could cure all winter, and tasty hams would be ready to enjoy around Easter. Nowadays, many folks simply choose ham because it is affordable, well-liked, and can easily feed a crowd.
Now, here’s what you need to know about cooking a spiral-cut ham. First, the ham is already cooked and can technically be eaten cold — but most people want to serve it warm when it’s the centerpiece of a feast.

The USDA’s guidelines state that you must heat the ham to an internal temperature of 140°F. Now for the real issue with cooking a spiral-cut ham: All of those convenient slices, those multiple cuts in the meat, are points through which the ham juices can leach out as you heat it to 140°F, potentially leaving you with dry results. You have to cook it carefully to keep the moisture from escaping.
To find out the best way to keep the meat juicy and tender, I sought out popular methods to try and got to work in my kitchen. (Note: I wanted to test an air fryer method, but I could not find a bone-in, spiral-cut ham small enough to fit inside an air fryer.)
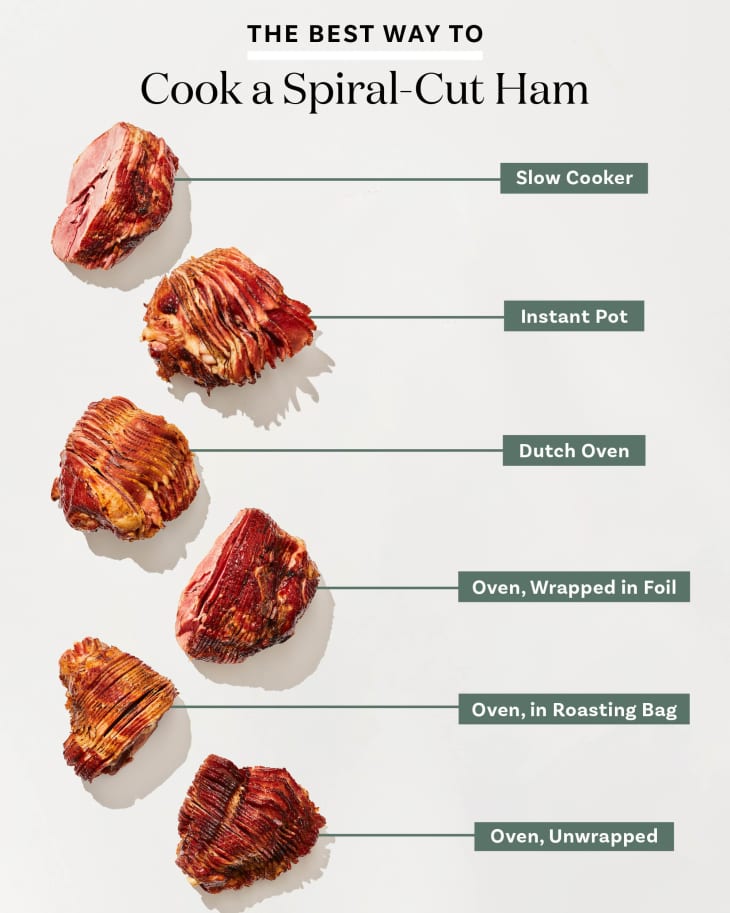
So, What Is the Best Way to Cook Spiral-Cut Ham?
The method that retained the most moisture and deep, porky flavor in the ham was to cook it in an oven roasting bag at a low temperature (250°F). Read on to learn all about the methods we tried out and why exactly we’re naming this one the best method of all!
A Few Notes on Methodology
The hams: With one exception, each of the hams I tested weighed between 9.25 and 9.5 pounds. To test the Instant Pot method, I used a smaller 7-pound ham, as anything larger would not fit inside the pot. They were all bone-in, spiral-cut hams, and I chose shank-end ham halves; this type of ham (as opposed to a butt-end ham half) contains more fat (for juiciness) and is easier to carve, with only one bone inside.
The tests: As explained above, I cooked each ham until it reached the USDA’s recommended safe temperature of 140°F. To keep the testing focused on the methods themselves, I did not introduce outside flavors during cooking — meaning no cooking in juice or cola, no basting during cooking. I ditched the flavor/basting packet that came with each ham. I took sample bites from different parts of each ham: outside versus inner slices, and the exterior of those slices versus the part closest to the bone.
The glaze: After cooking each ham, I brushed our easy, delicious glaze and broiled the ham for a couple of minutes to get a little bit of caramelization.
The times: Before cooking each ham, I unwrapped it and let it stand at room temperature for 1 hour (as I would do with any large roast) to take a bit of the chill off before cooking. I have made note of this time, along with the amount of time for actual cooking.
The ratings: I judged each method on a scale of 1 to 10, with 10 representing perfection. The main criteria I based my ratings on included texture (moisture level and tenderness), ease or difficulty of preparation, and time (whether the result was worth it).
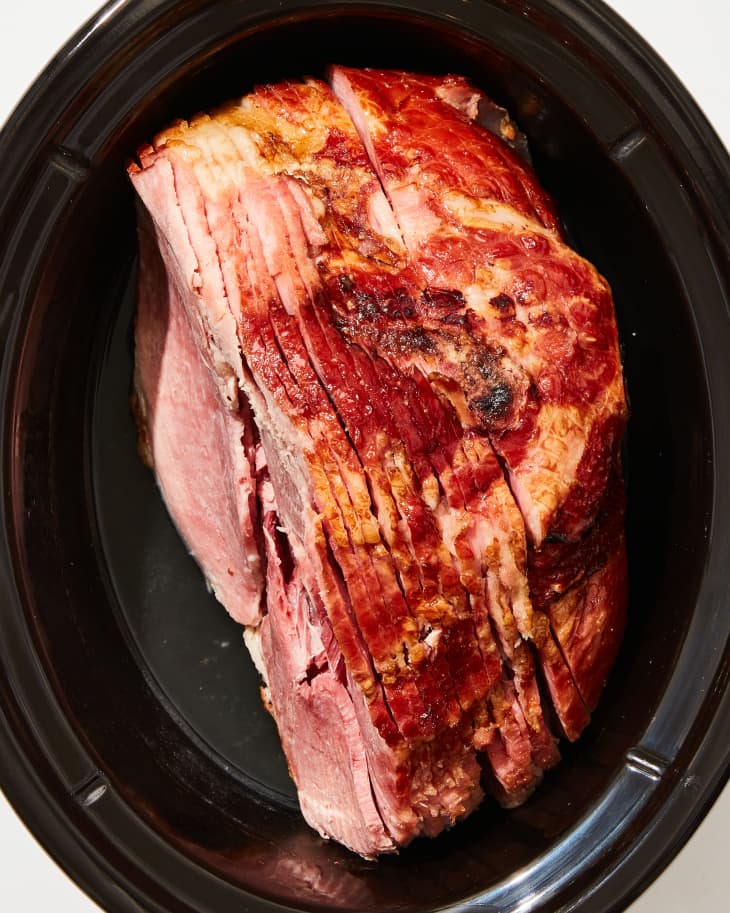
Spiral-Cut Ham Method: Slow Cooker
- Time: About 5 hours cooking (plus 1 hour of standing before cooking)
- Rating: 5/10
About this method: To test this method, I loosely followed the instructions from Eating on a Dime, using them for timing more than anything else, as I did not include the brown sugar rub or pineapple juice in the recipe. I placed the ham in the slow cooker with 1 cup of water, placed the lid on, and cooked it for 4 hours on Low. Since my ham was larger than what the recipe called for, I had to cook it an additional hour (so 5 hours total) to get the internal temperature to 140°F. After removing the ham from the slow cooker, I glazed it as described above in my methodology notes.
Results: I have a real love-hate relationship with the slow cooker, finding that it excels sometimes, yet (for me, at least) often produces less-than-desirable results. The latter was the case with this ham. It’s fascinating to me that cooking the ham on low heat, in liquid no less, made it quite dry and rather tough. Slices were on the tough side, verging on rubbery. Yes, the method was very easy and hands-off, but the results were lackluster.
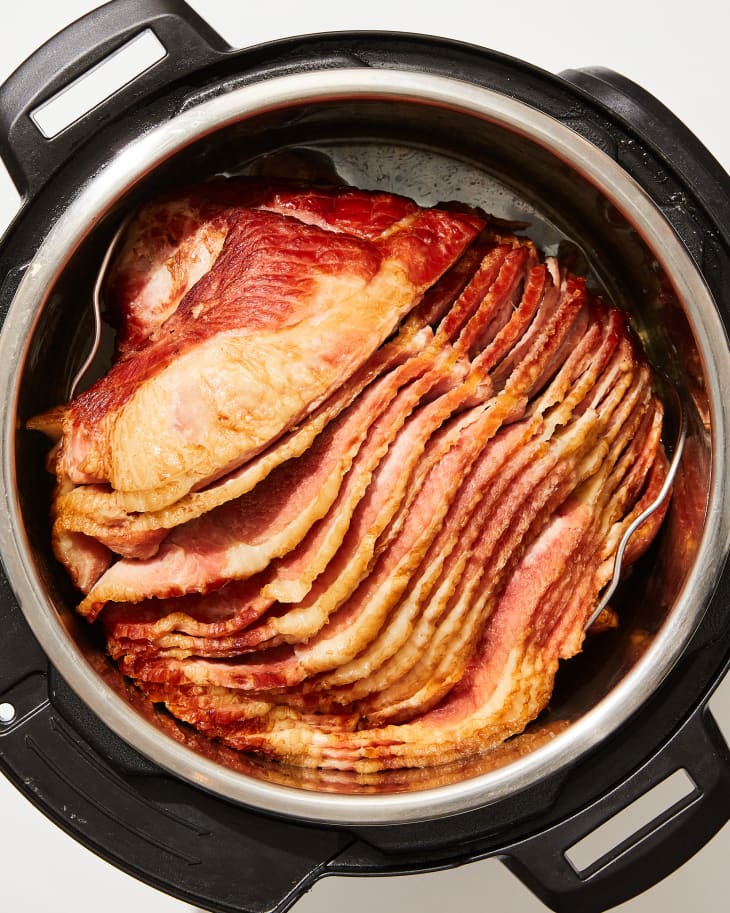
Spiral-Cut Ham Method: Instant Pot
- Time: 48 minutes cooking (plus 1 hour of standing before cooking)
- Rating: 6/10
About this method: I noted above in the notes on methodology that in order to test this method, I had to seek out a smaller ham so that it would fit inside the pot. I consulted recipes from Sunday Supper Movement and The Country Cook for guidance on the preparation and cook time. I placed the trivet into the pot, added 1 cup of water, and arranged the ham on the trivet. I then closed the lid, set the valve to “sealing,” and set the pot to cook on high pressure for 15 minutes (it took 20 minutes for it to come to pressure). After the cook time was over, I allowed the pressure to release naturally for 10 minutes, then quick-released the remaining pressure. I took the ham’s temperature; it was right at 140°F. Finally, I glazed and broiled the ham as noted above.
Results: This was a quick and easy method, and the trivet’s handles made it easy to remove the ham from the pot, but the ham was a bit disappointing. The meat darkened a good bit, giving it the look almost of country ham. With the glaze it was tasty, but the slices were dry through and through. I also had some difficulty finding a ham that was small enough to fit in the pot, so the method itself is limiting.
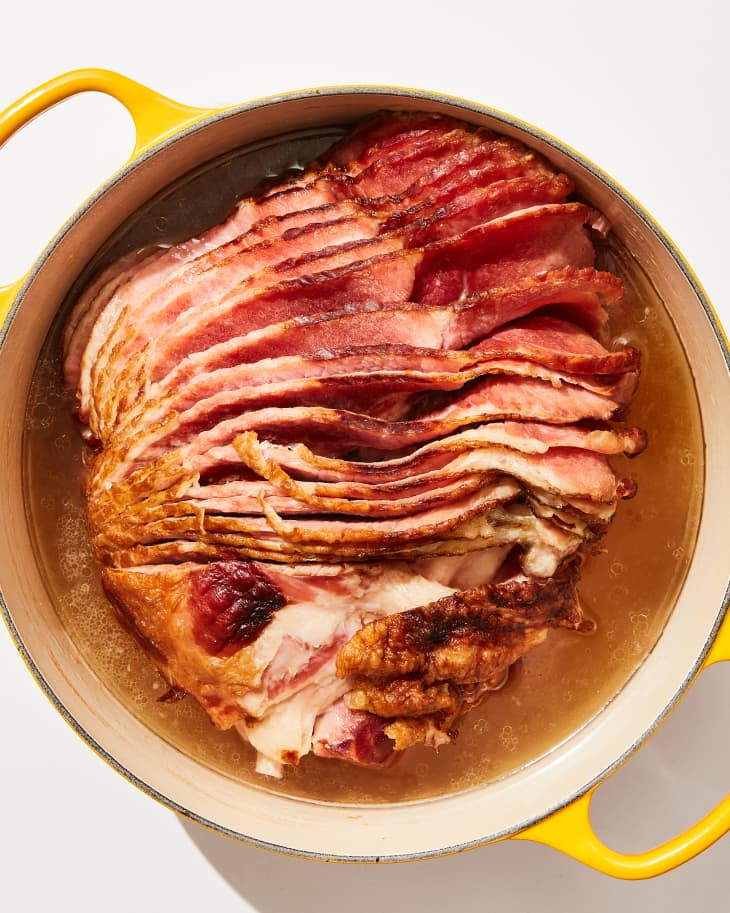
Spiral-Cut Ham Method: Dutch Oven
- Time: About 2 hours 8 minutes cooking (plus 1 hour of standing before cooking)
- Rating: 6.5/10
About this method: To test this stovetop method, I had to use my largest Dutch oven to accommodate the ham (a 7-quart oval one). I used ehow as my source, following their directions to place the ham in the pot, add water to come halfway up the ham, bring the water to a boil, cover, and cook. The website’s instructions state to cook the ham for 20 minutes per pound, which should have been 3 hours for my 9-pounder. I checked the ham’s temperature after 2 hours, and it was already above 140°F, so I stopped the cooking at that point and glazed and broiled the ham.
Results: The ham was falling-off-the bone tender, but it was also dry. In fact, it was so tender that I had a little difficulty keeping it intact as I tried to remove it from the pot; a set of long-handled tongs and a large grill spatula got the ham out in (mostly) one piece. As with the slow cooker method, cooking the ham in water somehow helped more of its juices escape. Although the slices were dry, when tasted with the glaze they had a delicious, almost candied effect. Despite that, I just can’t fully endorse this method because of the dryness.
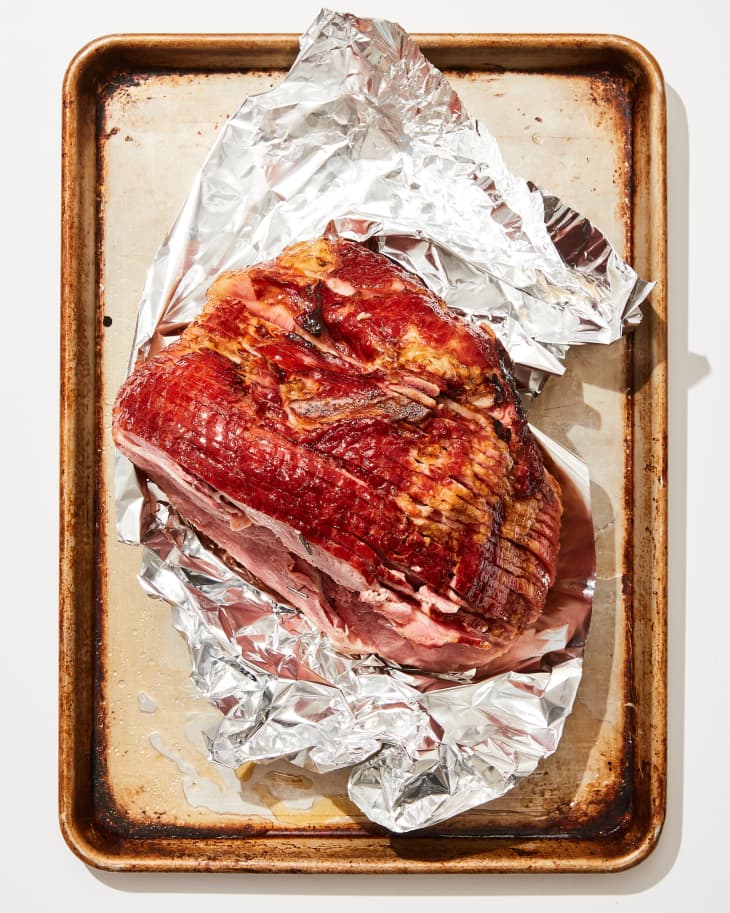
Spiral-Cut Ham Method: Oven, Unwrapped
- Cook time: About 1 1/2 hours cooking (plus 1 hour of standing before cooking)
- Rating: 7.5/10
About this method: I chose to use a recipe from Delish for loose guidance for this method. I started by placing a rack inside a roasting pan and covering the rack with foil. Then I poured 2 cups of water into the roasting pan and arranged the ham on top of the foil-lined rack, with a digital probe thermometer inserted toward the center of the ham. I cooked the ham in the oven at 350°F, without basting, until it reached 140°F; for me, this took 1 1/2 hours. I then glazed the ham per the notes above, but did not broil (explained below).
Results: The top edges of the ham slices got a bit charred from the direct heat of the oven, which was delicious. Because they were already charred, I did not broil the glaze onto the ham — I just brushed it on at the end. Most of the slices were overall a bit dry. The very innermost part of each slice, however, was juicy and tender, so each slice gave you two different textures: dry and tough (but deliciously charred), as well as juicy and tender. The method was easy and produced intriguing results.
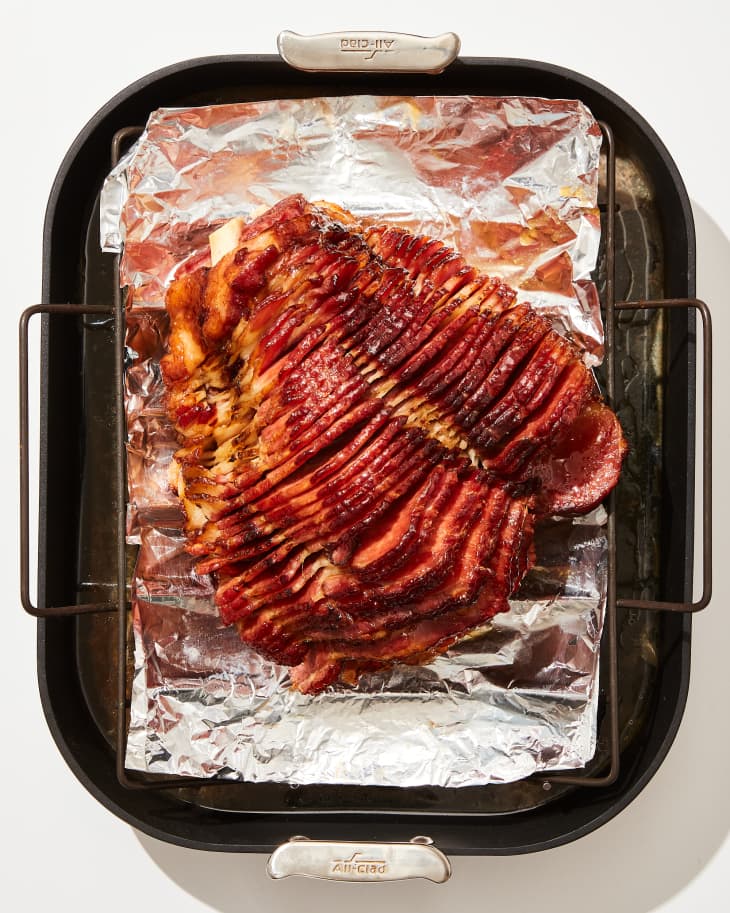
Spiral-Cut Ham Method: Oven, Wrapped in Foil
- Time: About 2 hours 45 minutes (plus 1 hour of standing before cooking)
- Rating: 8/10
About this method: I consulted a recipe from Food Channel to test this method. I wrapped the ham tightly in two large pieces of heavy-duty foil (I inserted a digital probe thermometer and worked around the wire) and placed it on a rimmed sheet pan. I baked the ham at 325°F until it reached 140°F, which for me was 2 hours 45 minutes. At the end, I unwrapped the ham, brushed it with glaze, and broiled it for a few minutes to brown it.
Results: This ham was more moist than the ones cooked in the slow cooker, Instant Pot, Dutch oven, and unwrapped in the oven. I wouldn’t describe the slices as moist overall — just simply more moist than when cooked other ways. The slices had a tender-chewy texture, which just seemed appropriate for ham — not too tender, but tender enough. Cooking in foil was easy and made cleanup a breeze, too.
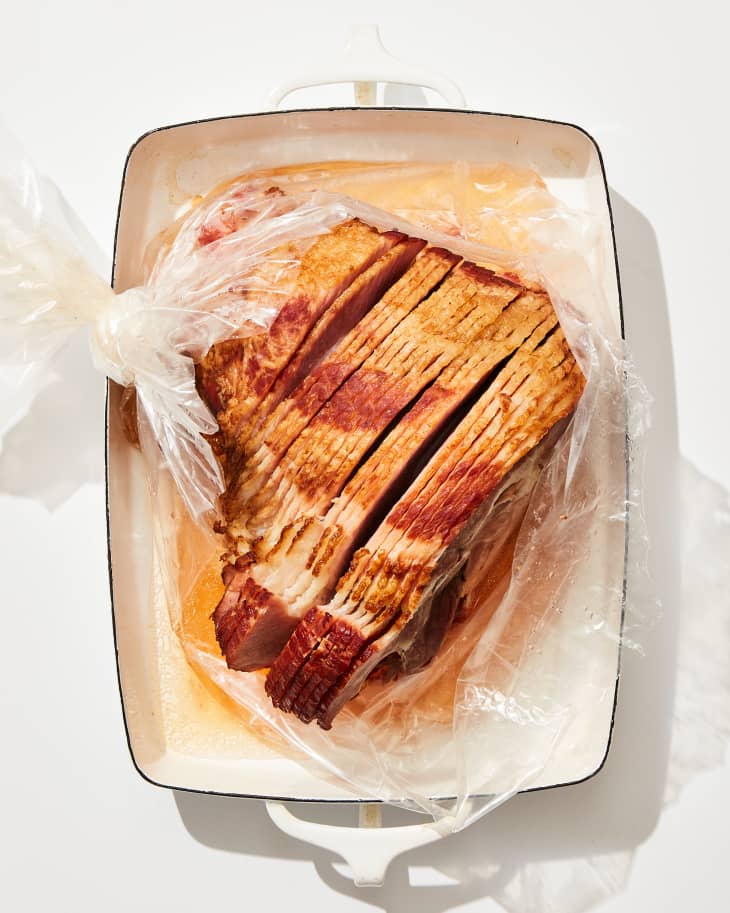
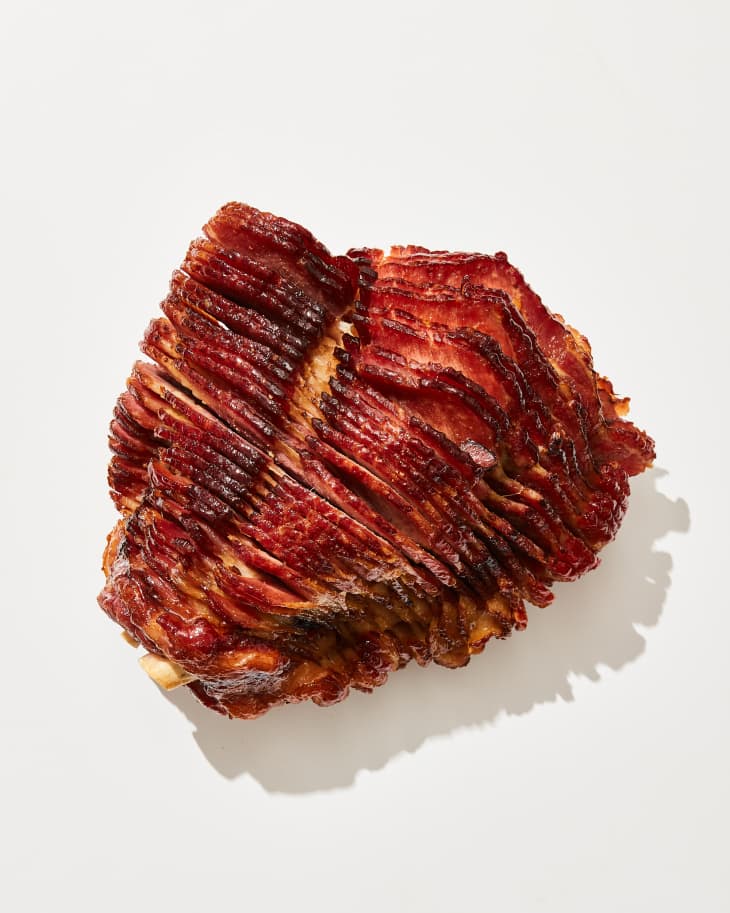
Spiral-Cut Ham Method: Oven, in Roasting Bag
- Time: About 2 hours 10 minutes cooking and 15 minutes standing after cooking (plus 1 hour of standing before cooking)
- Rating: 9.5/10
About this method: I loosely followed the instructions from America’s Test Kitchen to test this method. I started by placing the ham in an oven bag (flat-side down), sealing the bag, trimming excess plastic, and placing the bag inside a 13×9-inch baking dish. I cut 4 slits into the top of the oven bag and threaded a digital probe thermometer through one of the slits down into the ham. I placed the ham in a 250°F oven for cooking.
The site’s recipe states to cook the ham to an internal temperature of 100°F, and carryover cooking (as the ham rests for a few minutes) will bring the temperature up to 120°F. In compliance with the USDA’s guidelines (detailed above), I instead cooked the ham until its internal temperature registered 130°F; I then let it stand for 15 minutes, at which point carryover cooking brought the temperature up to 140°F. At that point, I removed the ham from the bag, glazed it, and ran it briefly under the broiler.
Results: All of the slices in this ham had consistent results. They were moist and pleasantly pink, and they retained more sweet-salty porky flavor than with any other method. Slices were just a teensy bit tough, but overall retained an alluringly tender-chewy, moist bite. The oven bag was easy to work with and made cleanup incredibly easy. This will definitely be my go-to method.