
Recipe Template: How to Make Beef Stew
Rich, long-simmered stews are as satisfying to eat as they are to make. It’s all about building layers of flavor and then stepping away from the stove to let the low heat gently do its magic. You don’t need a recipe – just a few basic guidelines will help create the perfect stew!
Note for Vegetarians – Sure, you can make stew, too! Instead of meat, try adding about a pound of mushrooms and a pound of potatoes. Make sure they’re nice and golden before deglazing and adding the broth so you can build as much flavor as possible.
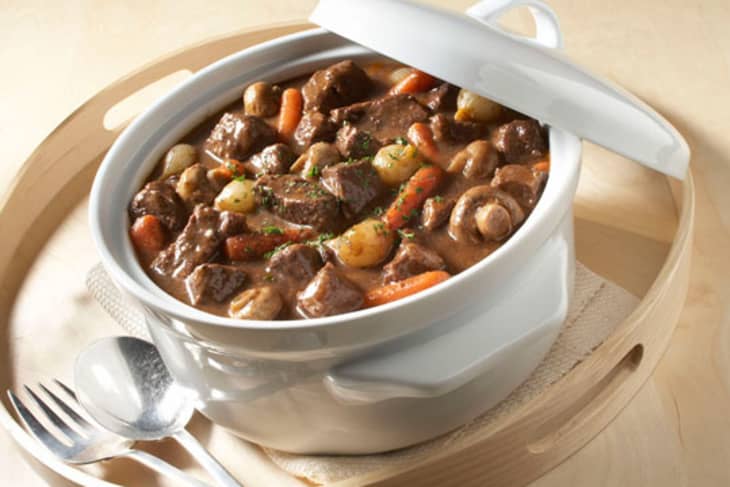
1. The Meat – This is the time for those big tough cuts. Go for top round, bottom round, chuck roast, or some naming variation thereof, and you’ll need 2-3 pounds of it. We typically use beef, but you can certainly make stew with lamb,
venison
Trim off as much of the fat and white connective tissue from the outside of the cut as you can, and then cut it into bite-sized cubes (roughly 1-inch). Get out your dutch oven or stock pot, add a thin film of canola oil to the bottom, and set it over medium-high heat.
When the oil is hot, add the meat in batches. You want a single layer of meat that’s not too crowded. Let the meat sit without stirring for 2-3 minutes so you get a nice sear on the bottom. Flip them around and give some of the other sides a chance to brown and sear as well, but you don’t need to worry about actually cooking the meat through at this point. Remove the seared meat to a clean plate or bowl and continue searing the other batches.
During this time, a nice glaze (a.k.a. “fond”) will be building on the bottom of your pan. It will look like a horrible burnt mess, but unless you see or smell smoke, you’re fine and can continue merrily on. If you do see or smell burning, don’t panic! Turn the heat down to medium until the smoking stops. If that doesn’t work or if you’re seeing a lot of smoke, remove any meat still in the pot and throw in a half cup of water to dissolve the glaze. Pour the glaze over your seared meat and continue searing the rest of the batch.
2. The Veggies – We tend to use what we have on-hand, which is almost always onions, celery, and a carrot or two. We also like mushrooms and potatoes. Aim for, oh, about 2-3 cups of total diced vegetables.
Once you’re done searing the meat, add another teaspoon of canola oil and start cooking your veggies. We usually cook the onions first and let them get soft. Then we add the mushrooms and cook them until they’re golden on the outside and have released all their liquid. Finally we add whatever veggies are left and cook them until they’re softened on the outside. This helps to build flavor, but if you want to save time, you can cook all the veggies together until they’re starting to soften.
While the veggies are cooking, the glaze at the bottom of the pan will dissolve and re-form as your veggies release moisture and then the moisture evaporates. You can scrape up the glaze while this is happening or leave it be, and it will be fine.
3. The Seasonings – We like to keep the seasonings very simple for a stew. We usually use 2-3 cloves of minced garlic, a teaspoon of thyme or rosemary, and one bay leaf.
When the veggies are nearly done, clear a little space in the middle of the pan and sauté the garlic just until it is fragrant (about 30 seconds). Then stir it into the veggies, along with whatever herbs you’re using and the bay leaf.
4. The Deglazing Liquid – Now is when you dissolve that beautiful glaze you’ve been building and rebuilding once and for all! A half cup of liquid will do the trick. We like to use something strong flavored like red or white wine, dark beer, or even cider. Simple broth or water will work as well.
When your veggies are all softened and you’ve added the seasonings, pour in whatever deglazing liquid you’ve chosen. It will start bubbling and boiling as soon as it touches the hot pan and then gradually calm down to a simmer. As this happens, scrape at the bottom of the pan with a wooden spoon to work up all of that glaze. It will mingle with the veggies and eventually dissolve into the broth.
5. The Broth – We usually use about 4 cups of broth and then top it off with just enough water to cover the meat and veggies.
Our favorite ratio is 2 cups of beef stock and 2 cups of chicken stock – we find all beef stock to be a little intense and all chicken stock to be a little thin, so we split the difference. You should play with the ratio yourself to see what you like best. You can also cut the beef stock with water or use more chicken stock for more flavor.
After you’ve finished deglazing, add the meat back into the pot and pour in your broth. Add water to cover everything by a half an inch or so. Bring the stew to a boil and then reduce the heat to low. Cover the pot.
Now you let the stew do its stewing. Check the meat after about an hour – when it’s done, you’ll be able to pierce it easily with a fork or knife and bits should flake off. You also can eat a piece to see if it’s tender. If it still seems dense and chewy, let the stew cook for another 15 – 20 minutes before testing it again, and then continue in 15 minute intervals.
If the stew tastes thin to you, leave the lid off for the last half hour of cooking so some of the liquid can evaporate and concentrate the flavors. Conversely, add a cup of water if it seems to concentrated.
6. The Finish – If you like, you can thicken the stew at the very end of cooking. Our preferred method is to whisk 2-3 tablespoons of flour with a half cup of the broth taken from the pot. Make sure there are no lumps, and then whisk this back into the main stew. You can also experiment with any of the methods mentioned in this post on how to make soups thick and creamy.
You can also add barley, farro, or any other grain to round out your stew. You can either cook the grain separately and combine it with the stew at the end of cooking, or you can cook the grain directly in the stew in the last 30 minutes of cooking.
The advantage of cooking it in the stew is that the grain absorbs the flavor of the broth and helps thicken the stew, but the disadvantage is that it’s hard to know exactly when to add it so that the grain and the stew finish cooking at the same time. The stew can usually take a little extra cooking, so we usually wait until we’re sure the stew will be done soon, add the grain, and cook everything until the grain is completely tender.
Later today, we’ll have a new recipe for a Beef and Barley Stew we made this past weekend so you can see how this all comes together!
What other pointers do you have for making stew?
Related: Homemade Stock: What’s Your Routine?
(Image: Beef Checkoff)