
How To Make Sourdough Bread
Everything you need to know about making sourdough bread from scratch.
Makes2 loaves
Prep24 hours to 48 hours
Cook45 minutes to 50 minutes
For many of us home bakers, making a good loaf of sourdough bread feels like striving for the World Cup or an Olympic gold medal. It’s the challenge to top all challenges and takes real commitment, but it’s also completely achievable.
Are you ready to take on the challenge of a true sourdough bread? If so — or even if you’re just curious to see what the fuss is about — here’s everything you need to know!
How to Make Sourdough Bread
- First things first: make a sourdough starter.
- Mix the starter with flour and water to create the leaven.
- Mix the leaven with more flour and water to create the autolyse.
- Fold the dough several times over the next 2 1/2 hours.
- After a few rounds of rising and resting, shape the dough and bake it in a Dutch oven.
My Sourdough Story
I made my first loaf of sourdough bread over a decade ago with the help of my father (who now owns his own bakery, Brick Oven Bakery in Northfield, Minnesota) and some well-packaged sourdough culture he carried in his suitcase.
He coached me through the basic steps; I was skeptical that something made with just flour and water would turn into delicious bread — but it did, and I was hooked.
I’ve been slowly working on my sourdough game ever since.
Bread-baking
It takes time to coach flour and water into something as beautiful and delicious as a finished boule or batard, and that’s time when I also slow down, breathe a little deeper, and relax into the process.
Sourdough bread is something you learn by doing. You’re not going to make a great loaf by reading a recipe or hunkering down with a cookbook; you’re going to have to get your hands in the dough, and you might have to try it a few times.
Even after making sourdoughs for years, I still get bloopers, like the first loaf I made from Tartine No. 3. Stay with the process, learn to work with the ingredients, and enjoy the adventure.
What Makes Sourdough Bread Sour
Sourdough bread is made entirely using wild yeast — with a strong, active sourdough culture of wild yeast, you won’t need any commercial yeast at all.
Wild yeast need a little more coaxing and works more slowly than commercial yeast, so sourdough breads are normally mixed, shaped, and baked over the course of a day, or even multiple days.
Besides giving the wild yeast time to do its job, this long, slow development time helps tease out more complex, nuanced flavors in the finished bread — far beyond those of your average loaf of sandwich bread or no-knead bread.
While the wild yeast is the star of this show, it’s not what makes the bread sour. That distinctive flavor comes from two kinds of friendly bacteria — Lactobacillus and acetobacillus — which grow alongside the yeast in the sourdough culture and help ferment the sugars in the dough.
Also, note that sourdough breads don’t always taste sour. Depending on how you develop your starter and make your bread, the sour flavor can be quite pronounced or it can be more subtle.
The recipe here strikes a balance — it’s a touch sour, but it’s balanced by a nice range of sweet, earthy, and yeasty flavors.
The Sourdough Starter
Before you can make a loaf of sourdough bread, you need to make a sourdough starter. This is a culture of flour and water for growing wild yeast and developing those bacterias.
Having a “ripe,” or fully developed, starter ensures a good rise and good flavor development in your sourdough bread. You can make your own starter in about five days:
- On the first day, mix flour and water into a batter. Let it sit at room temperature overnight. Wild yeast are everywhere — on the flour, in the air, on your hands — and they will quickly start to thrive in this culture.
- Over the next few days, feed the yeast and bacteria by pouring off some of the culture and adding fresh flour and water. You’ll know it’s ready to use to make bread when it becomes very bubbly within just a few hours of feeding, and when it smells sour but fresh.
Once you have a starter, you never have to make one again. I keep mine in the fridge, and I feed it roughly once a week. When I want to make a loaf of bread, I take it out a few days ahead and feed it once a day to strengthen it again.
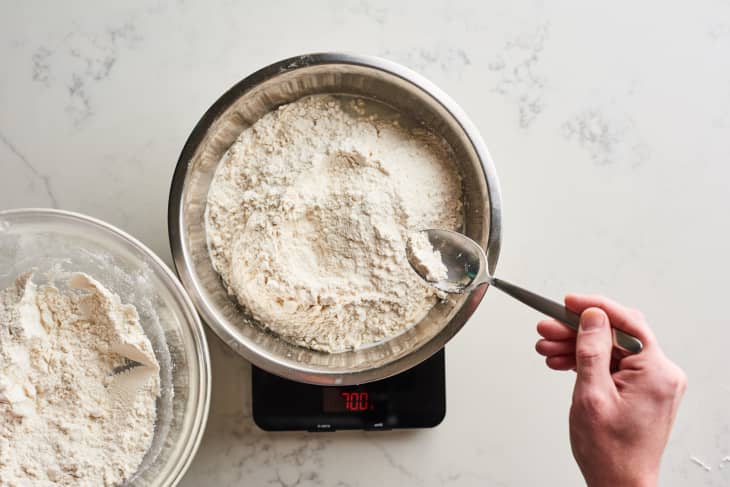
Why You Should Weigh Ingredients
I highly recommend weighing all your ingredients when making sourdough bread. Not only is this more accurate, but it’s also ultimately easier.
When weighing, all you have to do is dump ingredients in the bowl and watch the scale — plus there’s no guesswork about did I just add the fourth or the fifth cup of flour?
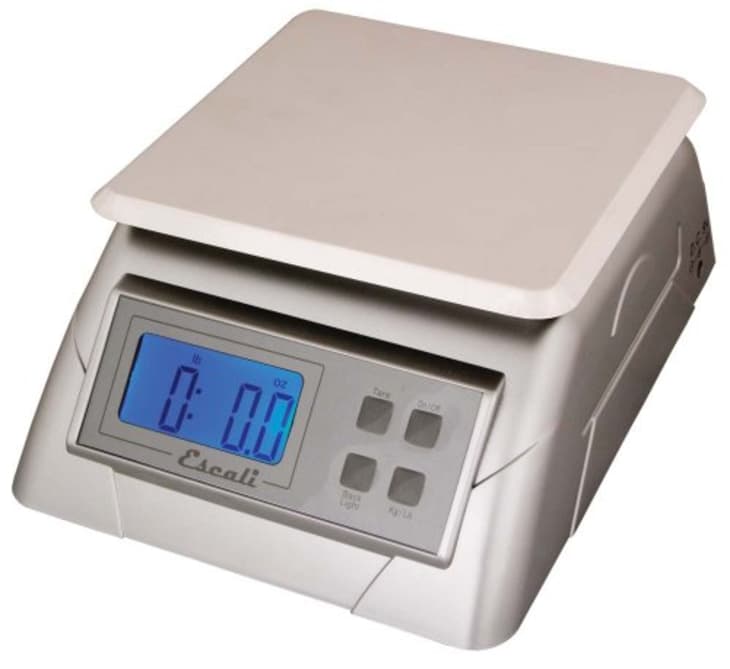
This said, I don’t want this to deter you from trying a loaf of sourdough for yourself. If you’re more comfortable working in cups and tablespoons, those measurements are here for you too.
It’s less accurate, but the recipe is forgiving and a few extra or a few fewer grams here or there isn’t going to affect much.
The Leaven
We already made the sourdough starter, so now we make the leaven, which is ultimately what gets mixed into the dough. It’s made with a tablespoon of your active starter and a specific amount of flour and water.
A tablespoon of starter might not seem like much, but you’ll be surprised at how quickly the yeasts in that tablespoon multiply and make the leaven bubbly!
Make the leaven the night before you plan to mix the dough and leave it on the counter. By the next morning, it should be bubbly and smell slightly sour. You can test that it’s ready by dropping a spoonful into a cup of water; if it floats, it’s ready!
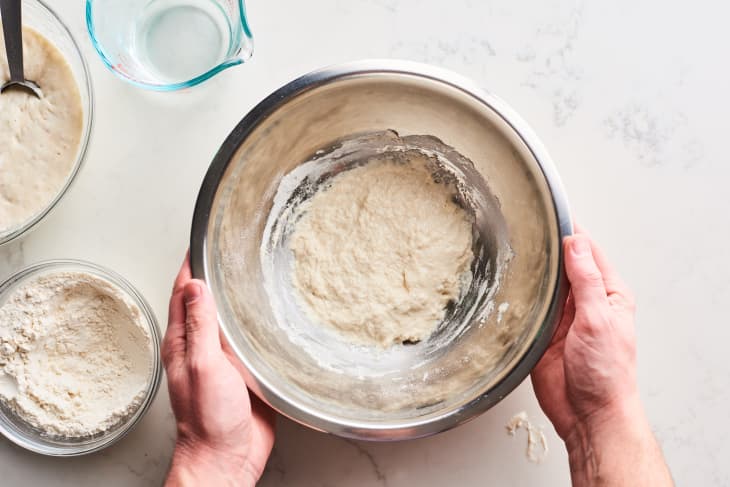
The Autolyse
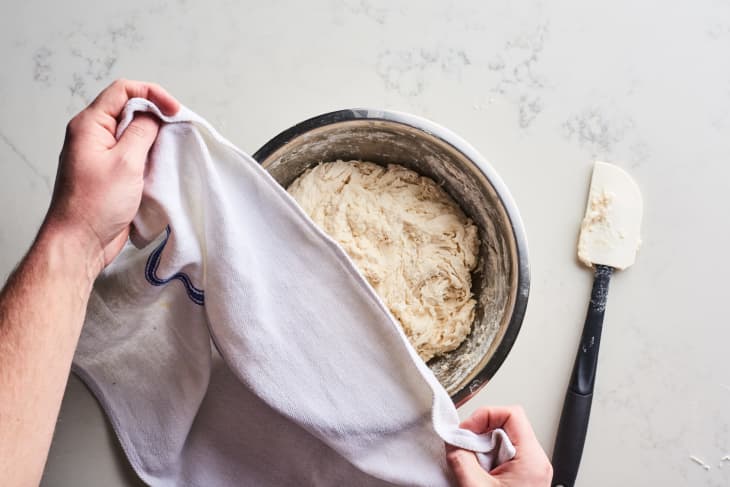
After you’ve mixed the leaven with the remaining flour and water, let it sit for at least 30 minutes or for up to four hours. A few things happen during this time:
- The flour absorbs the water and becomes fully hydrated, which helps gluten formation during the next step.
- Enzymes in the flour start to break down the starches into simpler sugars, which become food for the yeast and bacteria in the leaven and also make the bread more flavorful.
After this resting step, mix in the salt. Salt is necessary for a flavorful bread, but can inhibit the activity during the autolyse step.
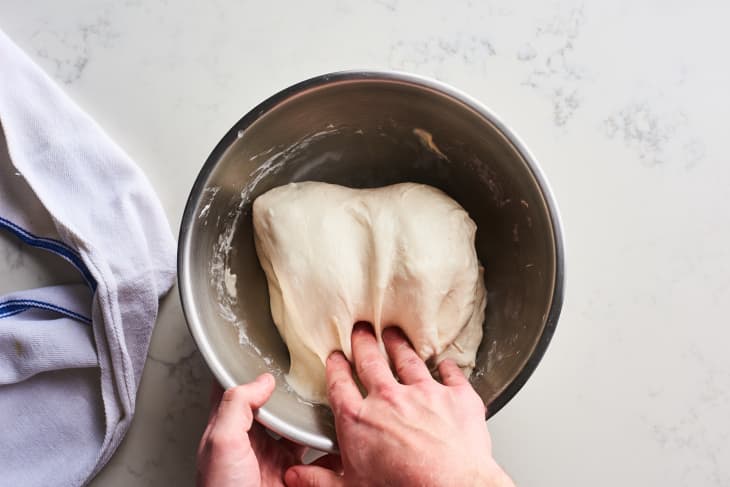
Folding (Not Kneading) the Dough
After trying a great many different sourdough recipes over the years, I have become a big advocate of the folding method for developing the gluten in the dough, rather than kneading in a stand mixer or by hand.
Folding is not only less labor intensive, but it also gives the crumb of the finished bread a better structure and a nicer network of holes (which are a good thing in the artisan bread world!). After the autolyse, begin folding the dough:
- Grab some of the dough from the side, stretch it up, and then fold it over on top of the dough. Do this a few times around the bowl.
- Let the dough rest about 30 minutes before doing it again.
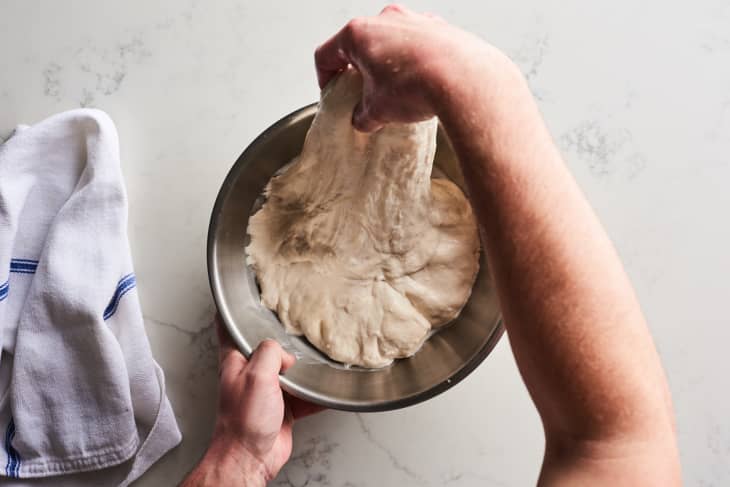
- After a few rounds, the dough will go from shaggy and clumpy to smooth and stretchy.
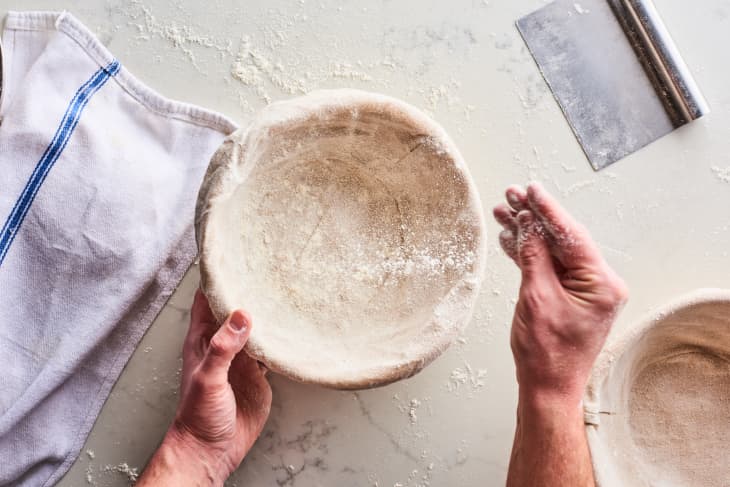
Using Proofing Baskets
Proofing baskets support the shaped loaves during their final rise before baking. You can buy the same kind of rattan or wicker proofing baskets that bakers use, or you can simply use a colander or a mixing bowl.
In either case, line the basket or bowl with a clean dishtowel and coat it generously with flour. Use your fingers to rub the flour into the cloth — this is what will keep the dough from sticking.
Proofing baskets don’t need much maintenance. After you’re done baking, knock out any loose flour, let them dry on the counter, and then store them in a cupboard.
If you bake fairly frequently, you don’t need to wash the dishtowel — in fact, letting the flour build up will help prevent the dough from sticking. Keep an eye out for mold, though, and always let the cloths and the baskets dry thoroughly before storing them again.
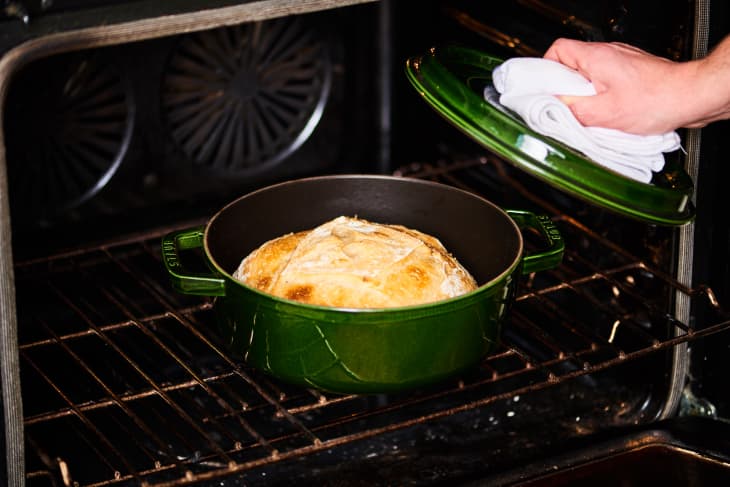
Bake in Dutch Ovens
Dutch ovens are a boon to home bakers. You need a moist, humid environment during the first few minutes of baking to get a good rise from the dough and to develop the crust, but making that happen in home ovens is tricky and imperfect.
Dutch ovens solve the problem. Dutch ovens trap the moisture evaporating from the bread and create its own steamy environment. Once the initial baking phase is over, you uncover the pot to release the excess steam and let the bread continue baking.
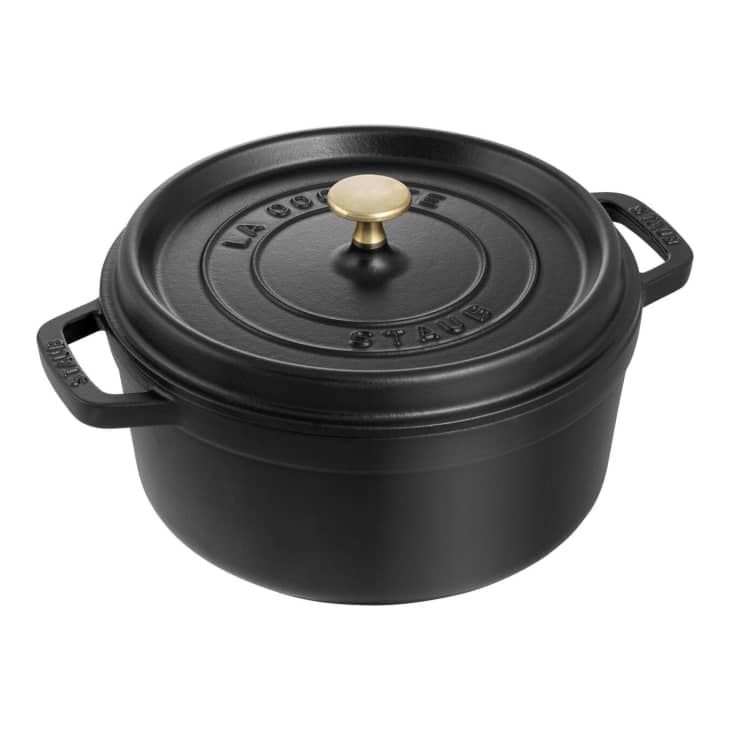
If you don’t have a Dutch oven, you can use any heavy pot with a lid, like a soup pot or even a large saucepan.
Slow Your Rise
This whole process, from mixing the initial dough to baking the bread, is a long, slow, drawn-out affair. You can do it in a day if you’re at home and feel like tinkering around in the kitchen for a few hours, or you can spread the process out over a few days.
There are a few moments in the recipe where you can pause and put the dough or the shaped loaves in the fridge overnight. This time in the fridge actually helps develop the flavors in the dough even more!
About This Recipe
This recipe is a modified version of the Tartine bread recipe that Chad Robertson shares in his books Tartine Bread and Tartine No. 3. In my time as a home baker, I’ve gone back to Chad’s master recipe and the variations in these books again and again.
It makes a very wet dough, which might feel unfamiliar to you at first, but it’s actually quite easy to work with. The tradeoff to the extra moisture is a really gorgeous crust and a chewy, well-developed crumb.
I’ve made a few changes to the original recipe, which I feel make the recipe a little more approachable for us home bakers:
- Chad’s recipes make two enormous rounds of bread, so I’ve scaled back this recipe to more human-sized loaves.
- I also modified the amount of leaven created so the full amount is used in the bread (Chad’s original recipe has you discard a portion, which always just seemed wasteful to me).
- Use this recipe as a jumping-off point. I made it with straight all-purpose or bread flour here, but you can swap in some whole-wheat flour or other whole-grain flour. You can also add things like nuts or dried fruit, or experiment with folding in some cooked grains, like quinoa or steel-cut oats.
Sourdough Bread Recipe
Everything you need to know about making sourdough bread from scratch.
Prep time 24 hours to 48 hours
Cook time 45 minutes to 50 minutes
Makes 2 loaves
Nutritional Info
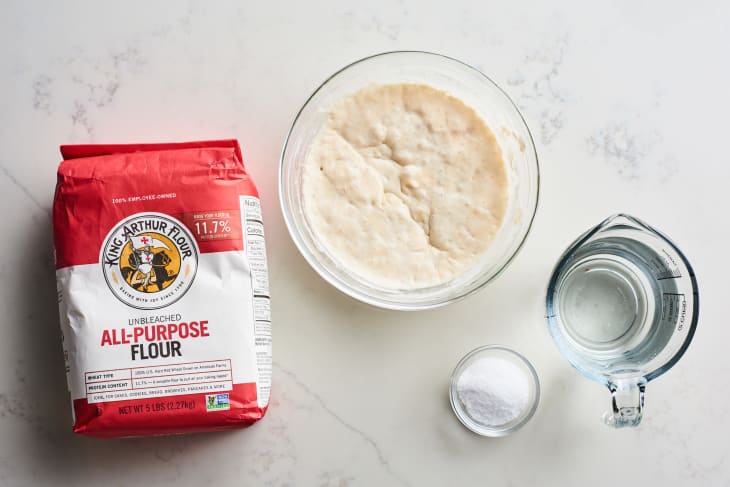
Ingredients
For the leaven:
- 1 tablespoon
- 75 grams
all-purpose flour or bread flour (1/2 cup)
- 75 grams
water (1/3 cup)
For the dough:
- 525 grams
water (2 1/2 cups), divided
- 1 tablespoon
salt
- 700 grams
all-purpose flour or bread flour (5 1/2 cups)
Equipment
Mixing bowls
Plastic wrap or other covering for the bowls
Spatula
Pastry scraper
Bread proofing baskets, colanders, or mixing bowls
Dutch ovens or large heavy-bottomed pots with lids
Lame, sharp knife, or serrated knife
Instructions
Make sure your sourdough culture is active. If your sourdough has been in the refrigerator, take it out 2 to 3 days before you plan to bake. Feed it daily to make sure it's strong and very active before you make the bread.
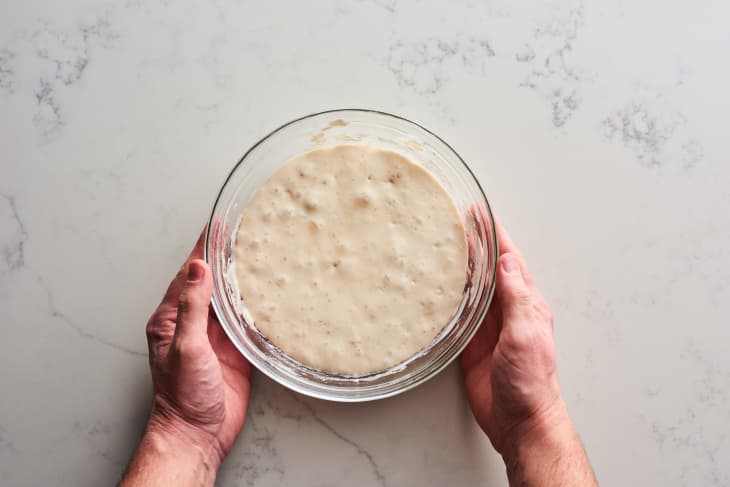
Make the leaven and let it sit overnight. The night before you plan to make the dough, place all the leaven ingredients in a large bowl and mix thoroughly to form a thick batter. Cover and let stand at room temperature overnight, about 12 hours.
Test that the leaven is ready. Generally, if the surface of the leaven is very bubbly, it's ready to be used. To double check, drop a small spoonful of the leaven in a cup of water; if the leaven floats, it's ready.
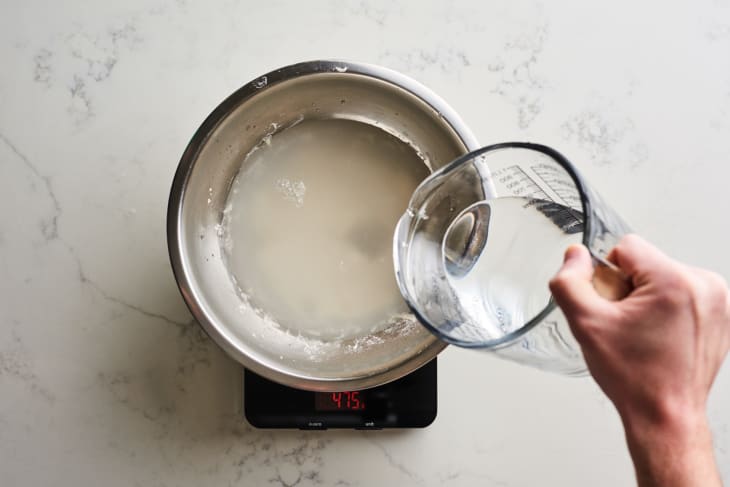
Dissolve the salt. Place 50 grams (about 1/4 cup) of the water and the salt for the dough in a small bowl. Set aside, stirring occasionally to make sure the salt dissolves.
Mix the leaven and water. Add the remaining 475 grams (2 cups) of water for the dough to the bowl of leaven. Stir with a spatula or use your hands to break up and dissolve the leaven into the water. It's OK if the leaven doesn't fully dissolve and a few clumps remain.
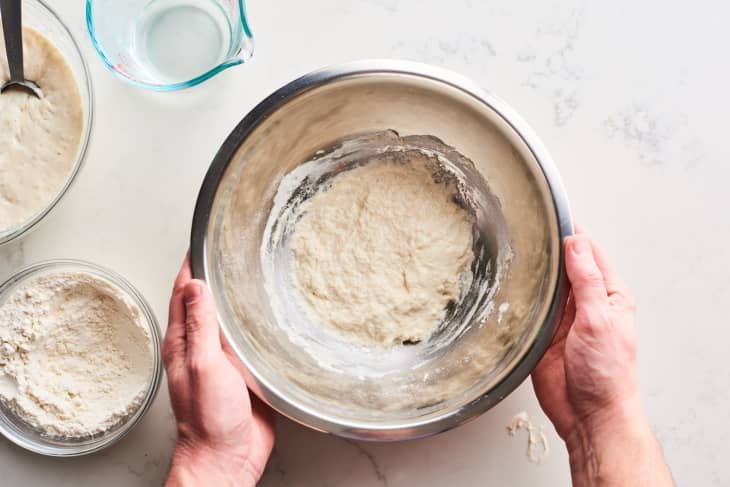
Add the flour. Add the flour and stir with a rubber spatula until there are no more bits of dry flour and it forms a very shaggy dough.
Rest the dough (30 minutes, or up to 4 hours). Cover the bowl with plastic wrap or a clean kitchen towel. Let the dough rest for at least 30 minutes or up to 4 hours. This is the autolyse stage where the flour is fully absorbing the water and enzymes in the flour begin breaking down the starches and proteins.
Mix in the salt. Pour the dissolved salt over the dough. Work the liquid and salt into the dough by pinching and squeezing the dough. The dough will feel quite wet and loose at this point.
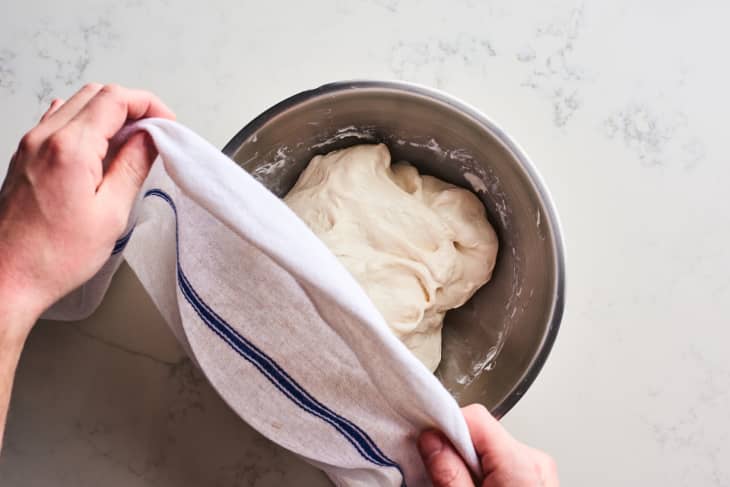
Begin folding the dough (2 1/2 hours). To fold the dough, grab the dough at one side, lift it up, and fold it over on top of itself. Fold the dough four times, moving clockwise from the top of the bowl (or giving the bowl a quarter turn in between folds). Let the dough rest 30 minutes, then repeat. Do this a total of 6 times, every half hour, for a total of 2 1/2 hours. The dough will start out shaggy and very loose, but will gradually smooth out and become tighter as you continue folding.
Let the dough rise undisturbed (30 to 60 minutes). Once you've finished the folds, cover and let the dough rise undisturbed for 30 to 60 minutes, until it looks slightly puffed. This dough won't double in size the way regular, non-sourdough breads will; it should just look larger than it did when you started.
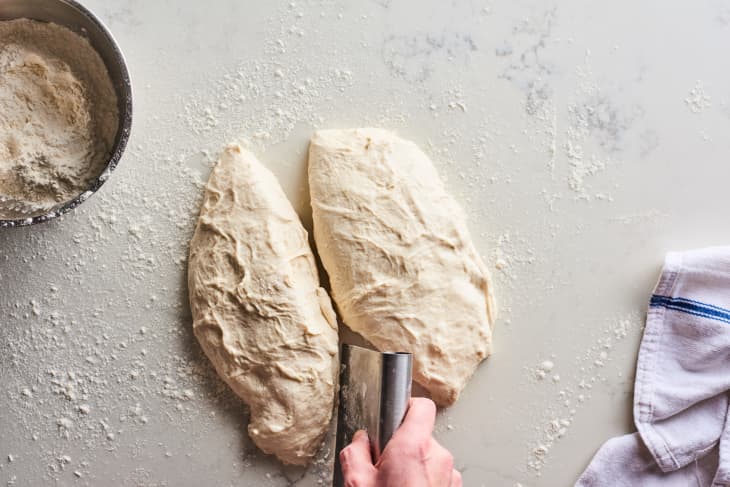
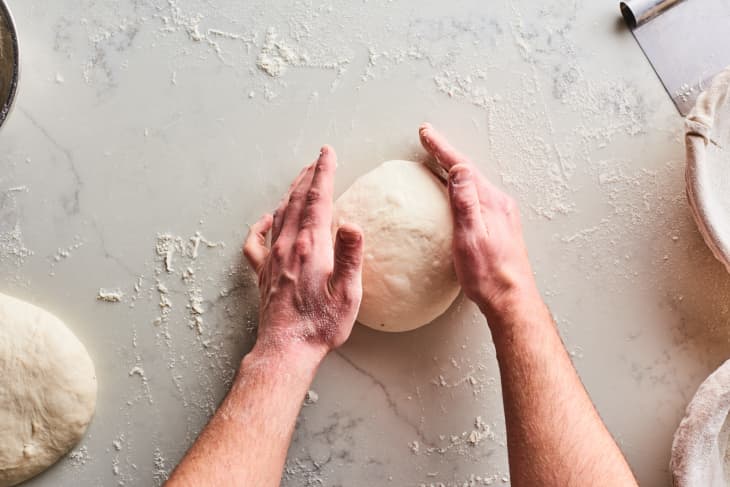
Divide the dough. Sprinkle some flour on a work surface and turn the dough out on top. Work gently to avoid deflating the dough. Use a pastry scraper to divide the dough in half.
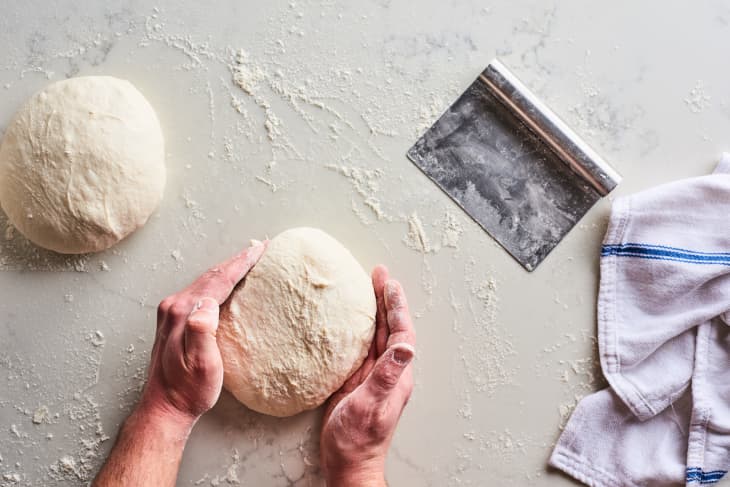
Shape the dough into loose rounds. Sprinkle a little flour over each piece of dough. Use your pastry scraper to shape each one into loose rounds — this isn't the final shaping, just a preliminary shaping to prep the dough for further shaping. Shape them into rounds by slipping your pastry scraper under the edge of the dough and then scraping it around curve of the dough, like turning left when driving. Do this a few times to build the surface tension in the dough (it makes more sense to do it than to read about it!). Flour your pastry scraper as needed to keep it from sticking to the dough.
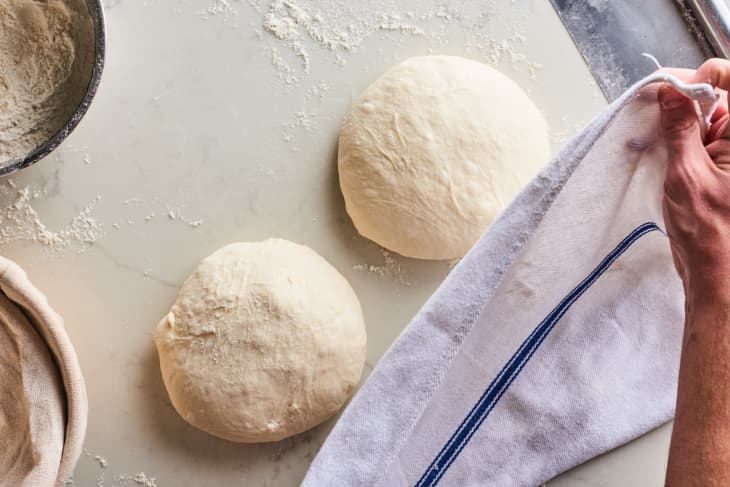
Rest the dough (20 to 30 minutes). Once both pieces of dough are shaped, let them rest for 20 to 30 minutes to relax the gluten again before final shaping.
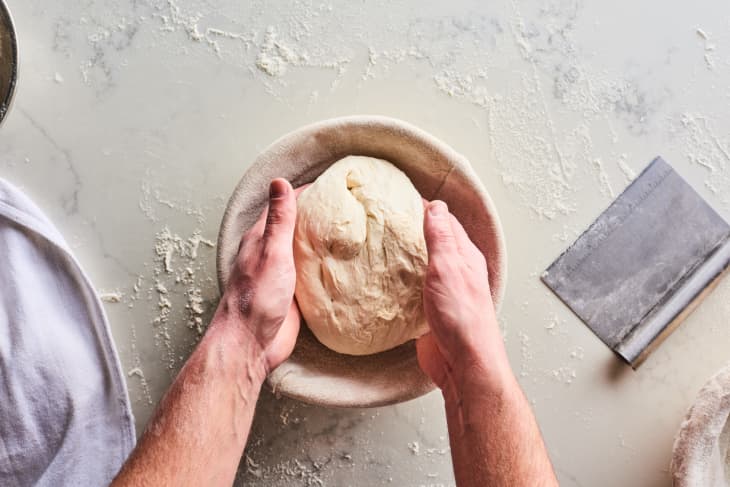
Prepare 2 bread proofing baskets, colanders, or mixing bowls. Line 2 bread proofing baskets, colanders, or clean mixing bowls with clean kitchen towels. Dust them heavily with flour, rubbing the flour into the cloth on the bottom and up the sides with your fingers. Use more flour than you think you'll need — it should form a thin layer over the surface of the towel.
Shape the loaves. Dust the top of one of the balls of dough with flour. Flip it over with a pastry scraper so that the floured side is against the board and the un-floured, sticky surface is up. Shape the loaf much like you folded the dough earlier: Grab the lip of the dough at the bottom, pull it gently up, then fold it over onto the center of the dough. Repeat with the right and left side of the dough. Repeat with the top of the dough, but once you fold it downward, use your thumb to grab the bottom lip again and gently roll the dough right-side up. If it's not quite a round or doesn't seem taut to you, cup your palms around the dough and rotate it against the counter to shape it up. Repeat with the second ball of dough.
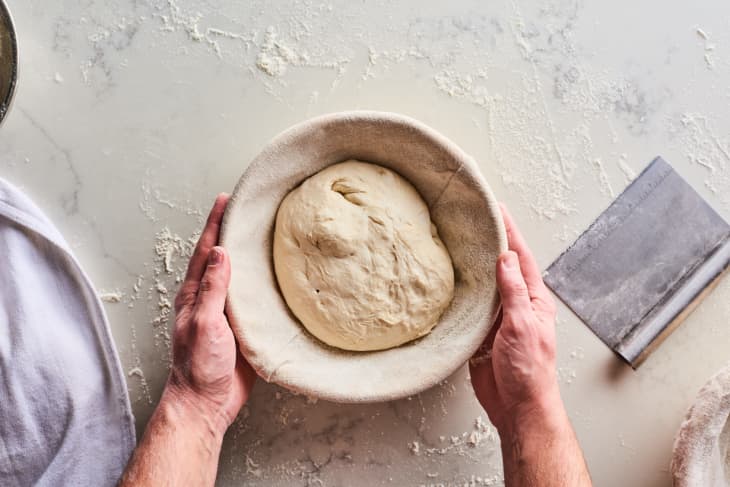
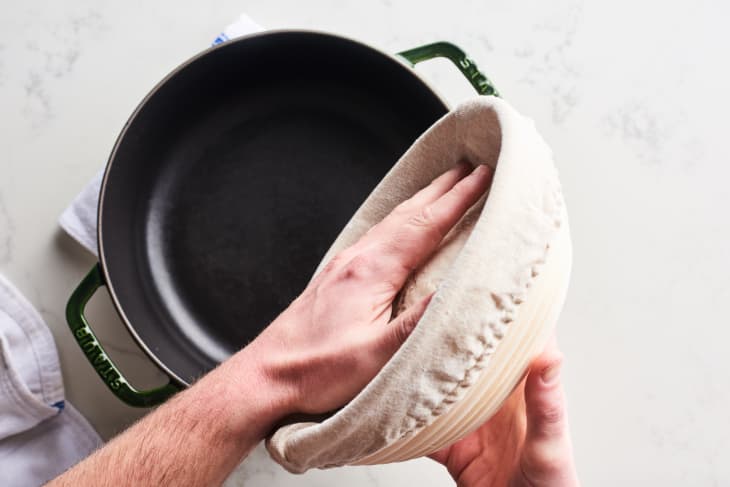
Transfer to the proofing baskets. Dust the tops and sides of the shaped loaves generously with flour. Place them into the proofing baskets upside down, so the seams from shaping are on top.
Let the dough rise (3 to 4 hours, or overnight in the fridge). Cover the baskets loosely with plastic wrap, or place them inside clean plastic bags. Let them rise at room temperature until they look billowy and poofy, 3 to 4 hours. Alternatively, place the covered basket in the refrigerator and let them rise slowly overnight, 12 to 15 hours. If rising overnight, bake the loaves straight from the fridge; no need to warm before baking.
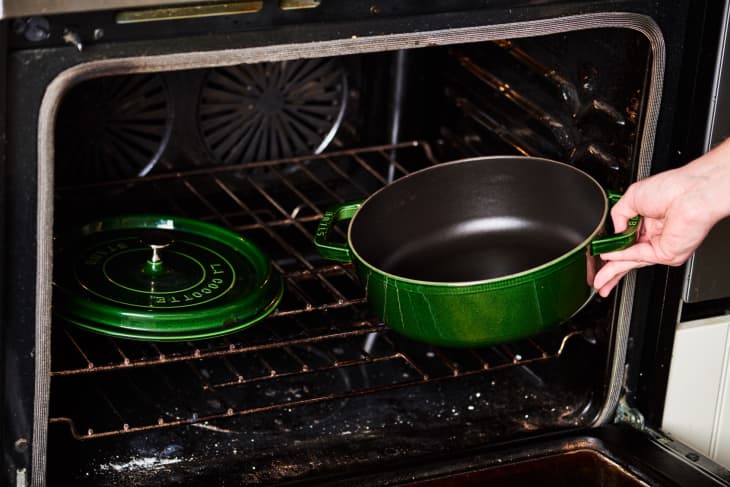
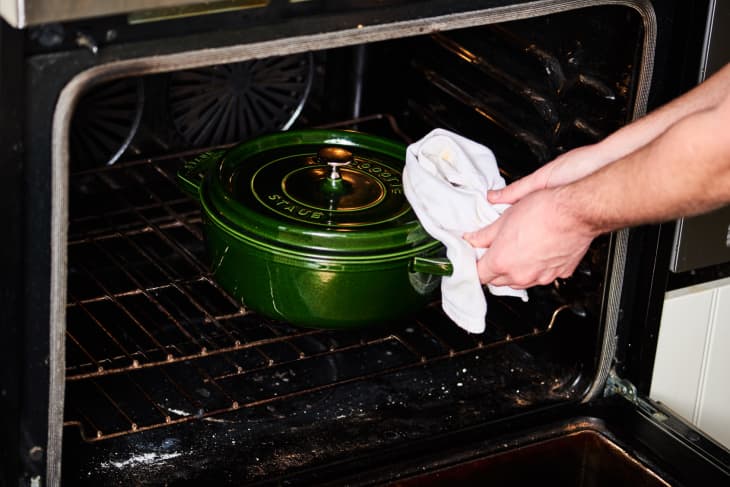
Heat the oven to 500°F. Place two Dutch ovens or other heavy-bottomed pots with lids in the oven, and heat to 500°F. (If you don't have two pots, you can bake one loaf after the next.)
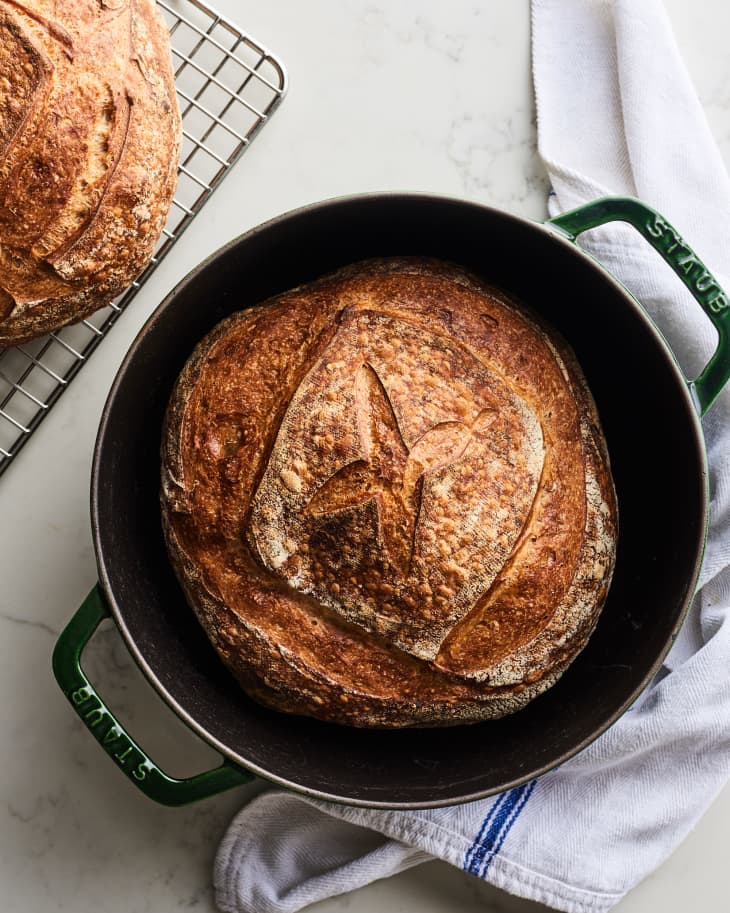
Transfer the loaves to the Dutch ovens. Carefully remove one of the heated Dutch ovens from the oven and remove the lid. Tip the loaf into the pot so the seam-side is down. Repeat with the second loaf. (See Recipe Note if your loaf sticks to the basket.)
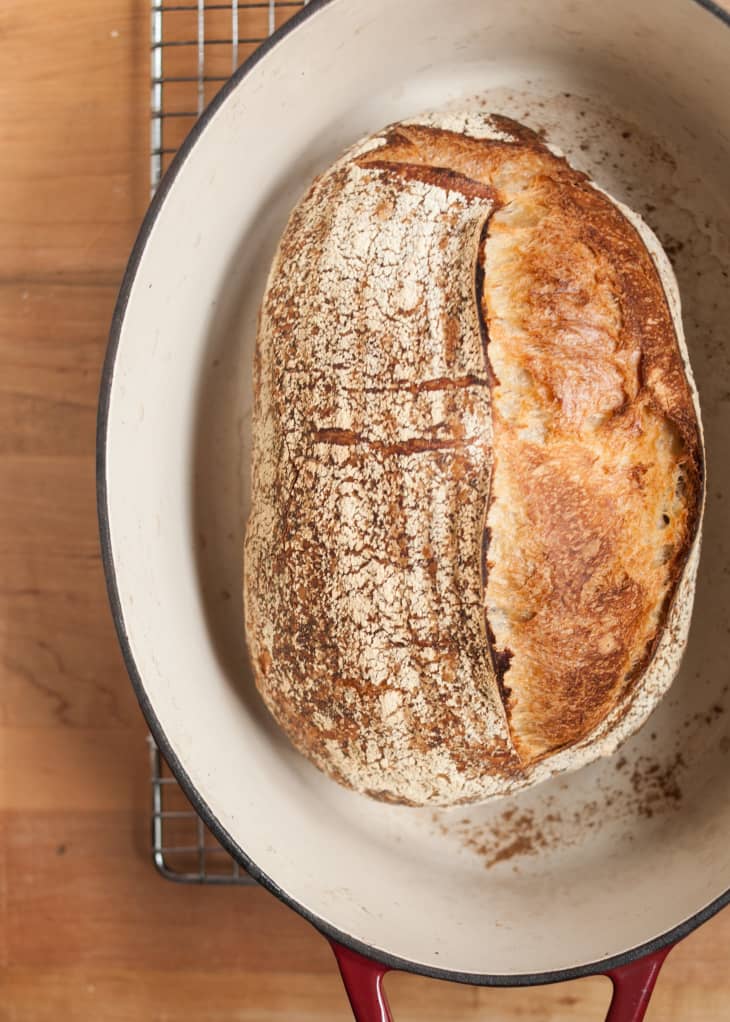
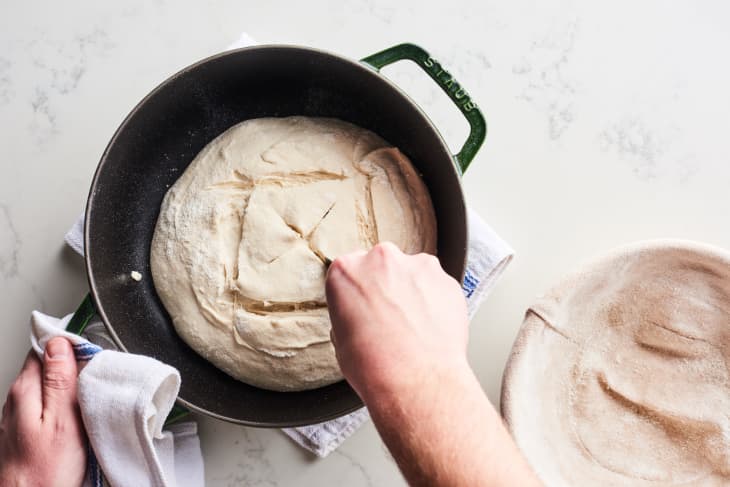
Score the top of the loaf. Use a lame, sharp knife, or serrated knife to quickly score the surface of the loaves. Try to score at a slight angle, so you're cutting almost parallel to the surface of the loaf; this gives the loaves the distinctive "shelf" along the score line.
Bake the loaves for 20 minutes. Cover and bake for 20 minutes.
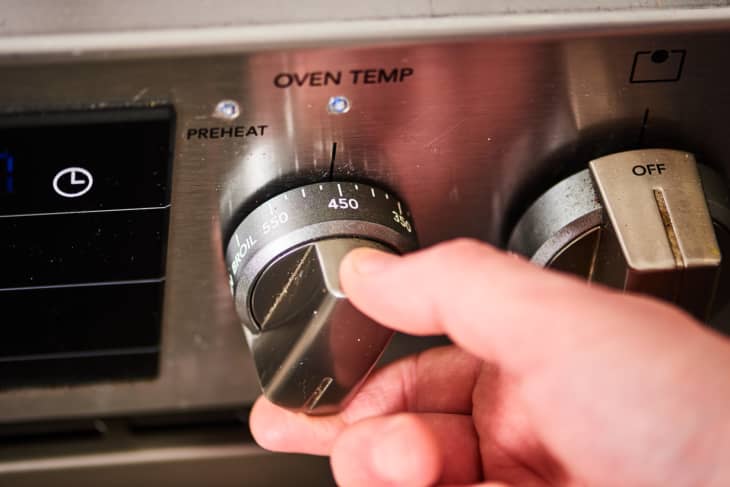
Reduce the oven temperature to 450°F and bake another 10 minutes. Resist the temptation to check the loaves at this point; just reduce the oven temperature to 450°F. Bake another 10 minutes.
Remove the lids and continue baking 15 to 25 minutes. Uncover the pots to release any remaining steam. At this point, the loaves should have "sprung" up, have a dry surface, and be just beginning to show golden color.
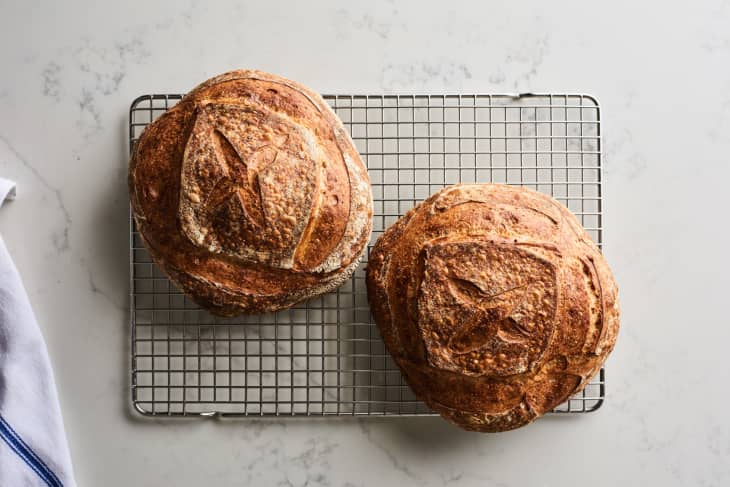
Bake another 15 to 25 minutes. Continue baking uncovered until the crust is deeply browned; aim for just short of burnt. It might feel a bit unnatural to bake loaves this fully, but this is where a lot of the flavor and texture of the crust comes in.
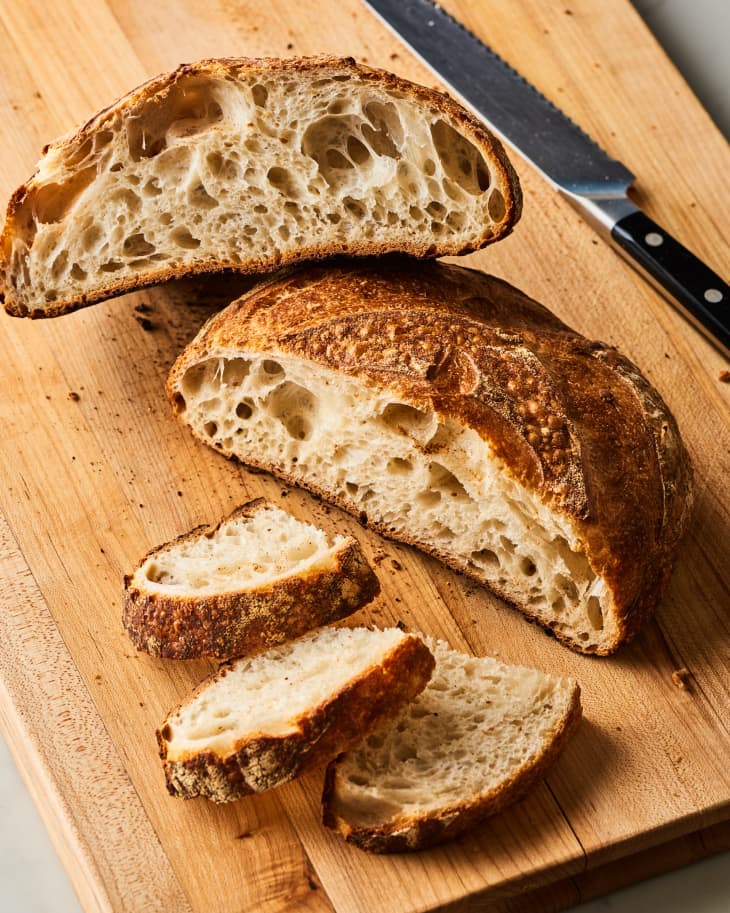
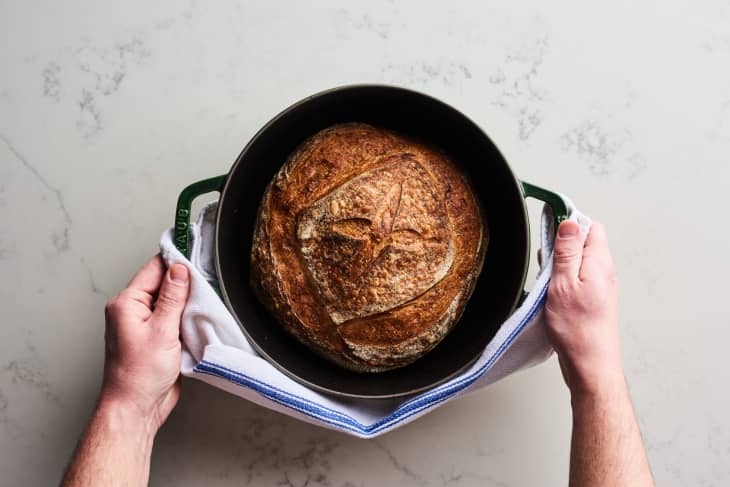
Cool the loaves completely. When done, lift the loaves out of the pots using a spatula. Transfer them to wire racks to cool completely. Wait until they have cooled to room temperature before slicing.


Recipe Notes
Whole-wheat sourdough: You can replace up to half of the all-purpose flour with whole-wheat or whole-grain flour.
All-purpose vs. bread flour: Bread flour will give your bread a sturdier, chewier texture and a loaf that's easier to slice. Loaves made with all-purpose flour will be a bit more delicate, especially when you cut them, but still work just fine.
If your loaf sticks to the proofing basket: This still happens to me all the time! It's annoying, but not the end of your sourdough dreams. If some of the dough stays stuck to the lining of the proofing basket, try to gently disengage it or pinch it away with your fingers. Fold a pinch of dough over the tear and bake as usual. The crust will look a little rough where it was torn, but the bread will still taste delicious.
Storage: Bread can be stored at room temperature (cut-side down if cut) in a paper bag for up to 3 days, or well wrapped in plastic wrap and frozen for up to 2 months.
Adapted from Tartine Bread.