
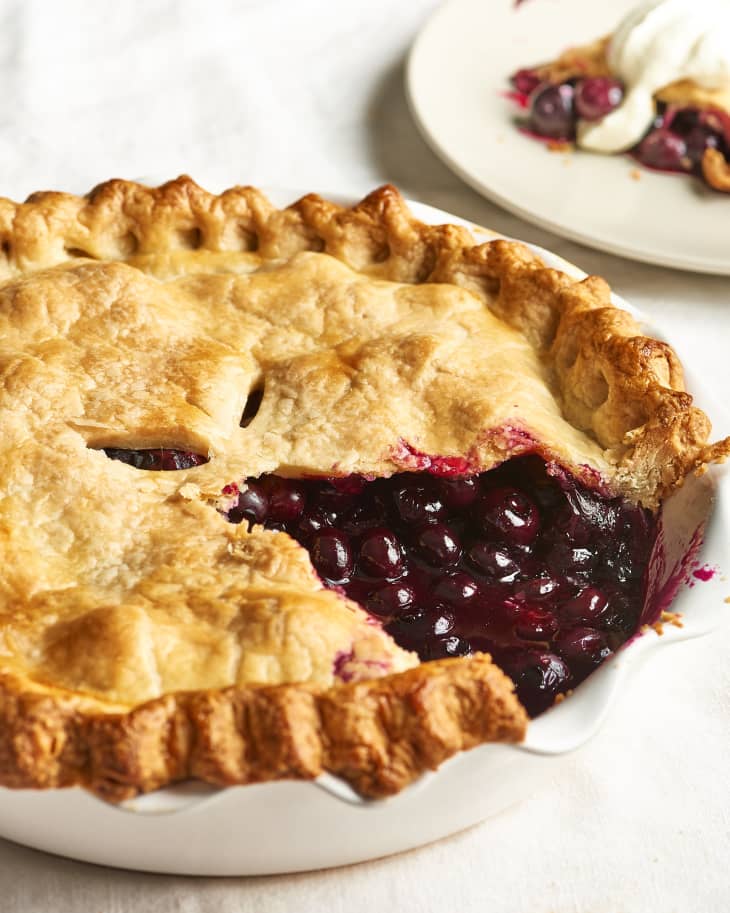
How To Make Perfectly Flaky Pie Crust

A step-by-step guide to making a flaky all-butter pie crust.
Makes2 (10-ounce) crusts
Prep10 minutes to 20 minutes

I am very worried, friends. Worried that the fear of pie crusts may be keeping a great many of you from making your own pies at home. Is this true? Does this sound like you? Do debates over butter vs. lard or tender vs. flaky make you want to run and hide? Well, take a deep breath and grab your notebook — today we’re going to go over how to make a pie from start to finish, one step at a time.
How to Make Homemade Pie Crust
Okay, here’s your first lesson: Homemade pies do not have to be perfect. Really. This is a hard lesson to learn because we want that perfectly crimped and beautifully burnished pie crust so badly! I completely understand. But if your pie crust rips in half while you’re transferring it to the pan, it’s OK. Remind yourself that at the end of the day, you still have pie, and that’s all that matters.
Next lesson: The more you make pies, the better you’ll be. Making pie crust is a lot like riding a bike — it takes a lot of practice before you can pull it off every time. I was just as astounded as you the first time I pulled a pie out of the oven and saw that it hadn’t shrunk, collapsed, burnt, or otherwise become disfigured. I don’t want to jinx myself by saying that I’m now a pie-making pro, but I really do feel that each pie I’ve made has been better than the last.
All Butter vs. Shortening vs. Mixed Crusts
Pie crusts are made by working fat into flour — when the fat melts during baking, it leaves behind layers of crispy, flaky crust. Yum. But just what fat you use in your pie is a matter of much debate — one that really boils down to personal preference. While some people prefer lard and shortening crusts because they can be easier to work with, I prefer all-butter crusts because of their lovely, rich flavor. Here, I’m sharing my go-to method for making an all-butter pie crust, which I promise is practically foolproof.
Flaky vs. Tender Crusts
The flakiness of a crust is a result of both the fat that you use and how much you work the fat into the flour before adding the water. Because of their higher melting temperature and unique structure, lard and shortening do make very flaky crusts. But you can make an equally flaky crust using all-butter by not over-incorporating the butter into the flour. In this recipe, that means adding the butter in two additions, and cutting it into the flour just until you see pieces no larger than peas. Conversely, if you like a very tender crust, work the butter into the flour until it resembles bread crumbs.
Should You Put Vodka In Pie Crust Dough?
Adding alcohol to pie dough aids in crispness and flakiness, which is why you’ll sometimes see pie crust recipes that call for vodka. (Don’t worry — all the alcohol bakes off in the oven). If you’d like to give it a try, replace half the water in this recipe with vodka. Or, follow our recipe for a vodka pie crust.
Should You Put Vinegar In Pie Crust Dough?
Vinegar helps prevent the formation of gluten, which makes for a tough crust. If you’d like, try adding 1 teaspoon of apple cider vinegar when you’re adding the ice water in this recipe. You won’t taste the vinegar in the finished pie.
Work Quickly to Keep the Ingredients Cool
One universal truth when making crusts is that you need to keep everything cool, particularly the butter. Warm butter will be absorbed by the flour instead of coating it, resulting in a tougher, less flaky crust.
Once you take the butter out of the fridge, work quickly to make the pie crust. Refrigerate the dough between each step. If you want to make a pie during hot weather, try to make it in the morning or in the evening when the temperature is a little cooler. You can also refrigerate your rolling pin and cutting board. Or just work quickly and refrigerate frequently. If you’re blind baking your crust, refrigerate or freeze it as the oven preheats.
Making It Pretty
Last but not least, there are lots of ways to make your pie extra-pretty. I love brushing the top with a simple glaze of egg yolk thinned with a little water. This makes a burnished, glowing crust. A friend of mine brushes her crusts several times during baking to make them even more golden and shiny. You can also brush the crust with cream or sprinkle it with a handful of large-grain sugar. Sparkly! If you’re ready to level-up your pie, try weaving the top crust into a lattice. It’s not that hard, but looks oh-so-pretty. Here’s how.
Knowing how to make your own pie from scratch is one of those skills that we feel that every home cook should have under their belt. You might not make pies very often, but when you do, we want to be sure you feel confident making one!
Tester’s Note
We’ve tested and made many, many pie crusts here at Kitchn because we want to make it as foolproof as possible when it comes time for pie. This recipe, originally by Emma Christensen, has changed over the years to reflect new techniques for making the ultimate flaky, buttery pie crust, including Meghan’s genius move in 2018 of adding the butter in two additions. I updated the recipe again recently to use a little more ice water to make the dough come together quickly, as I’ve found that adding more water incrementally if there’s not enough in the dough works the gluten too much, leading to tough pie crust. The more hydrated dough is also easier to roll out. Don’t worry, you still get a flaky crust that shatters when you bite into it!
This pie crust recipe makes enough dough for 2 (10-ounce) pie crusts, enough to line a regular pie plate. (You’ll need more dough to line a deep-dish pie plate, use this recipe instead.) We’ve also added the option of a touch of sugar if you’re making sweet pies, which you can of course omit if you’re going down the savory route.
—Christine, September 2021
How to Make Perfectly Flaky Pie Crust
A step-by-step guide to making a flaky all-butter pie crust.
Prep time 10 minutes to 20 minutes
Makes 2 (10-ounce) crusts
Nutritional Info
Ingredients
- 1 1/2 sticks
(6 ounces) cold unsalted butter
- 1/3 cup
plus 1 tablespoon ice water
- 2 cups
all-purpose flour, plus more for rolling
- 2 teaspoons
granulated sugar (optional)
- 1 1/2 teaspoons
kosher salt
Equipment
Measuring cups and spoons
Rolling pin
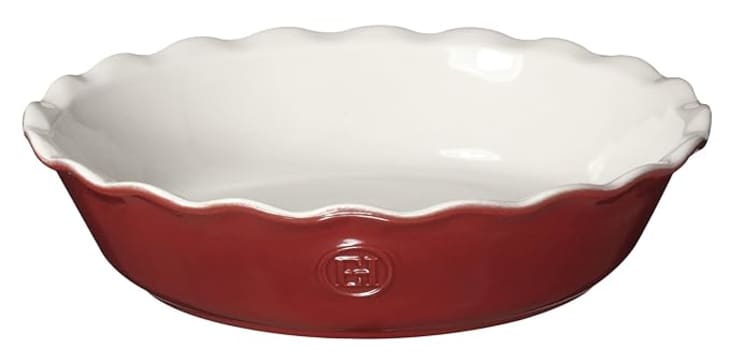
Regular pie plate
Food processor, or large bowl and pastry cutter
Bench scraper
Plastic wrap
Instructions
Make the dough:
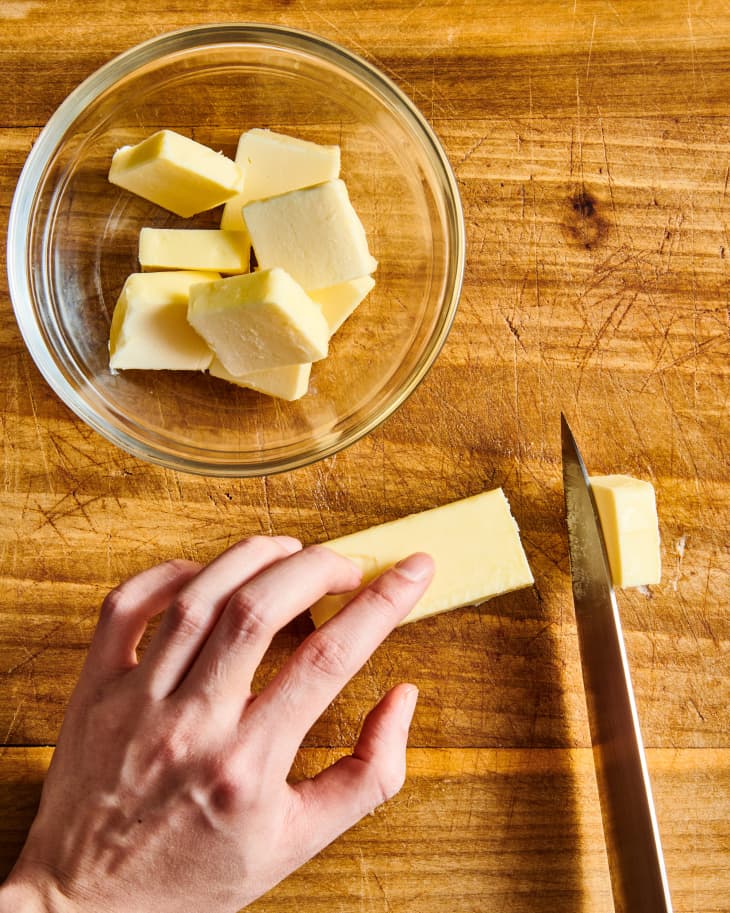
Prepare the butter and ice water. Cut 1 1/2 sticks cold unsalted butter into 1/2-inch cubes and refrigerate.
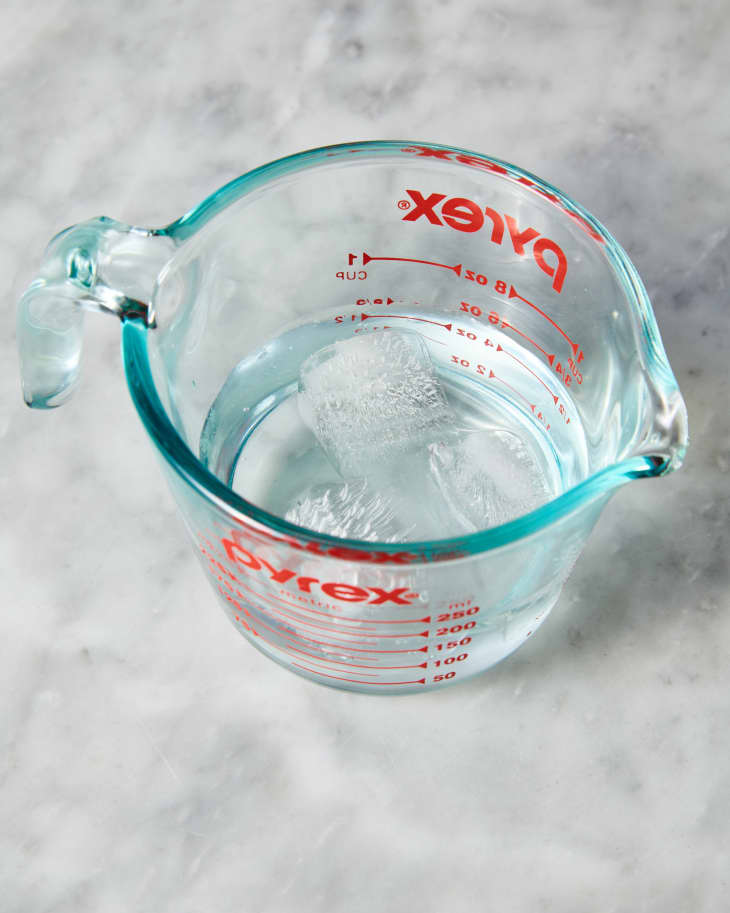
Place a few ice cubes in a liquid measuring cup and fill with cold water.
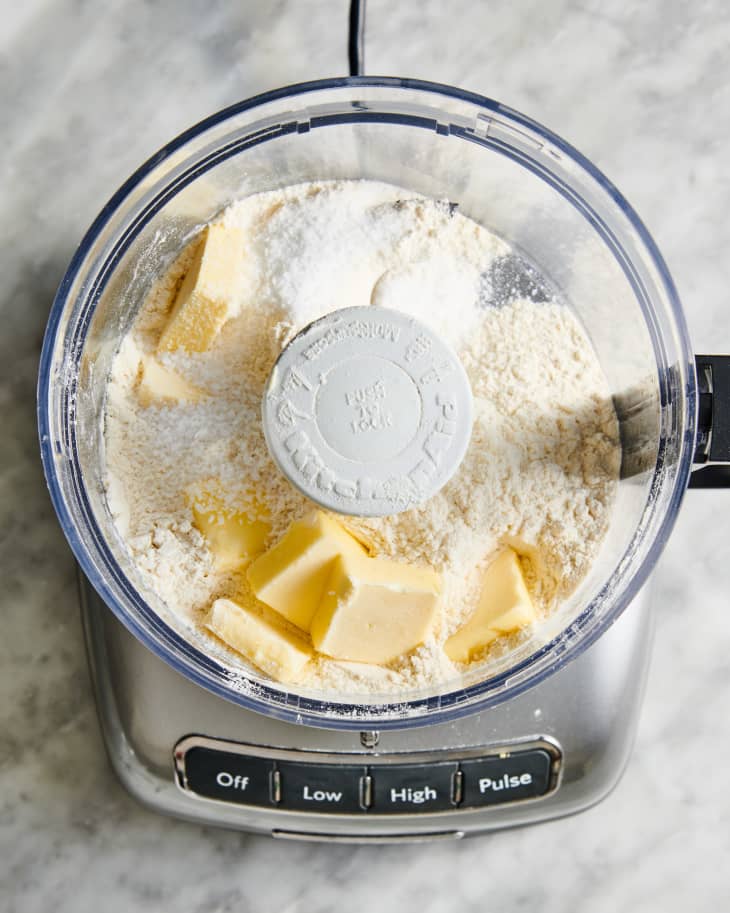
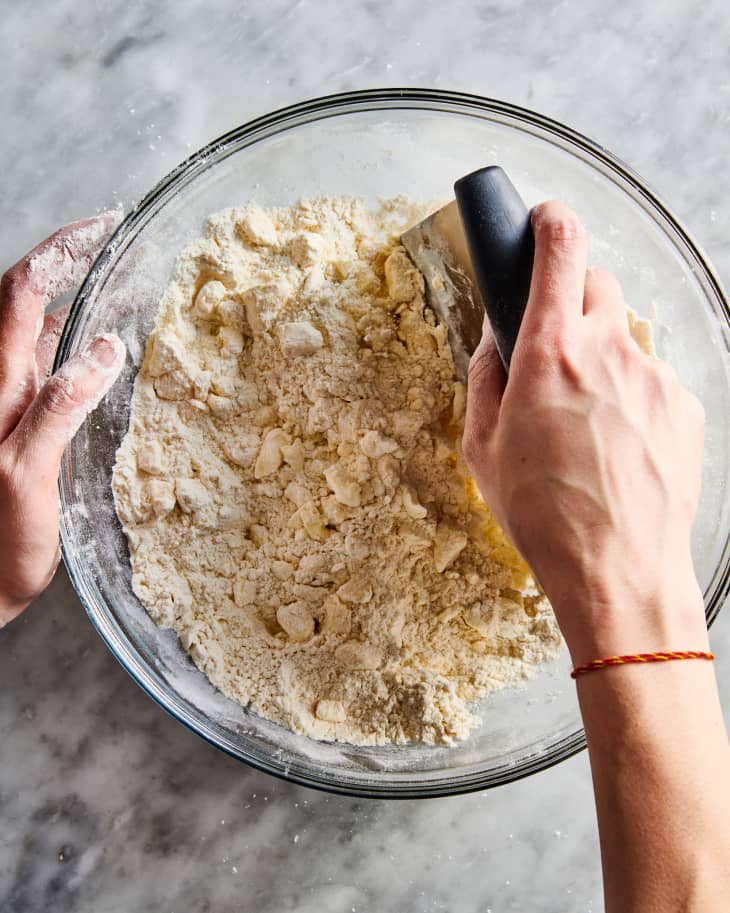
Method 1: Pulse the dry ingredients with half the butter in the food processor. Place 2 cups all-purpose flour, 2 teaspoons granulated sugar if desired, and 1 1/2 teaspoons kosher salt in a food processor fitted with the blade attachment. Pulse a few times to combine. Scatter half of the butter cubes over the flour.
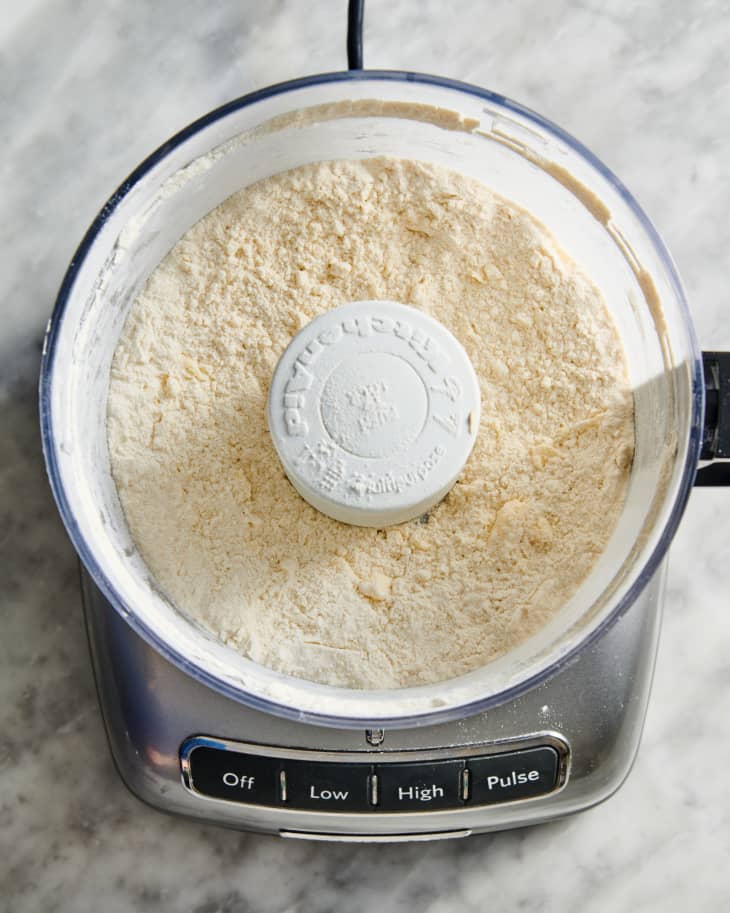
Pulse until the butter is cut into pieces no larger than a pea, about 7 (1-second) pulses.
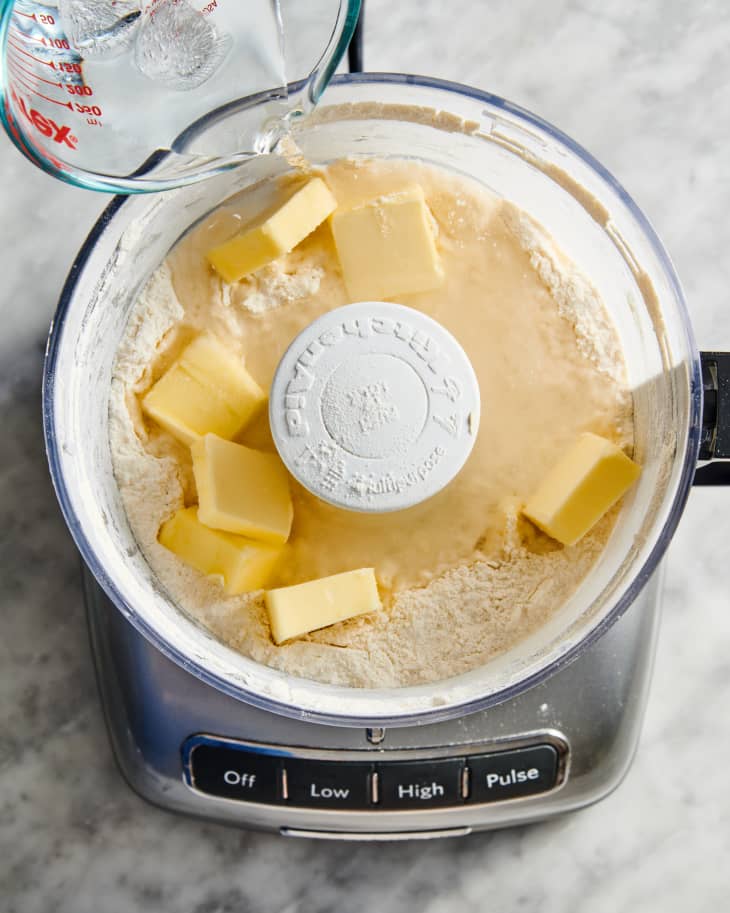
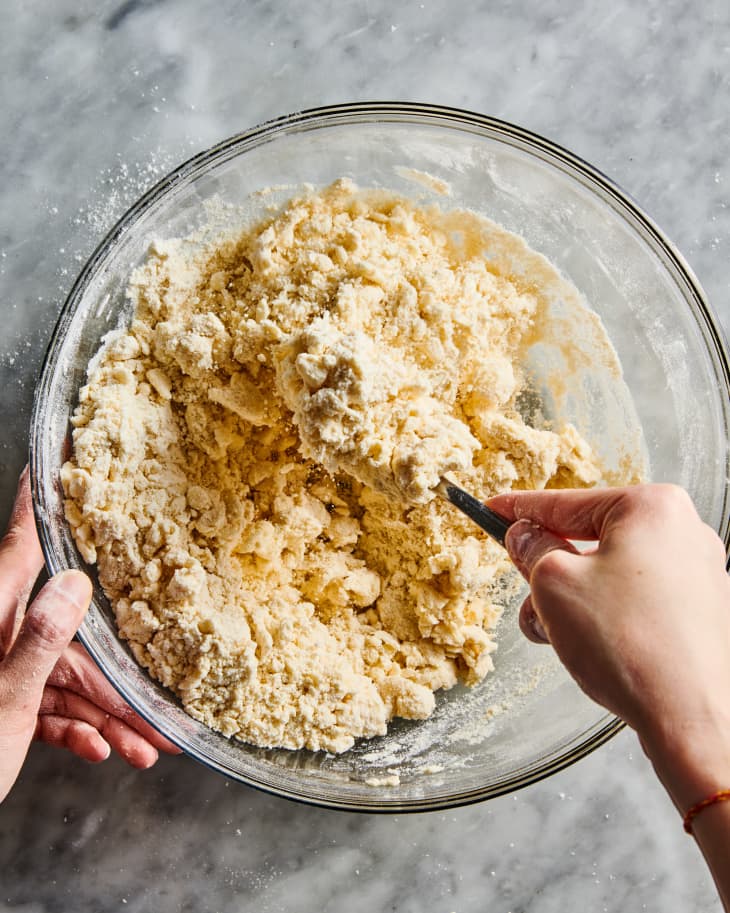
Pulse in ice water and the remaining butter. Scoop out 1 tablespoon of the ice water and drizzle over the flour mixture. Remove any ice cubes from the ice water and pour out the excess water until you have 1/3 cup left. Drizzle the 1/3 cup water over the butter-flour mixture. Scatter the remaining butter cubes over the water-flour mixture.
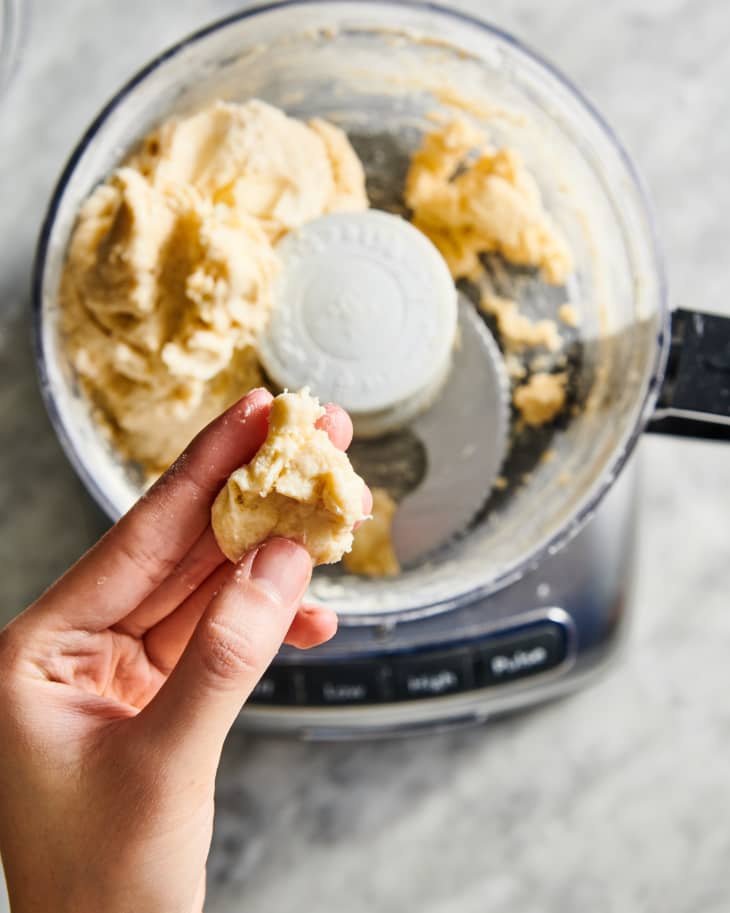
Pulse until the dough forms very small lumps about the size of a peppercorn, 7 to 10 (1-second) pulses. At this point, the dough should hold together and feel tacky when squeezed.
Method 2: Making dough by hand. Whisk 2 cups all-purpose flour, 2 teaspoons granulated sugar if desired, and 1 1/2 teaspoons kosher salt together in a large bowl. Scatter all the butter over the flour and toss with your hands to separate and coat the cubes. Cut the butter with a pastry cutter or two small knives into pieces no larger than a pea.
Mix in ice water. Scoop out 1 tablespoon of the ice water and drizzle over the flour mixture. Remove any ice cubes from the ice water and pour out the excess water until you have 1/3 cup left. Drizzle the 1/3 cup water over the butter-flour mixture. Stir and fluff the flour mixture with a fork until the dough is evenly moistened and shaggy.
Chill and roll out the dough:
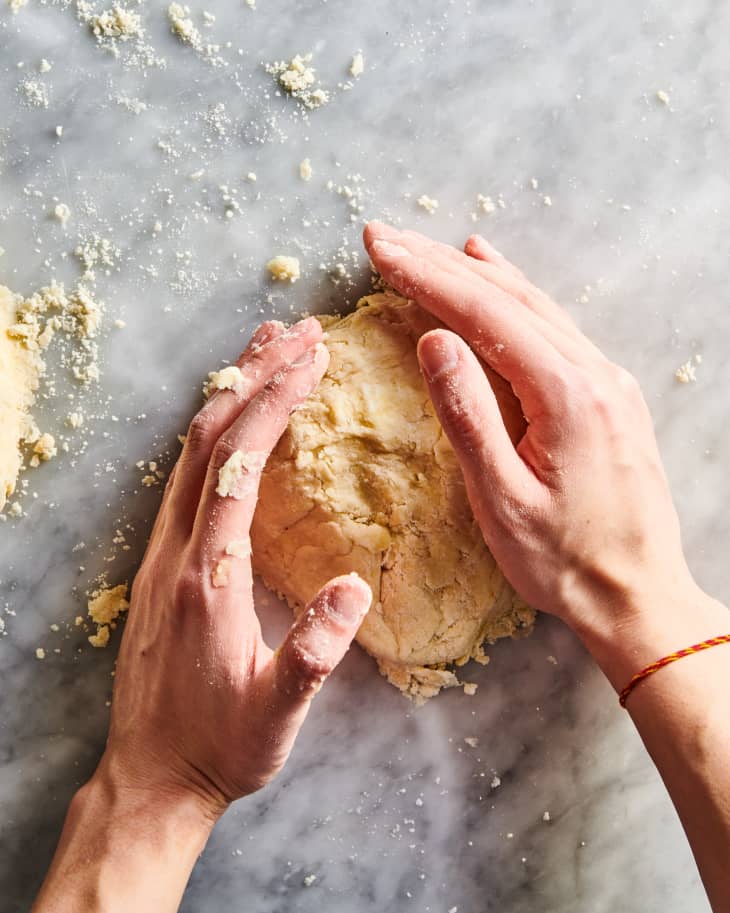
Form the dough into disks and chill. Turn the dough out onto a clean work surface. Divide the dough into two piles (about 10 ounces each). Use the palm of your hand to quickly gather and press each mound into a thick disk about 3 1/2 inches wide.
Wrap each disk in plastic wrap. Refrigerate for at least 1 hour or up to 4 days (or freeze for up to 3 months; thaw in the refrigerator overnight before using).
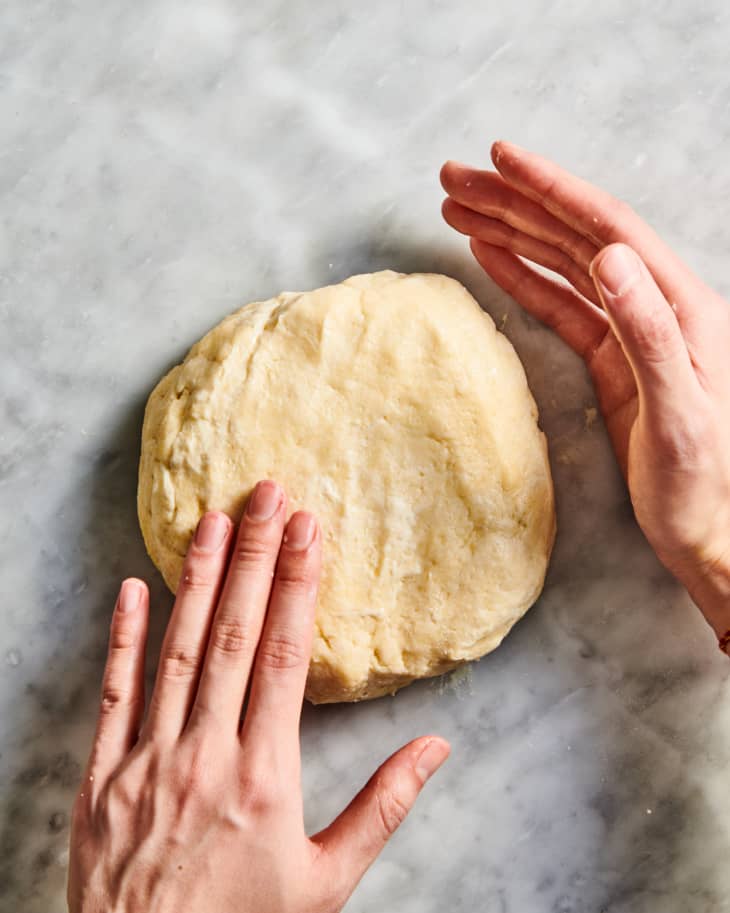
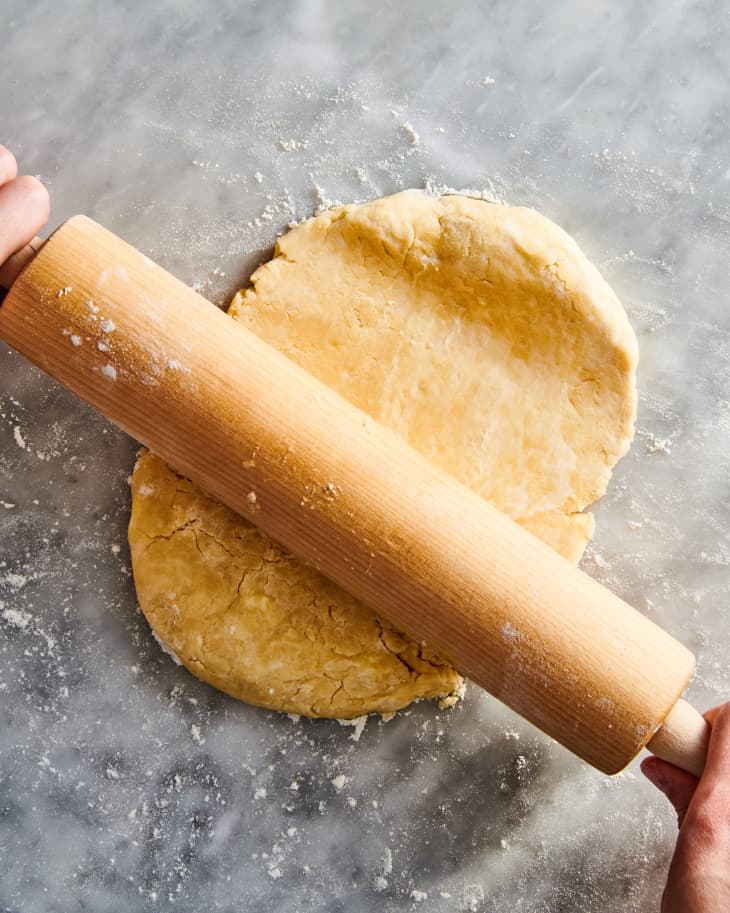
Roll out the dough. Let the dough sit at room temperature for 10 minutes before rolling out. Unwrap 1 of the disks and place on a work surface dusted lightly with all-purpose flour. Sprinkle a rolling pin with flour. Working from the middle of the dough outwards, roll the dough into a 12-inch round about 1/8-inch thick. If the dough cracks when you first start rolling, let it stand for one minute to warm slightly before rolling again. Use more flour if the dough starts to stick. Use a bench scraper to lift the pastry from the work surface occasionally and make sure it's not sticking.
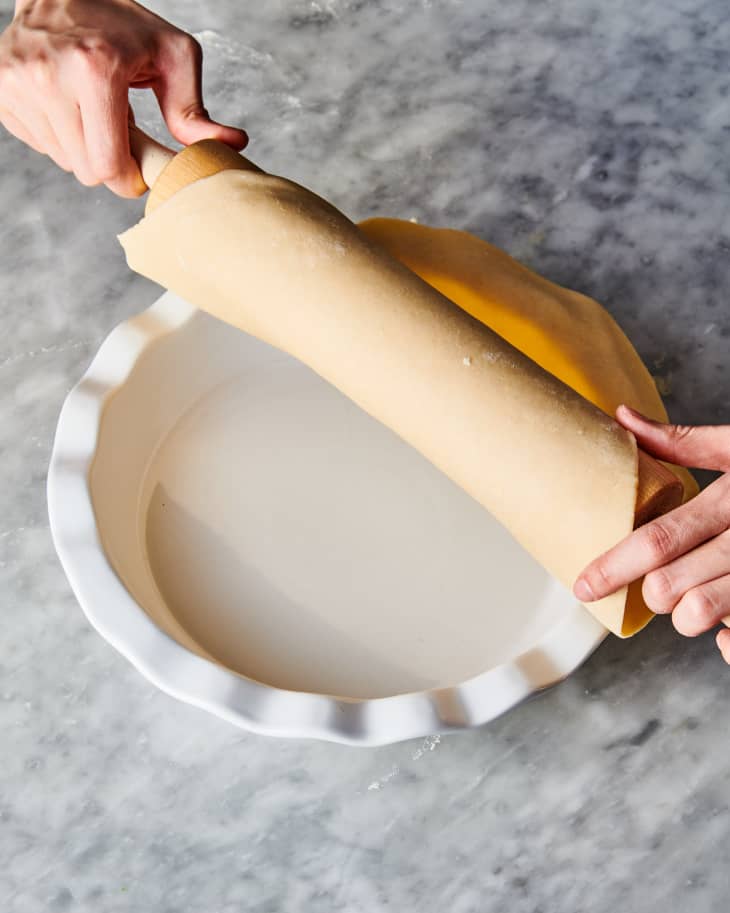
Transfer the dough to a pie plate. Lay your rolling pin on one edge of the pie crust and begin gently rolling the pie crust over the rolling pin. When it's all rolled up, move it to a regular pie plate (not deep dish) and gently unroll.
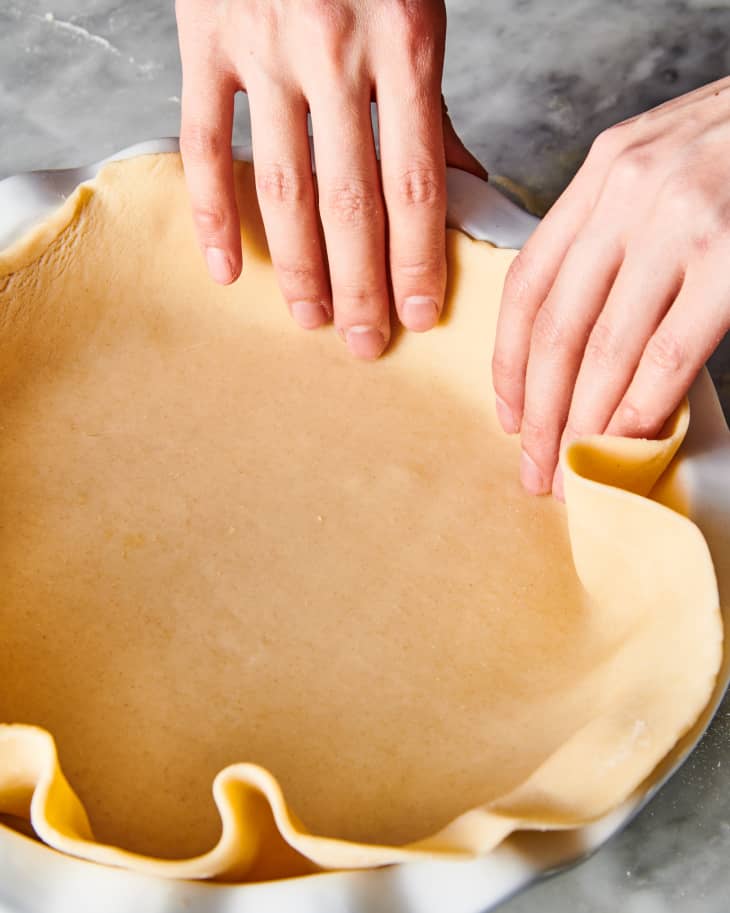
Ease the crust into the corners of the pan.
3 Pie Options
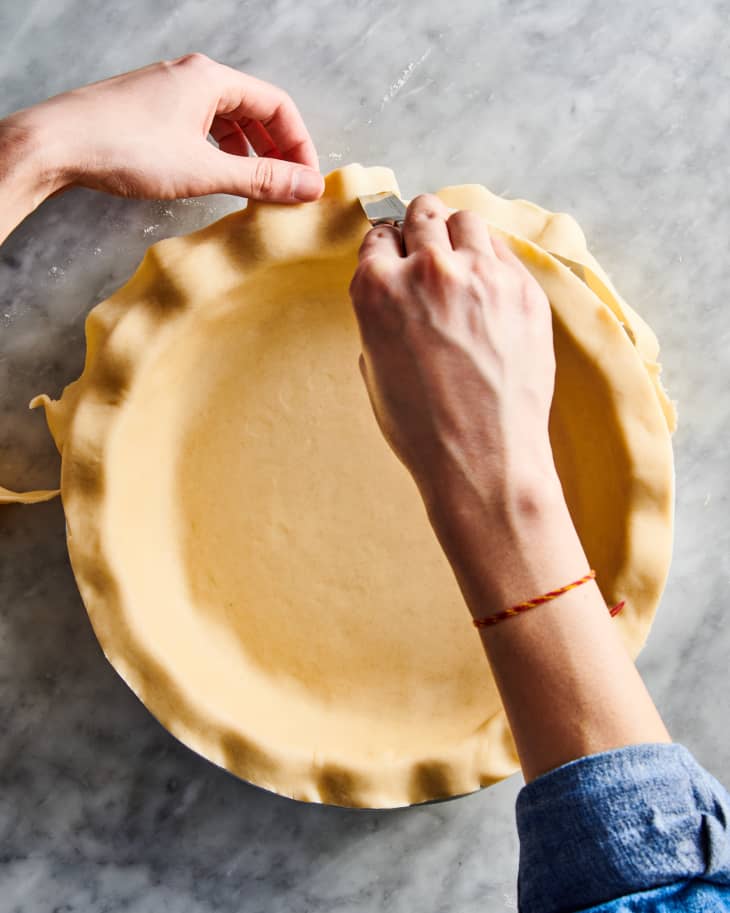
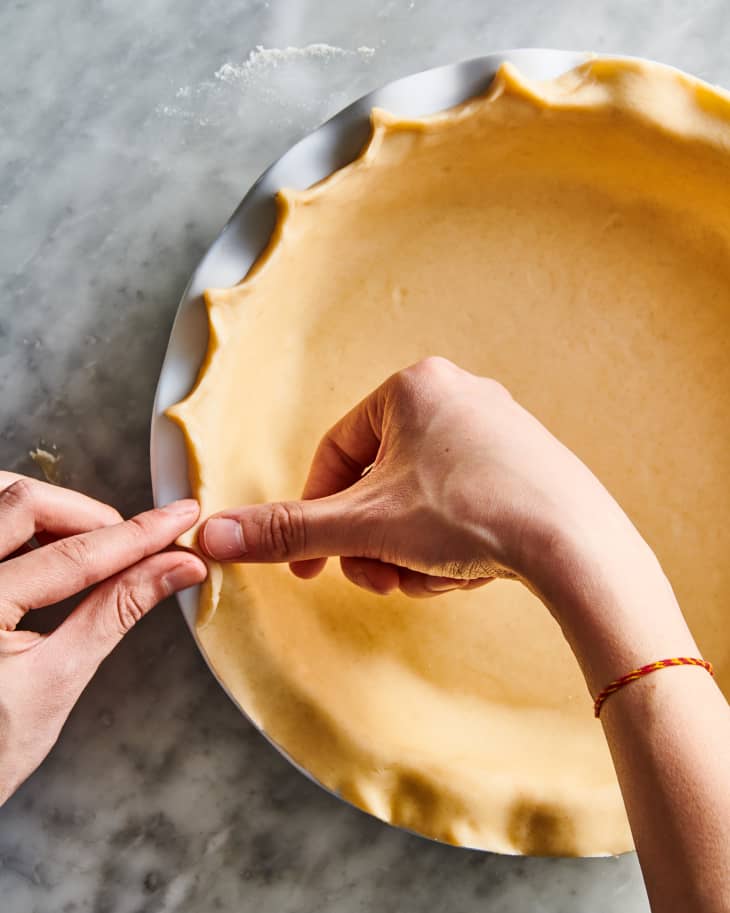
Option 1: Single crust pie. Trim all but an inch of dough from around the edges.
Roll the edges of the dough under itself and crimp with your fingers or the tines of a fork. The crust is now ready to be blind baked (step-by-step instructions here) or filled and baked.
Option 2: Top or lattice crust pie. Roll out the second pie dough into an 11-inch round. Fill the pie, then top with the second crust or a lattice design (step-by-step instructions here). Press the edges together to seal, then trim all but an inch of dough from around the edges before crimping. Cut a few slits into the top of a double-crust pie for venting before baking.
Option 3: Decorative cut outs pie. Roll out the second pie dough into a 12-inch round. Cut out shapes as desired. Fill the pie and top with the shapes. Trim all but an inch of dough from around the edges. Roll the edges of the dough under itself and crimp with your fingers or the tines of a fork.
Recipe Notes
Make ahead: The disks of dough can be made up to 4 days ahead and refrigerated. The wrapped dough can also be placed in a freezer bag and frozen for up to 3 months; thaw in the refrigerator overnight before using.