
Baking School Day 2: Pâte à Choux

The Kitchn’s Baking School Day 2: All about pâte à choux.
Join The Kitchn’s Baking School: Sign up and see all The Kitchn’s Baking School assignments
It’s the second day of Baking School and we’re diving straight into our first French pastry lesson. Pâte à what? Please don’t be alarmed or head for the hills just yet; it is not as intimidating as it sounds, and it is actually an incredibly rewarding and basic pastry that will let you do so many things. If you were in a pastry program at a fancy culinary school, this is one of the first things you would learn, and we want to start you off right.
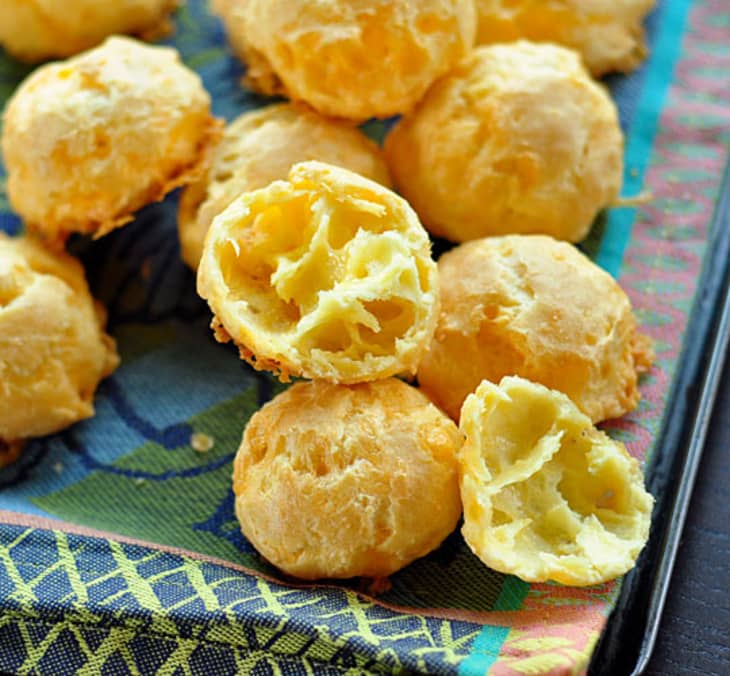
Pâte à choux (pronounced pat-a-shoe), or choux paste, is simply a roux (cooked flour and butter) mixed with eggs. It is what cream puffs, eclairs, and even some donuts are made from.

What Is Pâte à Choux?
The dough of pâte à choux is a thick paste made of water, butter, flour, and eggs — it’s thicker than a batter, but not quite as stiff as a dough. It’s typically piped into different shapes, and then either baked or fried. When heated, the liquid from the water and eggs quickly evaporates in the hot oven and creates steam. This makes the paste puff up as it bakes, ultimately creating a crisp, golden outer shell with a hollow, airy center.
How Do You Use Pâte à Choux?
Pâte à choux is the base for many classic pastries, from bite-sized cream puffs and individual eclairs to cheesy gougères, show-stopping croquembouche, and even French crullers! Once you know how to make it — a surprisingly easy process — there’s a whole world of pastries and desserts open to you.
The Role of Eggs in Pâte à Choux
Despite the thick texture of the paste, choux deceivingly contains a large amount of liquid. A big part of the liquid content comes from eggs. In fact, the more eggs you can add without jeopardizing the integrity of the paste, the better (more on this in a second).
Previously: Baking School Day 1: All About Eggs in Baking
Eggs: Steam, Stretchy Protein, Flavor, and Color
Once pâte à choux hits the heat of the oven, all this liquid quickly turns to steam, leavens the paste, and makes it rise. In addition, the proteins in the eggs uncoil, stretch, and “puff.” The signature hollow-ness of baked choux is a result of these proteins being stretched so far that they break. The eggs will eventually set, as cooked eggs do, to help support the structure and create the crisp outer shell of baked choux paste. However, if under-baked, the proteins will recoil and cause the choux to shrivel up and collapse.
As with many other pastries, eggs also provide flavor and color to choux pastries. Notice how there are few flavorful ingredients in a pâte à choux recipe? While they are pretty mild, any flavor at all can be attributed to the egg yolk, or simply, the fat. The yolk is also responsible for its appealing golden color.
But You Never Know Quite How Many Eggs You Need!
The number of eggs in a pâte à choux recipe is not actually constant. It is more important to understand the process of adding the eggs rather than the exact number of eggs. Confused? Let’s take a closer look.
Pâte à choux recipes will typically give a number of eggs as a starting point, but your goal should really be to add in only as many eggs as the butter and flour will hold. This amount depends on your flour, the size (and slight size variance) in your eggs, and even the humidity on the day you bake, so it can vary slightly from day to day and batch to batch.
How to Tell if Choux Paste Is Ready
This fact means that it is more important to know how the finished paste should look and feel than it is to just follow the recipe. Finished choux paste should be soft, smooth, and be able to be piped.
If you pull the paddle attachment of an electric mixer out of the paste, a “tongue” should appear at the tip of the paddle.
Similarly, if you gently scoop up a bit of the paste with a rubber spatula and let it fall back into the bowl, a “v” of paste should be left behind on the spatula.
Be sure to mix thoroughly between adding in each egg and then check the paste before adding the next one. The mixture will appear separated and gloppy in between additions, but will come back into a smooth paste as you mix.
If by the second-to-last egg, the paste is already looking smooth and forms a “v” as it falls back into the bowl, it’s OK not to add the last egg. Feel like your paste is borderline and just needs a little more egg? Whisk one up and only pour in half!
How to Make Choux Paste
Pâte à choux is actually one of the simplest French pastries to make at home — it requires very little work for some seriously impressive payoff. We’ll list the basic steps here for quick review, but for a step-by-step lesson with all the pictures you need to understand how this works, go through the full pastry lesson here.
The Basic Steps of Choux Paste
- Heat the oven: First and foremost, get that oven turned on. Heat is a major player in getting a good puff from your pâte à choux, so you want to make sure your oven has reached the correct temperature and is thoroughly heated before baking off the choux paste.
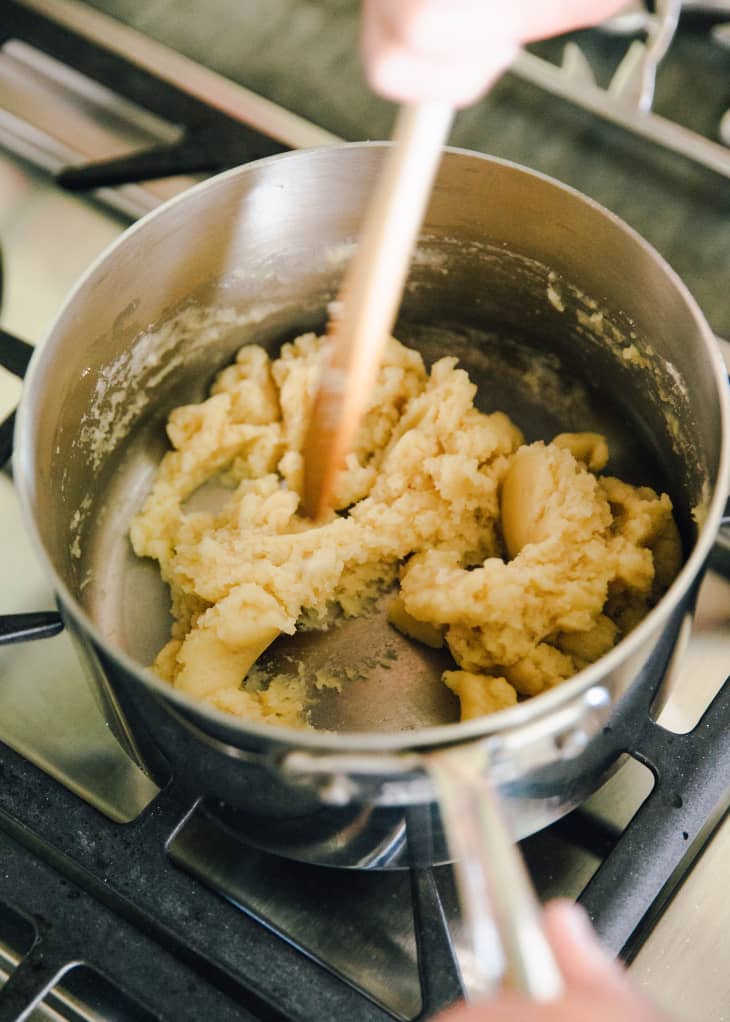
- Cook the butter and water, and add the flour: Now, to the stove we go. Dice the butter and combine it with the water in a saucepan with high sides. Bring the water to a boil and make sure all the butter has melted. At this point, take the saucepan off the heat and add in all of your flour. Immediately begin stirring with a wooden spoon, making sure to break up any lumps that may form and that any small pockets of dry flour are incorporated.
- Cook the flour paste: Return the saucepan to medium-low heat, and keep stirring to cook the flour, about three to five minutes. At some point, it will start to look like mashed potatoes, then begin pulling away from the sides of the pan. Has it formed a ball in the center of the saucepan? Does it look all nice and glossy? Great! Time to move on to the next step.
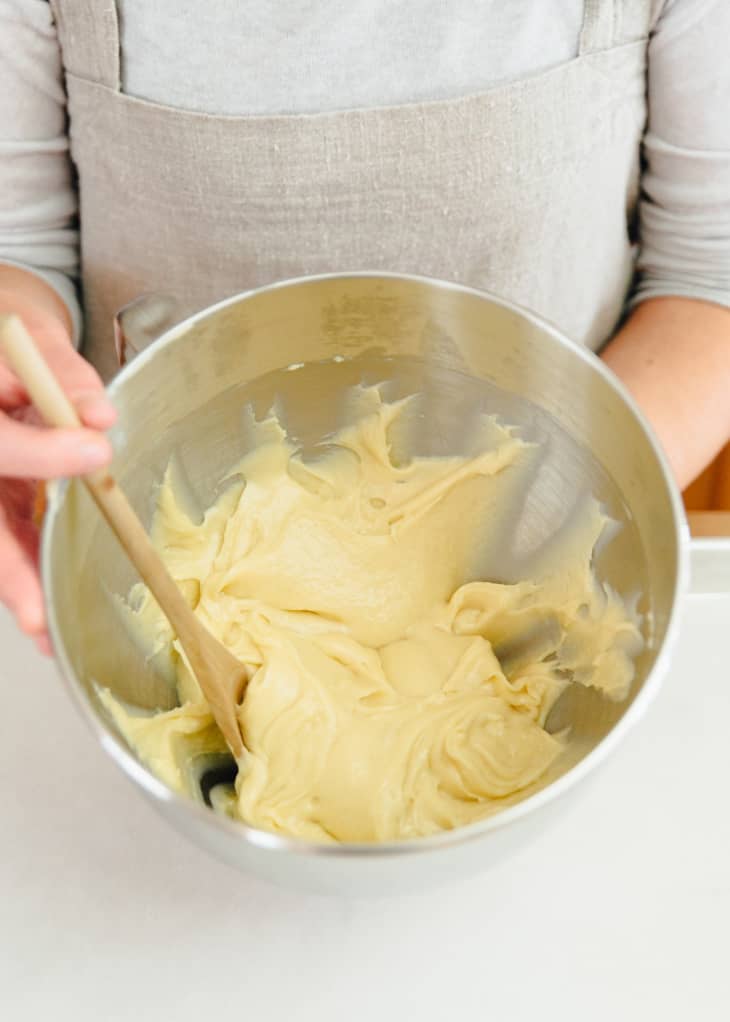
- Beat the dough with the eggs: Transfer the dough to a mixing bowl. Beat the dough for a few minutes to cool it down before adding the eggs (you don’t want the eggs to cook quite yet); the dough should be just warm to the touch. Beat in the eggs, one at a time, until the paste is smooth, soft, and holds its shape when piped.
Get Your Step-by-Step Baking Lesson:
Piping and Baking Pâte à Choux
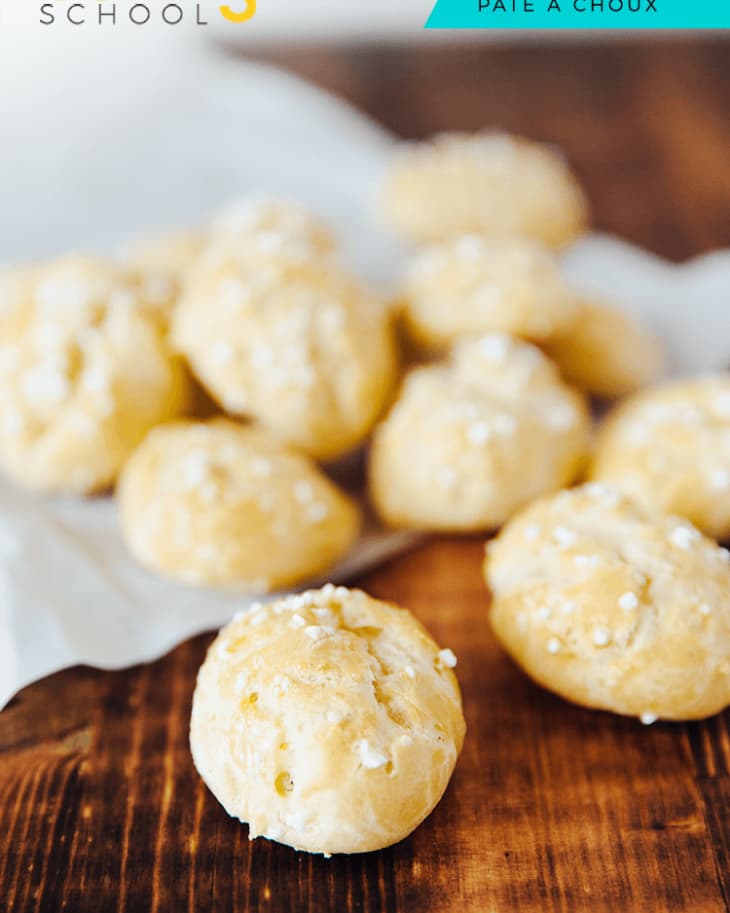
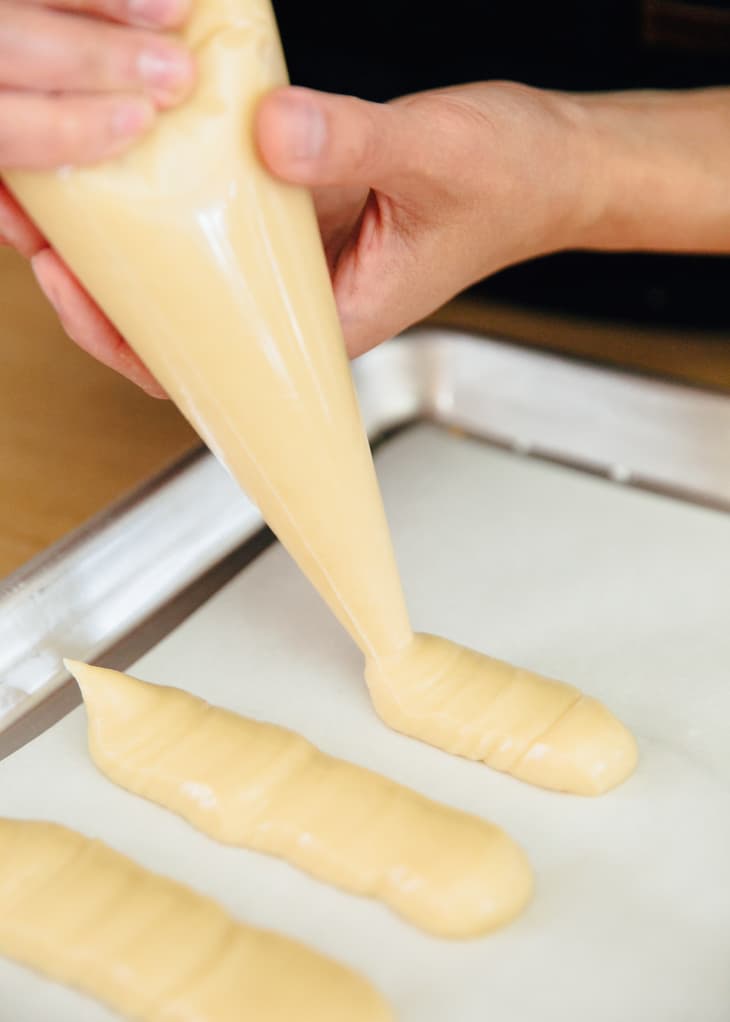
Your choux paste can be piped as puffs or longer tubes — you can also pipe them as big or small as you like, and just adjust the baking time to match. If piping isn’t your thing, you can also just use a spoon to scoop small puffs on to a baking sheet.
Just before baking, brush the choux paste with a “dorure.” Don’t be intimidated by the word — you’ve probably been using a dorure to make your pies golden and gorgeous for most of your life, but you just didn’t call it that. Dorure is the process of brushing an egg wash on dough before baking. Just like with pies, the dorure gives our choux pastries a rich, golden color and a bit of glossy shine.
Vocabulary Word of the Day: Dorure
An egg wash of beaten egg or egg yolk, thinned with milk or water. Used to give a golden glow to pastry. Brush on before baking.
You make this egg wash just by mixing a whole egg or yolk and then thinning it down with a splash of water or milk, if you want. Use a pastry brush to apply the egg wash and be mindful of drips and puddling as you brush it on; aim for a thin, even layer of egg wash for more even coloring. At this point, you can also use the pastry brush to gently press down any small peaks than may have formed from piping the paste.
The Two-Part Baking Process
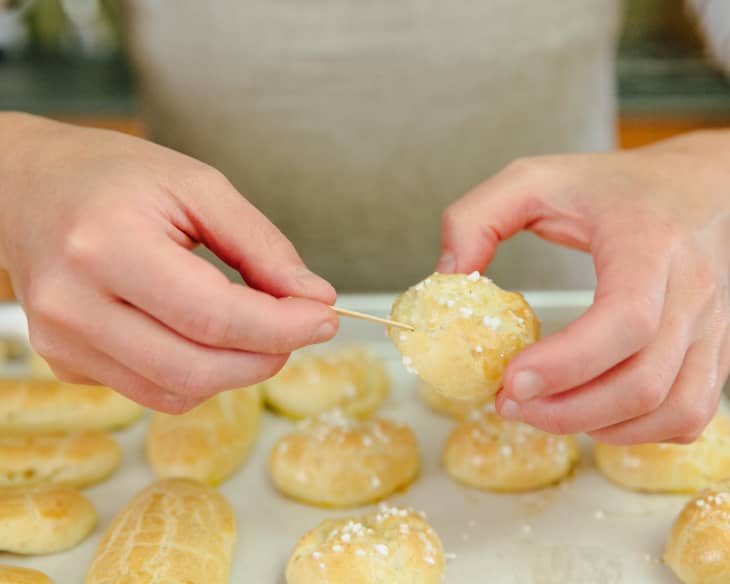
Baking pâte à choux is a three-part process: First, with the oven at high heat (425°F), the pastries puff and begin to set; then you lower the heat to 375°F to bake them and develop their golden color; finally, you lower the heat even further to 300°F and let the pastries hang out a little longer to make sure they’re dried-out and crisp.
When you take the puffs out of the oven, poke them with a toothpick to help vent any remaining steam — if left trapped inside, this steam can make the puffs soften and lose their crispness.
How Choux Pastries Puff
What is really going on in that oven? How are these pastries rising without any leavening agents? It’s all about the steam! The heat from the hot oven causes the liquid in the paste to quickly evaporate and turn to steam. The steam rapidly expands the paste, leaving behind hollow pockets of air with a crisp outer shell.
It’s a Touchy-Feely Process — Don’t Be Discouraged!
Pâte à choux is a good place to start in baking classic pastry because it teaches you from the get-go to rely not just on a recipe, but on your senses of touch, smell, and sight.
What I’m trying to say here is: don’t be discouraged if your first batch of choux turns out a little flatter than you expect, or if it doesn’t behave the way you want it to. That’s OK — think of it as an investment in your own experience and in understanding how this kind of dough works. Watch and record what you do the first time around, and if it doesn’t work well, come and talk in the comments and we’ll try to help with troubleshooting.
Ways to Use Pâte à Choux
Now we come to the best part. What can you do with this modest, humble dough? It can play so many glamorous roles! (We’ll come back to doing more with choux paste in two days.)
- Profiteroles and cream puffs: Pipe or scoop out a small portion of the choux paste (usually about the size and shape of a ping-pong or golf ball) and either bake plain or with a sugary disk of short dough on top. Fill cooled profiteroles with Bavarian cream or whipped cream. Top plain puff with chocolate glaze or confectioner’s sugar.
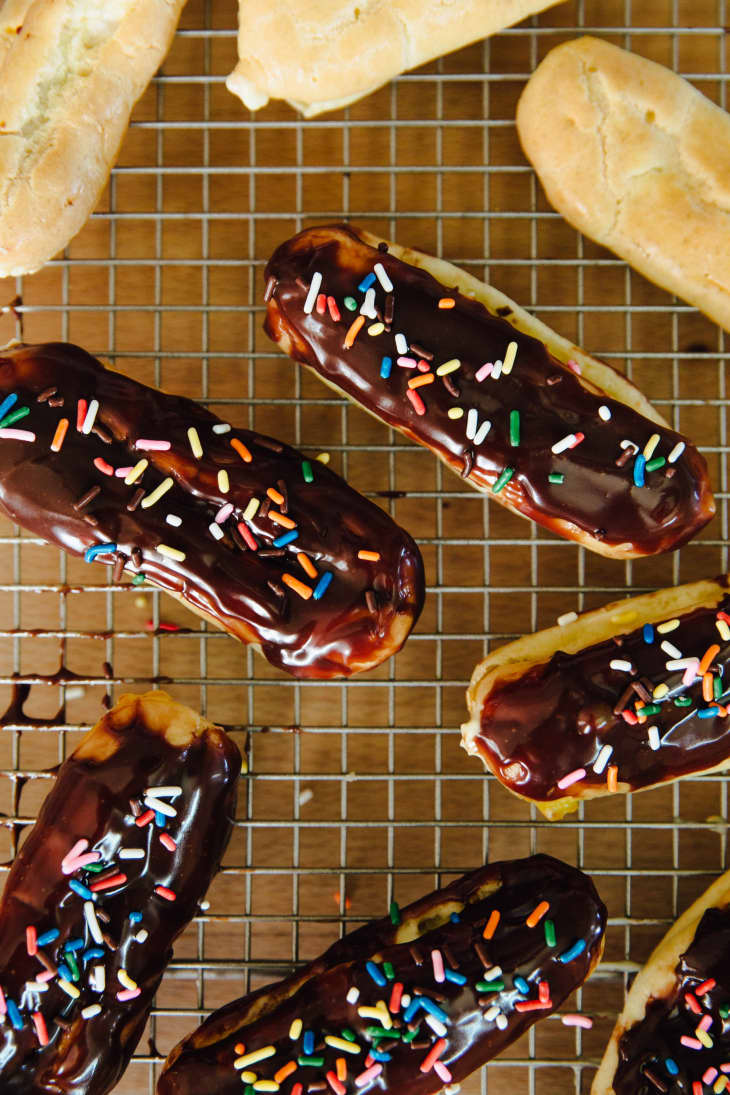
- Eclairs: Pipe choux paste with a pastry bag fitted with a plain or star tip. Pipe “fingers” that are about 4 to 5 inches long, 2 inches apart. Glaze the tops with chocolate and fill with whipped or pastry cream.
- Paris Brest: Pipe choux paste in a ring. Once baked and cooled, halve horizontally with a serrated knife before filling with pastry cream and dusting with confectioner’s sugar.
- Gougères: Mix grated Gruyère into the pâte à choux before piping to make savory, cheesy puffs. (Note: They will not rise like profiteroles.) Great as a canapé!
- St. Honoré Cake: The base of this stunning cake is made of a circle of puff pastry with a ring of pâte à choux piped around the edge. After baking, top the “cake” with whipped cream and a ring of cream puffs.
- Croquembouche: Make this show-stopping dessert by dipping pastry puffs in caramel and then stacking them in a dramatic cone-shape. The towering confection is usually then wrapped in spun sugar.

Every lesson has three homework options. Maybe you’ve already got one down, or you just have time for a quick study session. So pick one, and show us by tagging it with #kitchnbakingschool on Instagram or Twitter.


Make cheese gougères for dinner tonight or eclair shells for tomorrow’s dessert.

Make the choux balls for croquembouche and freeze for Christmas.
Join The Kitchn’s Baking School!
SIGN UP
SHARE YOUR PROGRESS
- Follow and show your progress on Instagram, Pinterest, Facebook, and Twitter! Make sure to use the #kitchnbakingschool hashtag.