
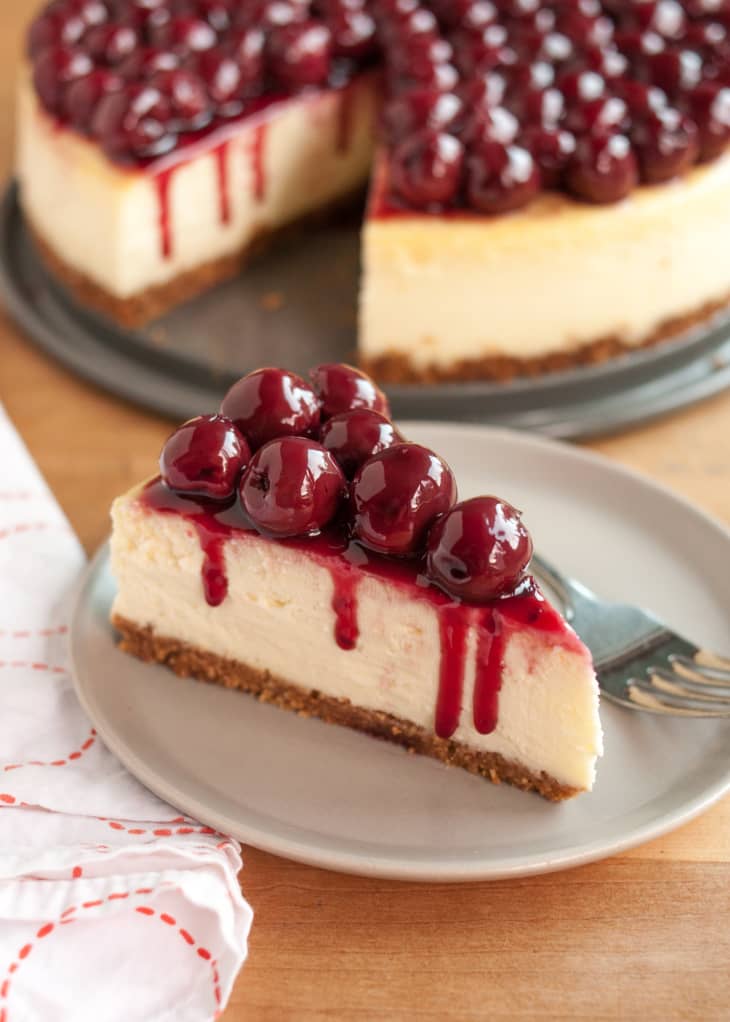
How To Make Perfect Cheesecake
This foolproof recipe is perfect for beginners. It results in a rich, tangy, perfectly smooth cheesecake every single time.
Serves8 to 10
We’ve diligently tested many cheesecakes over the years. And we’ve developed many variations: Basque cheesecake! No-baked cheesecake. Even Instant Pot cheesecake! And in all of our testing, we’ve learned a lot about mistakes to avoid when making cheesecake.
As for the very best recipe when you want a classic cheesecake? We can confidently say that this is it. Perfectly creamy and simple to prepare, this cheesecake will be your new go to recipe.
3 Tips for Perfect Cheesecake
- Use a water bath. Baking the cheesecake in a water bath makes it extra creamy.
- Don’t overbake. You’ll know it’s ready when the outer ring is slightly puffed, but the inner circle jiggles like barely set Jell-o.
- Let it cool slowly. Let the cheesecake sit in the turned-off oven with the door cracked for one hour, remove it from the water bath and let it cool completely on the stovetop, then chill in the fridge overnight.
Now, let’s break down how to make cheesecake into easy pieces. Let’s talk about ingredients, water baths, dealing with surface cracks — the whole shebang. Here’s a step-by-step recipe that will help you make a creamy, no-fail cheesecake that is everything you ever dreamed it could be.
The Best Ingredients for Perfect Cheesecake
- Cream cheese: Specifically, full-fat cream cheese. Cheesecake is not the time to skimp.
- Sour cream: Most cheesecake recipes use either heavy cream or sour cream; either will do the job of softening the texture of the cheese and adding some moisture. I prefer sour cream because I like the extra hit of sour tang it adds to the cake.
- Eggs: Three whole eggs hold the cheesecake together. I also add an extra yolk, which enhances the cake’s velvety texture. (Whites tend to lighten the cake, which is actually fine — if you don’t feel like separating that fourth egg and don’t mind some extra airiness in the texture, just add in the whole egg.)
- Cornstarch: Just a little bit helps avoid cracking!
Why Add Cornstarch?
A little bit of cornstarch or flour in the cheesecake batter is insurance against cracking and makes the cake easier to cut into clean slices, though it does change the texture of the cheesecake a bit. Starch makes the cheesecake more firm and sturdy, while a cheesecake that relies on eggs alone has a softer, super-creamy texture.
I have tried both and love both. I feel like the texture difference is actually quite slight — it might be noticeable in a side-by-side comparison, but it would take a true cheesecake connoisseur to distinguish one on its own. Go whichever route makes you happiest.
How to Set Up a Water Bath
A water bath helps cook the cheesecake oh so gently while also creating a steamy environment so the surface doesn’t get too dry. It’s like a day spa for the cheesecake, and makes it supremely smooth and creamy.
A water bath is also not that hard:
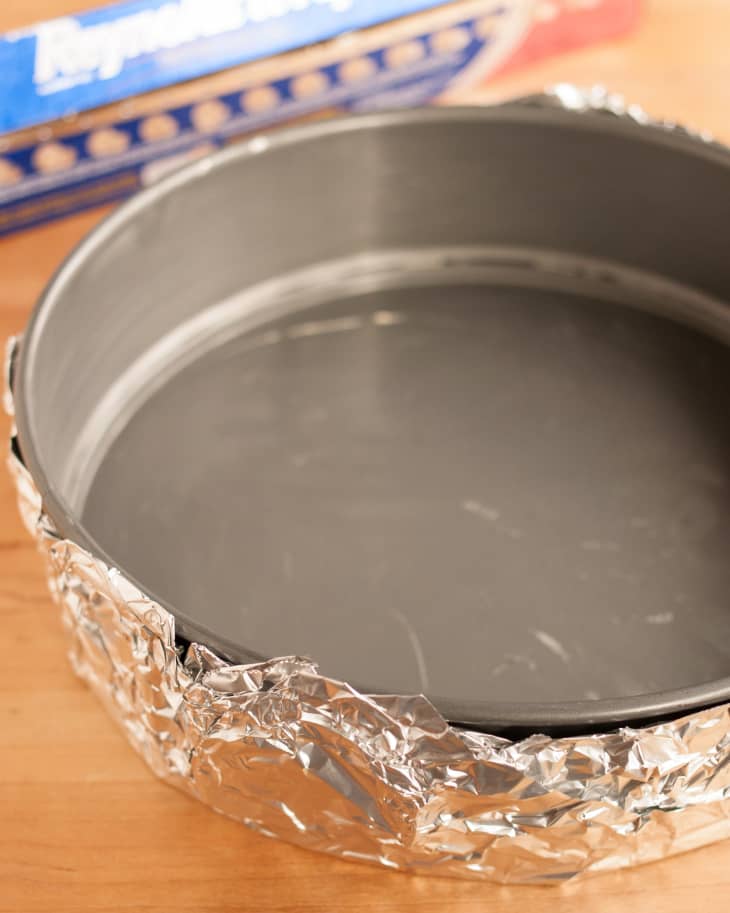
- Wrap the cheesecake pan in foil to help keep any water from seeping through the cracks of the pan.
- Set the cheesecake in a roasting pan or other large baking dish.
- Fill it with a few inches of water, and put the whole contraption in the oven.

Preventing Cheesecake Cracks
There are two main reasons why your cheesecake might form cracks: Overcooking and too-fast cooling. Both are entirely preventable. Cook your cheesecake until the outer ring of the cake is slightly puffed and fairly firm, but the inner circle still jiggles like barely set Jell-o. A few toasty golden spots are fine, but if you see any small cracks forming, immediately move on to the cooling step.
When cooling, do it gradually. Let the cheesecake sit in the turned-off oven with the door cracked for about an hour, then remove it from the water bath and let it cool completely on the stovetop. When you remove it from the water bath, also run a thin-bladed knife around the edge to make sure the cake isn’t sticking to the pan, which can also cause cracks as the cake settles.
Always (Always) Chill a Cheesecake
A cheesecake is a make-ahead cake in the sense that you have to make it ahead. After all the careful baking and slow cooling, the cheesecake still needs to chill in the fridge and finish setting up for at least four hours or (ideally) overnight.
If you cut into the cheesecake before chilling, it will have a firm custardy texture, like flan, and you will think that you’ve done something terribly wrong. But after chilling, it will have transformed into that velvety, creamy, lush cheesecake that we all know and love. It’s like magic.
4 Things You Shouldn’t Worry About
There are a few moments in this process when you may think that all is lost. I want to set your mind at ease.
- Tiny bits of cream cheese in the batter: Sometimes you get some little specks of cream cheese in the batter that won’t go away — either because your cream cheese was still a bit chilly or because of the cream cheese itself (cream cheese with fewer additives tends to incorporate less easily into the batter, surprisingly). You don’t want large lumps, but these tiny speckles are fine. They will melt into the cheesecake as it bakes and won’t affect the finished cake.
- A few cracks: Yes, sometimes you’ll get cracks in your cheesecake. It happens — usually if you accidentally cooked the cheesecake a little too long or cooled it too quickly. But a few cracks don’t mean you failed or that your cheesecake is ruined. Just cover it with topping and carry on.
- A little water in the pan: Oh, no! Did a little water work its way through the foil and leak into your pan? Don’t worry about it. The outside edge of your crust will look a bit soggy at first, but it will set up in the fridge overnight with none the wiser. Promise.
- Wrong pan size: If you only have a 10-inch pan and you want to make a recipe for a 9-inch cheesecake, it’s fine to use the pan you have. Changing the pan size when making cheesecake will affect the height of the cheesecake and its cooking time (thinner cheesecakes will cook a bit more quickly), but not its flavor or texture.
More Cheesecake Recipes to Try
You are now armed with the knowledge you need to make the best cheesecake ever. Use the recipe below, or just apply these steps and techniques to your next cheesecake — either way, cheesecake bliss awaits. Once you’ve got it down, here are more cheesecake recipes to try:
Tester’s Note
Flawless and foolproof. This is a high standard for a dessert fraught with the potential for error, but it truly is. With clear and specific instructions, it was as if I had a friend holding my hand at each step. I took Emma’s suggestions, using cornstarch as insurance against cracking and including sour cream for its tang to cut through the dense, richness of the cheesecake.
I baked my cake in a 9-inch springform pan, making sure there was a tight seal of aluminum foil before pouring in the water for the bath. Straightforward instruction on what to look for in batter texture and the wiggle-jiggle of the finished cake made me breathe a little easier.
The result was a rich, creamy, and tangy cake, with no signs of cracking. I served this to friends welcoming a new baby, and before I left a quarter of the cake was already gone. If you’ve never tried to bake a cheesecake, or have tried before and failed, tie on your apron and get baking with this recipe by your side.
— Patty, April 2018
Perfect Cheesecake Recipe
This foolproof recipe is perfect for beginners. It results in a rich, tangy, perfectly smooth cheesecake every single time.
Serves 8 to 10
Nutritional Info
Ingredients
For the cheesecake:
Butter, for coating the pan
- 2 pounds
full-fat cream cheese
- 1 cup
granulated sugar
- 1 tablespoon
cornstarch, or 2 tablespoons all-purpose flour (optional)
- 1/8 teaspoon
salt
- 1/2 cup
sour cream
- 2 teaspoons
freshly squeezed lemon juice (optional)
- 1 teaspoon
vanilla extract
- 3
large eggs
- 1
large egg yolk
For the crust:
- 12
whole graham cracker rectangles (6 ounces)
- 5 tablespoons
unsalted butter
Equipment
9-inch or 10-inch springform pan
Aluminum foil
Food processor
Stand mixer or electric hand mixer
Measuring cups and spoons
Spatula
Roasting pan or other dish big enough to hold the springform pan
Instructions
Heat the oven and soften the cream cheese. Arrange a rack in the lower-middle position of the oven and heat the oven to 350°F. Take the blocks of cream cheese out of their boxes and let them come to room temperature on the counter while you prepare the crust, about 30 minutes.
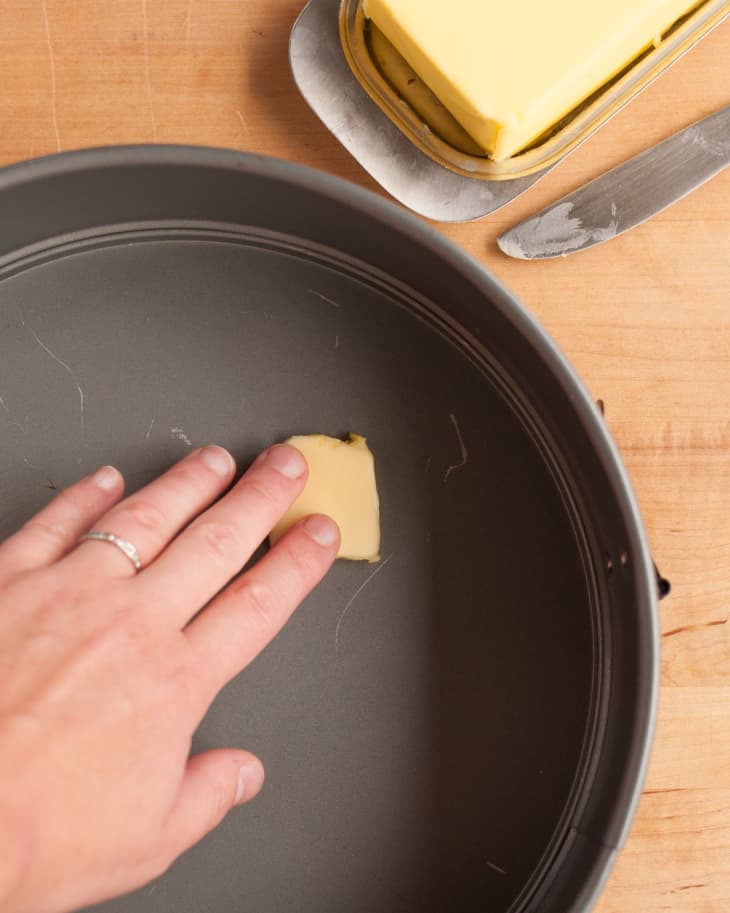
Coat the pan with butter. Use your fingers to coat a small pat of butter all over the bottom and sides of a 9-inch or 10-inch springform pan.
Wrap the pan in foil. Cut 2 large pieces of foil and place them on your work surface on top of each other in a cross. Set the springform pan in the middle and fold the edges of the foil up and around the sides of the pan. The foil gives you extra protection against water getting into the pan during the water bath step.
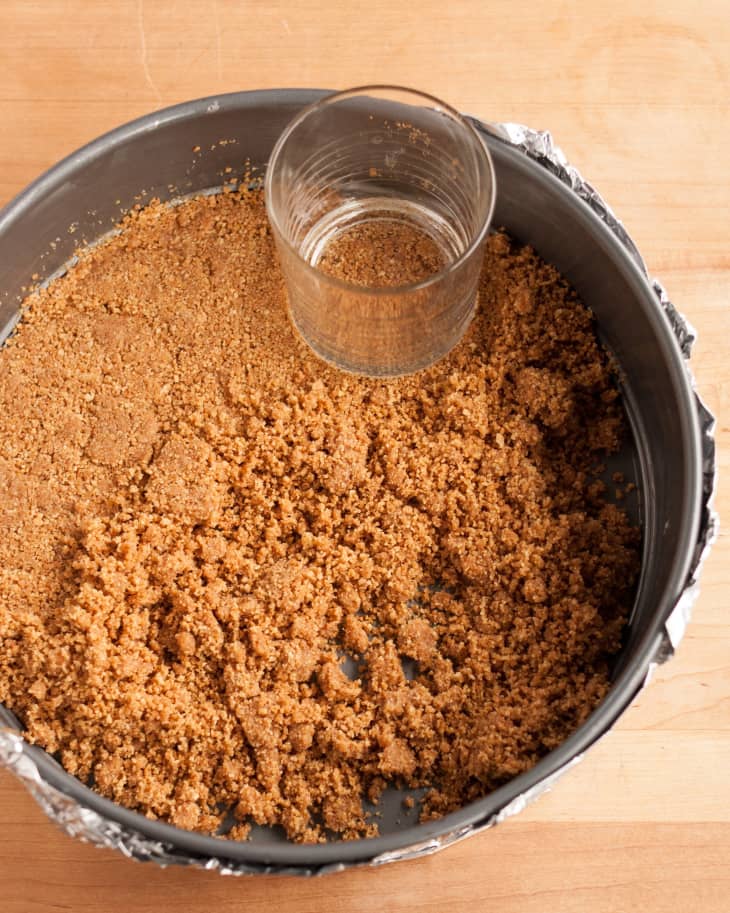
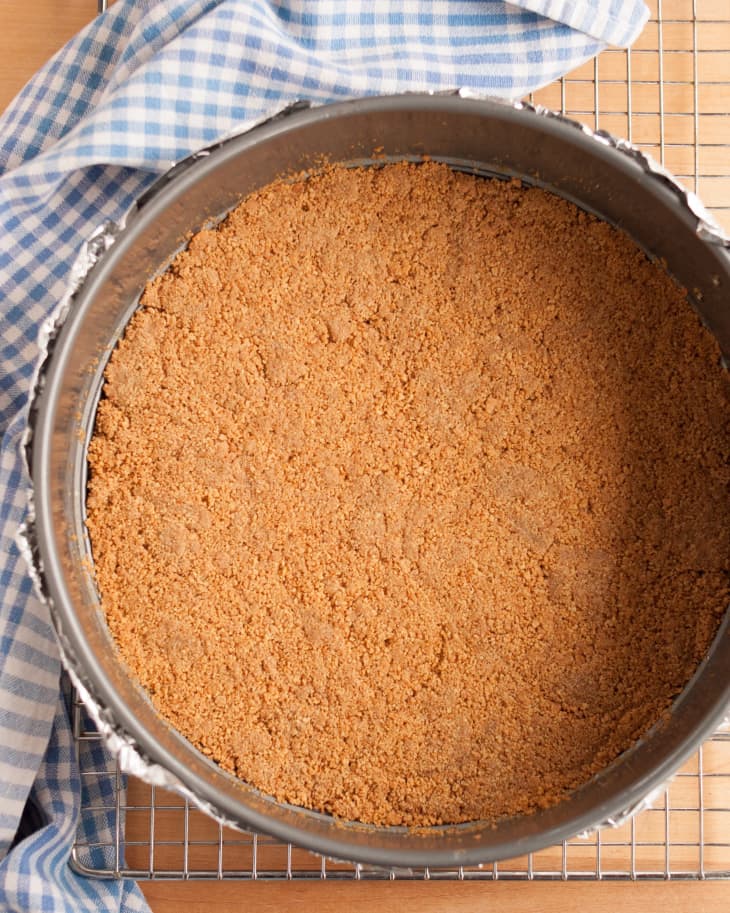
Prepare the crust. Crush the graham crackers in a food processor (or in a bag using a rolling pin) until they form fine crumbs — you should have 1 1/2 to 2 cups. Melt the butter in the microwave or on the stovetop and mix this into the graham cracker crumbs. The mixture should look like wet sand and hold together in a clump when you press it in your fist. If not, add extra tablespoons of water (one a time) until the mixture holds together. Transfer it into the springform pan and use the bottom of a glass to press it evenly into the bottom. (For step-by-step instructions of this step, see How to Make a Graham Cracker Crust.)
Bake the crust. Place the crust in the oven (be careful not to tear the foil). Bake until the crust is fragrant and just starting to brown around the edges, 8 to 10 minutes. Let the crust cool on a cooling rack while you prepare the filling.
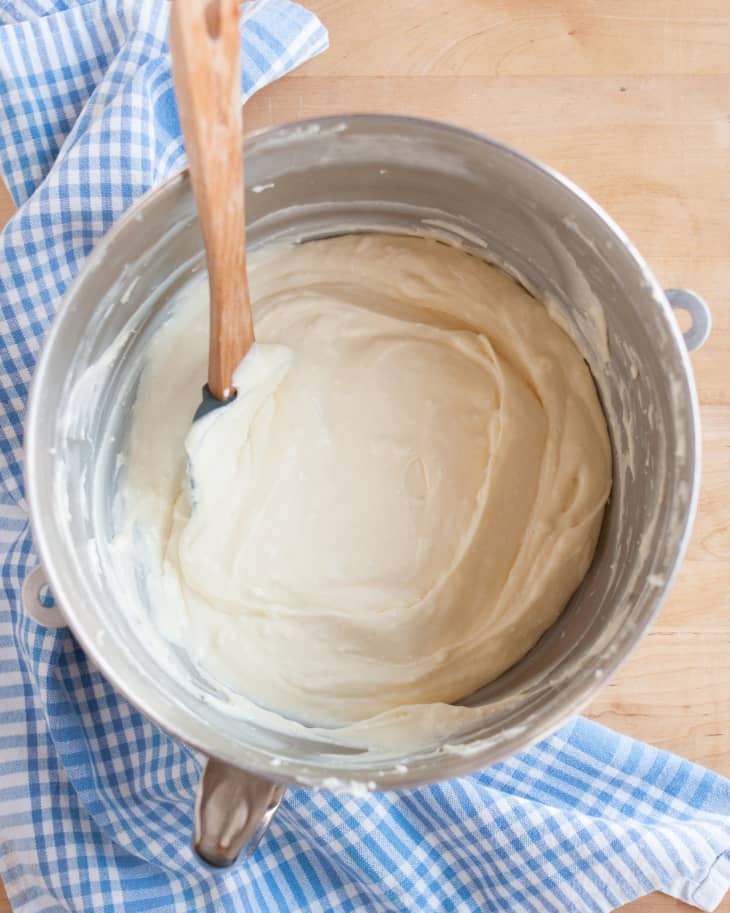
Mix the cream cheese, sugar, cornstarch, and salt. Place the cream cheese, sugar, cornstarch, and salt in the bowl of a stand mixer fitted with a paddle attachment. (Alternatively, use an electric handheld mixer and large bowl.) Mix on medium-low speed until the mixture is creamy, like thick frosting, and no lumps of cream cheese remain. Scrape down the beater and the sides of the bowl with a spatula.
Mix in the sour cream, lemon juice, and vanilla. Add the sour cream, lemon juice, and vanilla and beat on medium-low speed until combined and creamy. Scrape down the beater and sides of the bowl with a spatula.
Mix in the eggs and yolk one at a time. With the mixer on medium-low speed, beat in the eggs and the yolk one at a time. Wait until the previous egg is just barely mixed into the batter before adding the next one. At first, the mixture will look clumpy and broken, but it will come together as the eggs are worked in.
Stir a few times by hand. Scrape down the beater and sides of the bowl with a spatula. Stir the whole batter a few times by hand, being sure to scrape the bottom of the bowl, to make sure everything is incorporated. The finished batter should be thick, creamy, and silky. Don't worry if you see a few specks of un-mixed cream cheese here and there; they will melt into the batter during baking and won't affect the finished cheesecake.
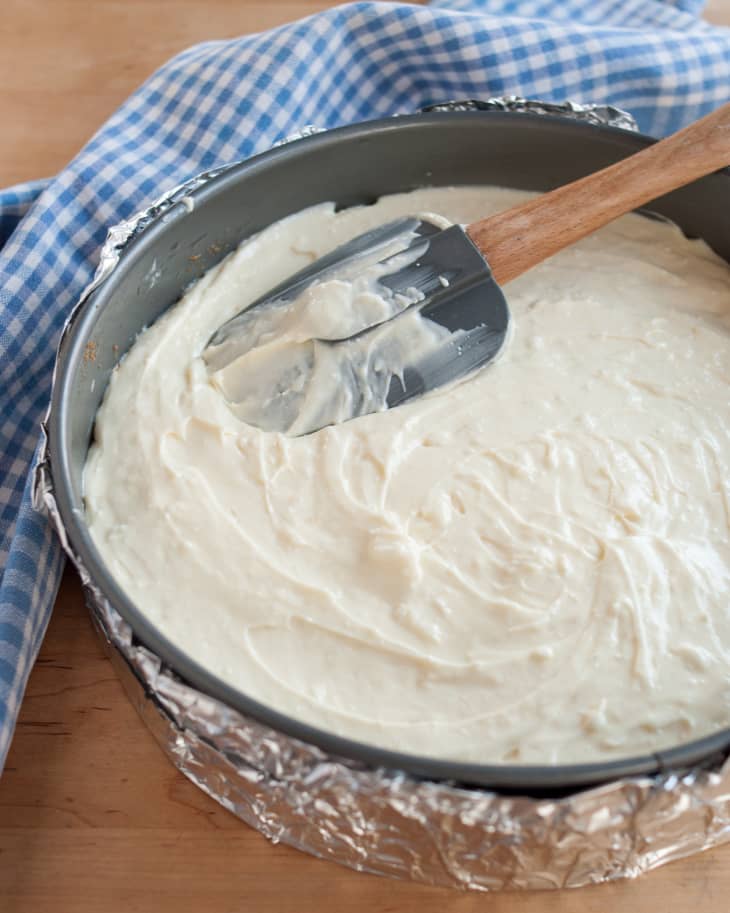
Pour the batter over the cooled crust. Check to make sure the crust and the sides of the pan are cool — if they're cool enough to comfortably touch, you can go on. Pour the batter over the cooled crust and spread it into an even layer.
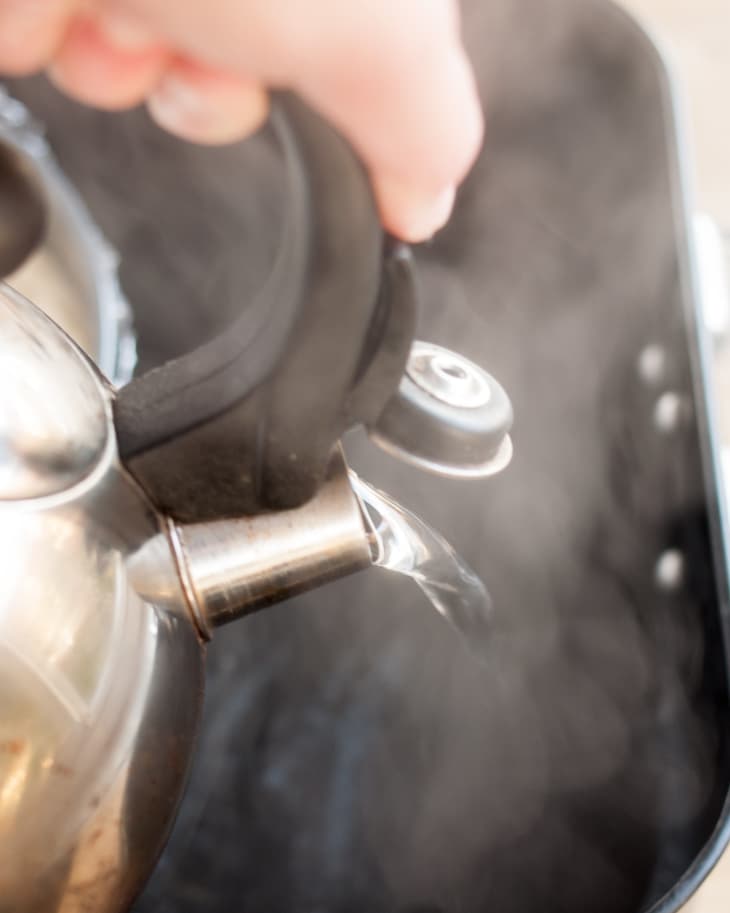
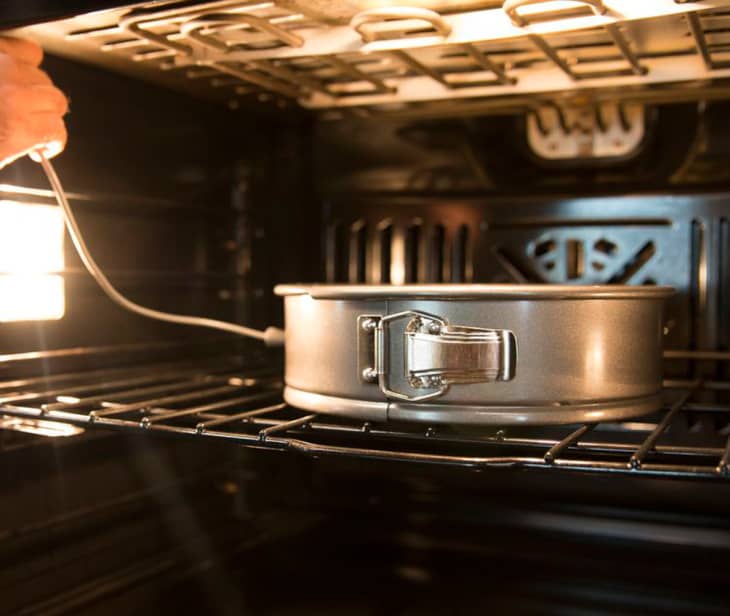
Transfer the pan to the water bath. Transfer the pan to a roasting pan or other baking dish big enough to hold it. Bring a few cups of water to a boil and pour the water into the roasting pan, being careful not to splash any water onto the cheesecake. Fill the pan to about an inch, or just below the lowest edge of foil.
Bake the cheesecake. Bake the cheesecake for 50 to 60 minutes. Cakes baked in a 10-inch pan will usually cook in 50 to 55 minutes; cakes in a 9-inch pan will cook in 55 to 60 minutes. The cheesecake is done when the outer two to three inches look slightly puffed and set, but the inner circle still jiggles (like Jell-O) when you gently shake the pan. Some spots of toasted golden color are fine, but if you see any cracks starting to form, move on to the next step right away.
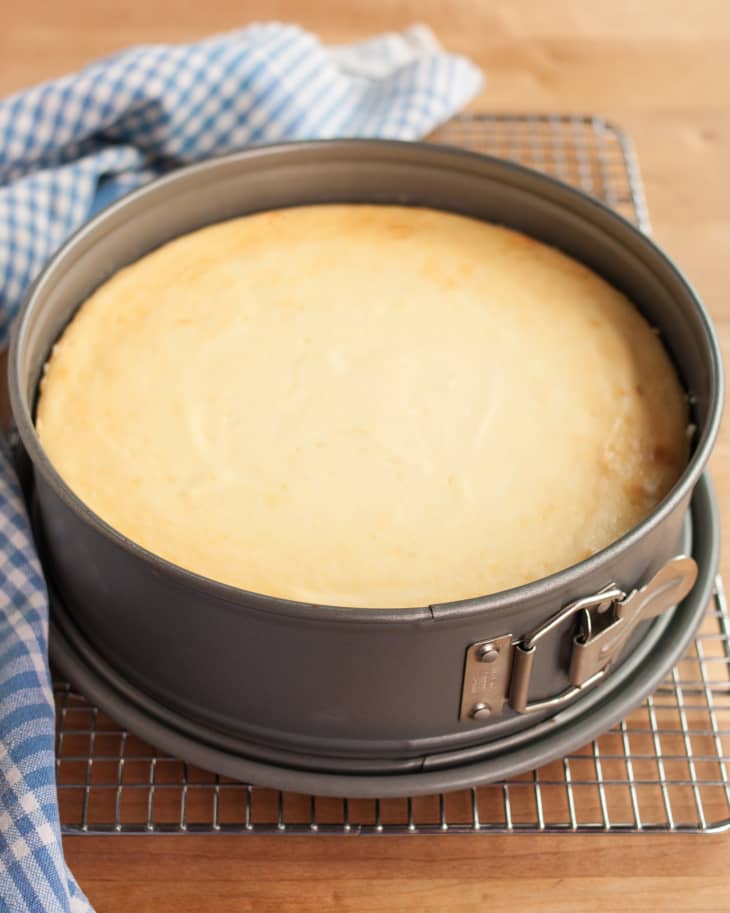
Cool the cheesecake in the oven. Leave the cheesecake in the oven. Turn off the oven and crack the door open or prop it open with a wooden spoon. Let the cheesecake cool slowly for 1 hour.
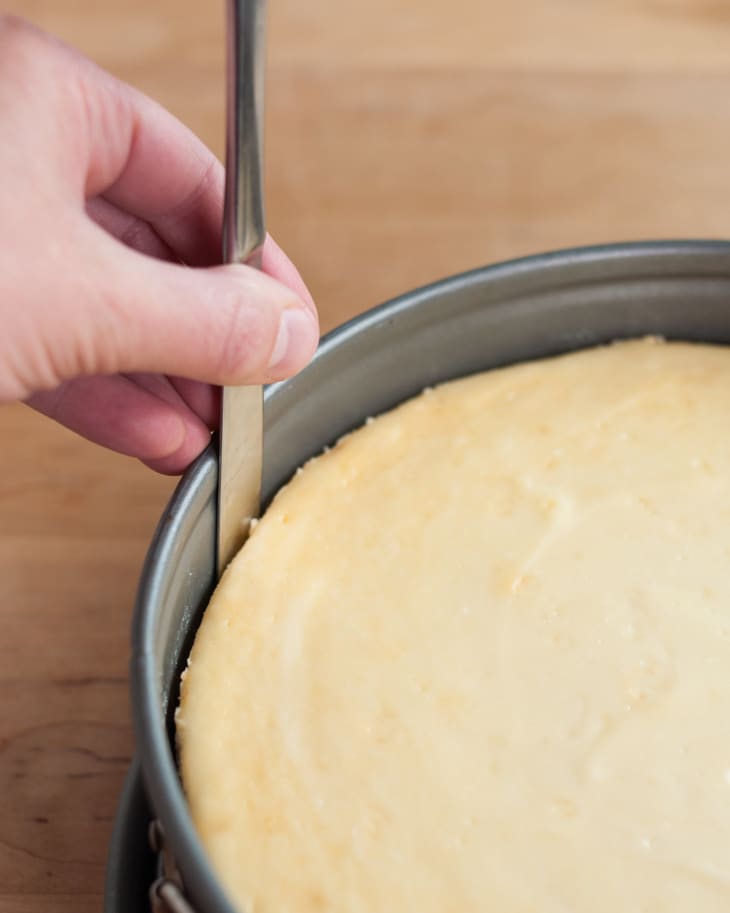
Run a knife around the edge of the cake and cool the cake completely. Remove the cheesecake from the oven and from the water bath, unwrap the foil, and transfer it to a cooling rack. Run a thin-bladed knife around the edge of the cake to make sure it's not sticking to the sides (which can cause cracks as it cools). Let the cheesecake cool completely on the rack.
Chill the cheesecake for 4 hours in the refrigerator. Chill the cheesecake, uncovered, for at least 4 hours or up to 3 days in the refrigerator. This step is crucial for letting the cheesecake set and achieving perfect cheesecake texture — don't rush it.
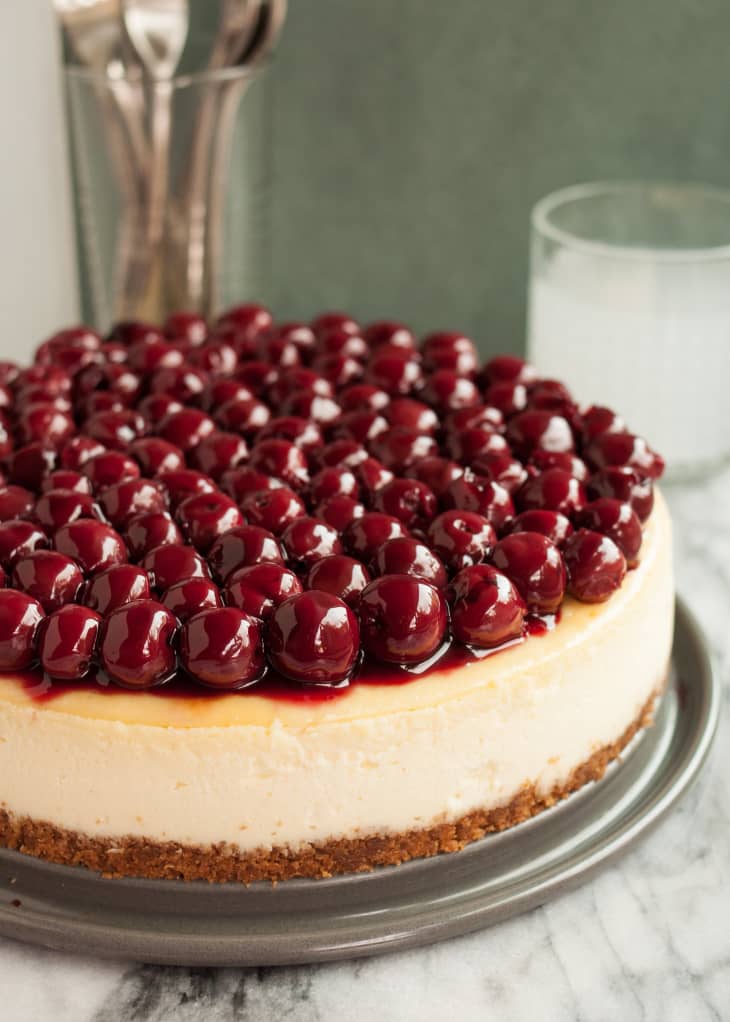
Top the cheesecake and serve. Take the cheesecake out of the refrigerator about 30 minutes before you plan to serve. Unmold the cake and top the cheesecake just before serving. You can serve the cake right from the bottom of the springform pan, or use a large off-set spatula to gently unstick the crust from the pan and transfer it to a serving platter.
Recipe Notes
Storage: Leftovers will keep refrigerated, uncovered to avoid condensation building up, for several days.
Alternative crusts: Substitute the graham cracker crumbs with 1 1/2 to 2 cups of any other crushed cookie, including gluten-free cookies. Gingersnaps, chocolate wafers, and butter cookies all make great crusts for cheesecake.
Ideas for Topping Your Cheesecake:
- Spread the top with a thin layer of sour cream or whipped cream.
- Pour soft chocolate ganache over the top of the cheesecake.
- Add chopped fresh fruit, either all on its own or tossed with a fruit syrup.
- Warm some peanut butter with a little cream to form a sauce and pour this over the cheesecake.